
Jan's Working with Databases
Forms & Reports: Forms: Tab Control
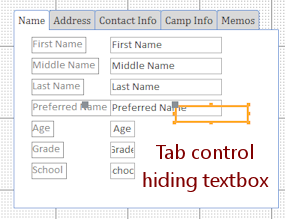
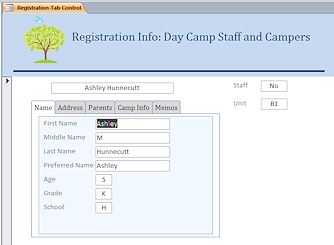
When you have a large number of controls to show, you can use a tab control to put your controls on separate pages. You can tuck a large number of controls into a small space with this kind of control. In the illustration below, each page in the tab control holds one or more controls. This layout is better for looking up information than it is for entering new data.
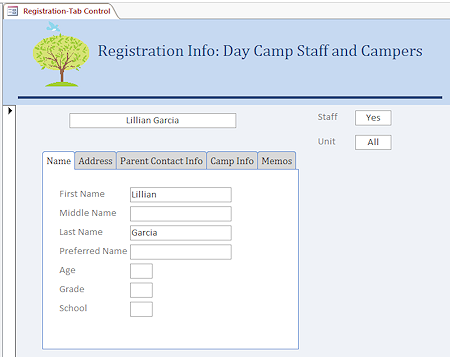
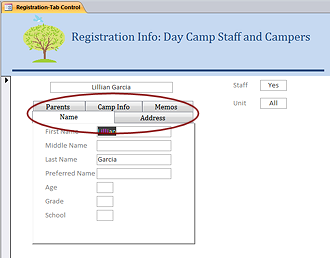
![]() Click on each tab in the tab control to see each page.
Click on each tab in the tab control to see each page.
The illustration is from the DayCamp.accdb ![]() database in your resource files.
database in your resource files.
About the Tab Control
 Create Tab Control:
-
 Tab Control button from the palette of controls on the ribbon
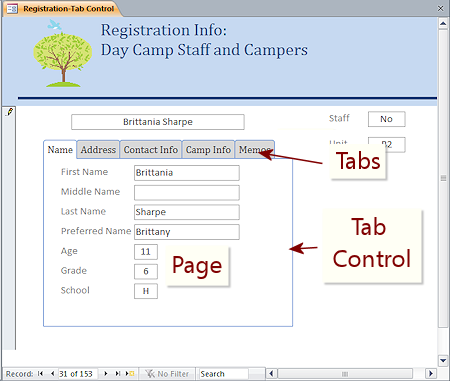
Parts of a tab control:
- Tabs: Area across the top looking like file folder tabs
The default tab control has two tabs across the top but you can add more. - Page: Rectangular area below a tab which holds the controls.
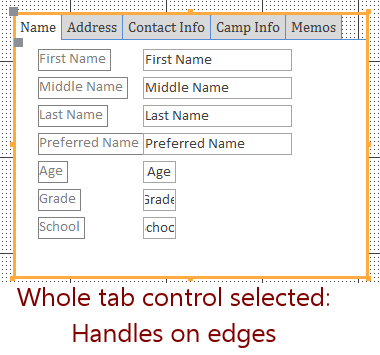 Selecting
the whole tab control:
Selecting
the whole tab control:
- Click the edge of the tab control.
The selected border runs above the tabs.
The handles show at the corners and middle of each edge. - If you miss the edge, either nothing will be selected or perhaps the tab page will be selected (if you click in just the right spot).
- The Move handle at the top left of the tab control moves the whole tab control
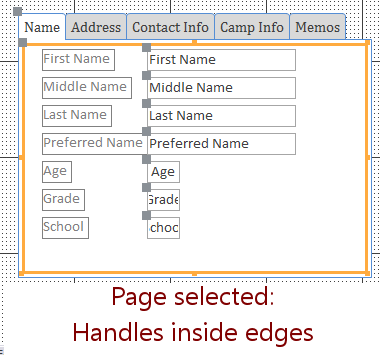 Selecting a tab page:
- Click the tab for the page. Handles appear inside the tab control.
- If you click on the page itself, nothing happens unless you happen to click on the border for the page, which is just inside the visible border of the tab control.
- The Move handle at the top left of a page (below the tabs) does not move the page area in the expected way. Instead it enlarges the tab control without changing the way the controls on the page line up with the tabs.
-
 If there is a control underneath the tab control, its selection border and handles will show
if you click in the page area over the hidden control. Of course you do not
normally want to have controls that are hidden by a tab control. This
situation can occur while you are revising your form.
If there is a control underneath the tab control, its selection border and handles will show
if you click in the page area over the hidden control. Of course you do not
normally want to have controls that are hidden by a tab control. This
situation can occur while you are revising your form.
Name Property for Tab Control and Pages:
- Tab control name: Like TabCtl24.
- Tab name: Name or Caption for the page. Defaut is like Page25.
- Where the numbers come from: How many other controls have already been added to the form, even if they have already been deleted.
If the tab control itself is named TabCtl24, then the two default tabs will be named Page25 and Page26. - Change page name (what shows on the tab itself):
Edit the Name or Caption property in the Property Sheet.
Surprisingly, you cannot edit the label directly on the tab itself.
Tab Icons: Picture Property
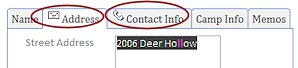 You can include a small image beside the tab label or instead of text using the Picture property for the tab page.
- Allowed formats:

 Access 2007, 2010: BMP or ICO format.

 Access 2013, 2016: Many graphic formats, including BMP, WMF, EMF, DIB, BMP, ICO, EPS, GIF, JPG, PCT, PNG, WPG.
 - Size: Small pictures are best, around 20 x 20 pixels. The tab will enlarge automatically.
- Add Icon: Picture property in the Property Sheet for the tab's page.
 Built-in icons:
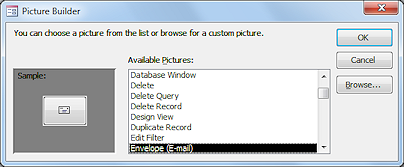
Access 2007, 2010: The ellipsis button  at the right of the Picture property opens the dialog Picture Builder. It includes a list of icons that are part of the Access interface.
- Navigate to image:
Access 2007, 2010: Click the Browse button in the Picture Builder dialog and navigate to an image on your computer.
Access 2013, 2016: Click the ellipsis button at the right of the Picture property. - Path to image: If you know it, you can type the path to the image directly in the Picture Property. It becomes embedded in the database, so the original can be moved or renamed.
- Image with no text: Add an image to the Picture Property and put a space in the Caption property.
Formatting a tab control:
- Background color of tabs: Default is gray for inactive tabs and white for the active tab.
Access 2010, 2013, 2016: Back Color property in the Property Sheet for the tab control affects only the inactive tabs, not the pages or the active tab.
(Access 2007 does not have a Back Color property for the tab control.) - Fonts: Tabs use the formatting in the Property Sheet of the tab control for Font, Font Size, Fore Color, etc. Controls on a page can be formatted as usual.
Page Background:
- Page background color is White. You cannot change the background of a page directly.
 Option 1: Transparent background > Form background:
Change the Back Style property for the tab control to Transparent. That lets the form's background to show through. Access 2010, 2013: The tabs become transparent, too, so you cannot tell which one is active! If you also set the property Use Theme to No for the tab control, then the form looks like an Access 2007 form but at least the tabs work as expected.
 Option 2: Normal background with Rectangle or Image underneath controls:
Put an image or a colored rectangle on a page. Use Send to Back to put it underneath the controls on the page.
Tabs
in Multiple Rows:
It is handy to have multiple rows of tabs if the label
text is long or if you have a large number of tabs.
- Tab Control Property Sheet > Multi Row Property = Yes
- Access 2010, 2013: You must also set the property Use Theme to No.
The tabs will look like Access 2007 tabs instead of like the flatter Access 2010 tabs.
Form Design View: Adding Controls to a Tab Page
New controls:
- Ribbon: Select the tab page and use the normal tools from the ribbon to create a new control.
 Field List: Drag from the Field List but be sure
that the page area highlights (reverse colors) when your mouse drags over it. Drop. If there is no highlight, you drop onto the form instead of onto the tab page.
Field List: Drag from the Field List but be sure
that the page area highlights (reverse colors) when your mouse drags over it. Drop. If there is no highlight, you drop onto the form instead of onto the tab page.
Move existing controls to a tab page:
You must use copy-and-paste to move existing controls to a tab page. Dragging won't work!
- Select the controls and copy or cut them.
- Select the tab page (not the tab control itself).
- Paste.
- If you copied, go back to the form and delete the controls.
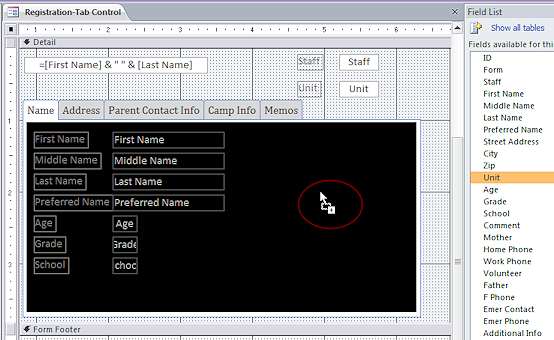
![]() No drag-and-drop to
move existing controls.
No drag-and-drop to
move existing controls.
If you drag and drop an existing control onto a tab page, the control goes underneath the tab control instead of onto the tab page.
Form Design View: Managing Tab Pages
Add a tab page to a tab control:
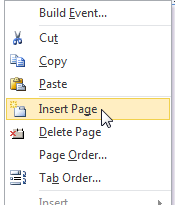 Right click on the tab control and select Insert
Page .
Right click on the tab control and select Insert
Page .
Remove a tab page from a tab control:
- Right click on the tab control and select Delete Page .
OR - Select the page and press the Delete key.
 Change
order of pages in the tab control:
Change
order of pages in the tab control:
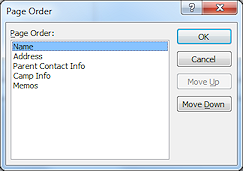
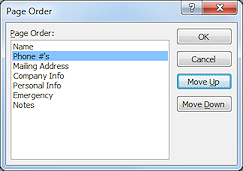
You cannot drag the tabs on the control. The Page Order dialog shows the Name or Caption values for the pages. You cannot drag items around in this list.
- Right click on the control and choose Page Order from the menu.
The Page Order dialog appears. - Select a page name and use the Move Up and Move Down buttons to change the order of the pages.
Form View: Navigating Between Pages in a Tab Control
- Mouse: Click on the tab of the page that you want.
- Keyboard:
CTRL + TAB moves to the next tab page to the right.
CTRL + SHIFT + TAB moves to the next tab page to the left.
Access 2007: Left and right arrow keys move focus to the next tab page IF the
focus is on the tab label - dotted box around the label for the tab 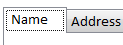 .
.
Access 2010, 2013, 2016: Arrow keys do NOT move the focus to a different tab.
Form View: Navigating Controls on Page with a Tab Control
To move through all of the controls on a form by using the TAB key can be a bit tricky when the form has a tab control. The tab order for the form just shows the tab control itself. Each page has its own tab order. More than a bit confusing!
What happens:
- Pressing the TAB key moves you from control to control on the form until you get to the tab control.
- Once the focus is on the tab control, the TAB key takes you through each control on the first page.
- But... from the last control on the first tab page, the TAB key takes you out to the next control on the form or to the next record. The TAB key alone will not get you to another tab page.
Solution: You must use CTRL + TAB to change to the next tab page. Confusing for sure!!
Tab order for a tab page: Each tab page has its own tab order. In Form Design View select a tab page and then right click on it. Select Tab order... from the context menu.
| |
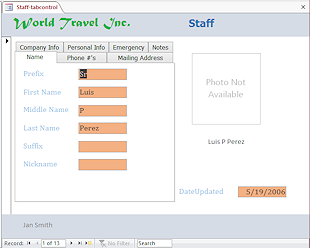
Step-by-Step: Tab Control |
|
| What you will learn: | to create a tab control to rename tabs to format tab text to add and configure tab pages, including multiple row tabs to move controls to tab pages to verify tab page content to edit Property Sheet to resize form to verify tab order to set Scroll Bars property |
Start with: ![]() , resource files, worldtravel-Lastname-Firstname.accdb from folder databases project4 as updated in the previous lesson
, resource files, worldtravel-Lastname-Firstname.accdb from folder databases project4 as updated in the previous lesson
Create Tab Control
You have so many controls on the Staff form that even with a logical arrangement it is rather hard to read the data. It's worth revising!
-
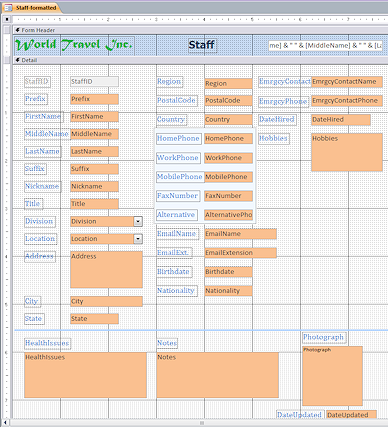 Open the form Staff-formatted from the previous lesson in Form Design View.
This form has so many controls that it may not fit well on some monitors.
How could you group these controls onto several tab pages? Are there natural groupings? There are many "right" answers to this question!
Because there are already controls on the form, it will be a bit messy to change to a tab control.
 Save the form with a new name, Staff-tabcontrol.
 Click on the Tab Control button on the ribbon tab
Form Design Tools: Design.
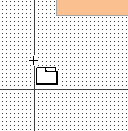
The mouse pointer changes shape.
-
 Click in the blank area below the Hobbies control.
A tab control appears with the default properties. The page numbers on your tabs may be different from the illustration.The form automatically widened to hold the new control at its default size. That will be something to fix later.
Rename Tabs
Like many other controls, tab pages have both a Name property and a Caption property. These are not the same! Captions can be duplicated on a form, but a value for a Name property cannot.
For example, if a form contains controls for a mailing address and a physical address, you might have two labels that show "City". But the controls must be named differently, like MCity and PCity.
It is always a bad idea to use the name of a property (any property!) as the value for a property (any property!). When writing expressions or programming code, it is too easy to confuse the computer, and the programmer, about what you are talking about - a value or a property.
-
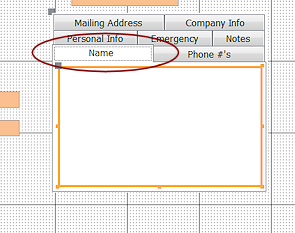
 Click on the tab control and then click on the first tab to select it.
(Handles must show inside the control.)
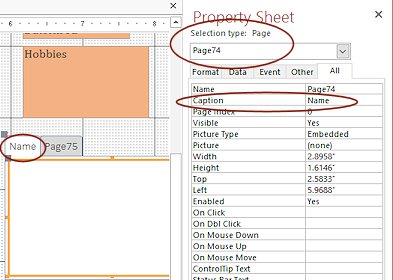
- In the Property Sheet, change the Caption property to Name.
(Be sure that the dialog the Selection type: Page, and not the tab control itself.)
We did not changethe Name property to 'Name' because it is confusing to use a property's name as the value of the property. It is even hard to say clearly!
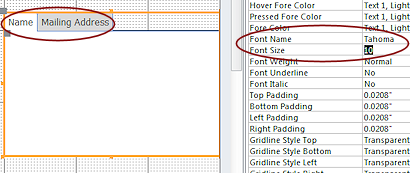
- Similarly, change the second tab to read Mailing Address by changing the Caption property.
We are not going to be doing any fancy programming, but good habits are worth starting early.
Format Tab Text
You can change the font for the tabs to something you like better.
-
 Click on the edge of the tab control to select the whole control.
(Handles are on the edge of the control.)
- In the Property Sheet, change the following properties:
Font Name = Tahoma
Font Size = 10
Add and Configure Tab Pages
- Right
click on the tab control and select from the menu that appears.
A new tab appears with a boring default caption.
- Change the text to read Phone #'s.
-
Similarly, create tabs that have the following text:
Company Info
Personal Info
Emergency
Notes
 Problem: Error!
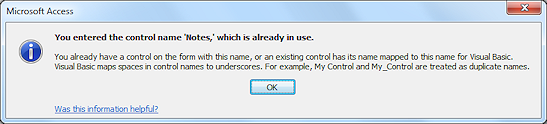 The name Notes is already used by a control on the form.
You changed the Name property instead of the Caption property.
Solution: Undo your last change and edit the Caption property instead.
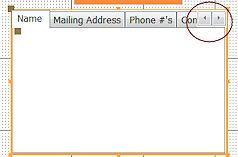 Access 2007: A pair of navigation arrows appears at the top right of the tabs when they won't fit across the width of the tab control.
 Access 2010, 2013, 2016:
The tab control automatically widens to hold the new tabs. That may not be the best arrangement.
- Multi Row:
-
 Select the whole tab control.
- In the Property Sheet, change the property Multi Row to Yes.
-
Access 2010, 2013, 2016: Change the property Use Theme to No.
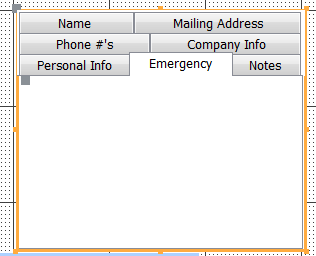
Otherwise, the tab stubbornly stay in a single row. - Resize the tab control to about 3" x 3".
The tabs arrange themselves onto as many rows as needed to show the caption text.
-
-
 Reorder
tabs:
Reorder
tabs:
- Right click on the tab control.
- From the menu that appears, select The Page Order dialog appears.
- Click on Phone #'s to select it.
- Click on the button Move Up.
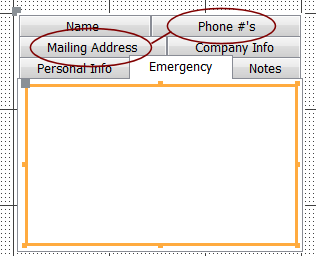
The Phone #'s entry shifts up one line.
-
 Click on OK.
The dialog closes and the design shows the new order for the tab pages.
 Switch to Form View.
 Experiment: Tabs
Click on the various tabs while in Form View. The current row moves to the bottom. Did you expect that?
Move Controls to Tab Pages
Now comes the trickiest part. To move the existing controls onto tab pages, you must use Copy and Paste. You cannot drag the existing controls and drop them onto a tab page. They would drop onto the form underneath the tab control instead.
First you will try drag and drop anyway, just to see what it looks like. It's quite confusing when this happens to you unexpectedly!
Drag-and-Drop fails:
 Switch to Design View.
-
 If necessary, click on the Name tab to make it the active tab.
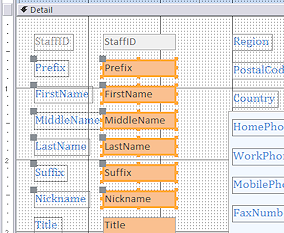
 - Drag on the form to select the controls for the staff member's name, from
Prefix down the column through Nickname.
 Drag the selection to the tab control
Outlines show the controls that you are dragging so you can see where they will drop.
-
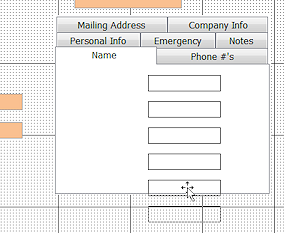
 Drop.
Drop.
Hmmm. No controls are showing on the tab page, Name.
The selection border and handles that you do see show us that the controls are underneath the tab control.
Copy-and-Paste works:
-
 Click
on the edge of the tab control to select it.
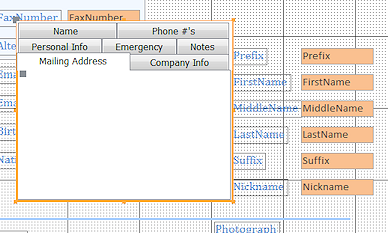
Click
on the edge of the tab control to select it.
- Move it sideway until you can see where those controls went. Not onto the tab page, but
onto the form itself.
- Undo the move.
- Undo the paste.
- Select the controls again.
- Copy.
-
 Click on the Name tab to select that tab page.
Be sure that the page area shows the selection border and Name is surrounded by a dashed border.
-
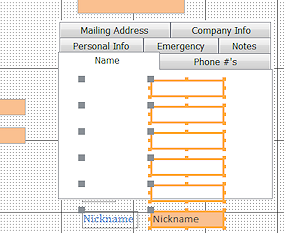
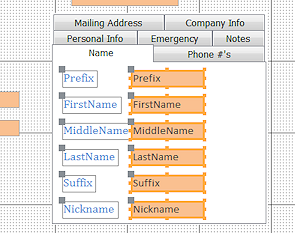 Paste.
The controls are pasted starting at the top left. They keep their original size and spacing. The tab control automatically resizes to hold the pasted controls.
- Delete the original controls from the form.
-
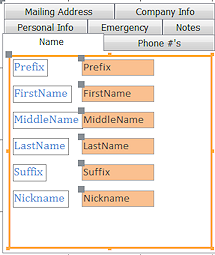
Similarly, copy and paste the following controls to specified tab page:
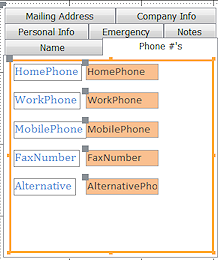
Hint: Spacing between control and label and between controls will be preserved. If controls are not adjacent (next to each other), copy and paste them separately.Phone #'s: all 5 phone number controls but not the colored rectangle behind them.
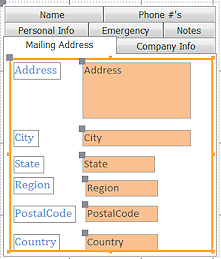
Mailing Address: 6 controls, from Address through Country
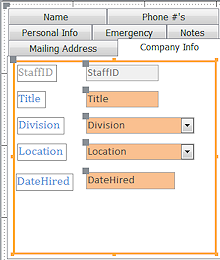
Company Info: 5 controls - StaffID, Title, Division, Location, DateHired
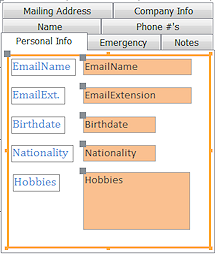
Personal Info: 5 controls - EmailName, EmailExtension, Birthdate, Nationality, Hobbies
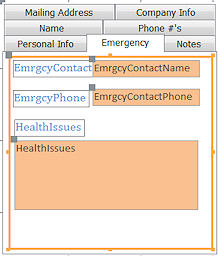
Emergency: EmrgcyContact, EmrgcyPhone, Health Issues
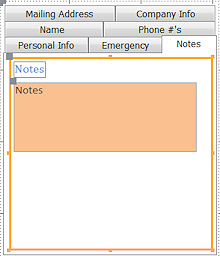
Notes: Notes - Delete the rectangle that was behind the phone numbers and the horizontal line that was above the Memo/Long Text controls.
- Save the form
[Staff-tabcontrol]
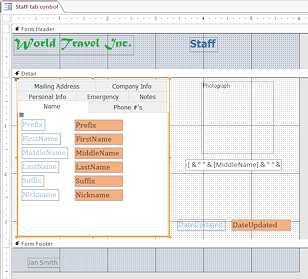
Rearrange Form
Now that nearly all of the controls have been moved to the tab control, you need to clean up the form layout. You will wind up with a smaller form.
-
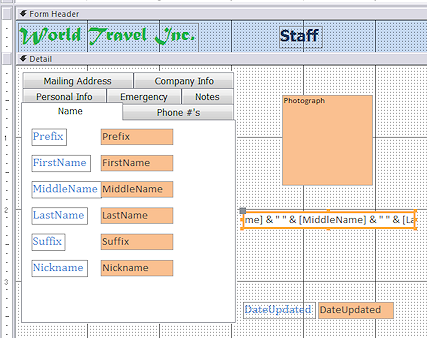 Drag the tab control to the upper left of the Detail section.
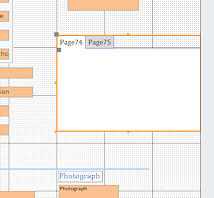
- Delete the label for the Photograph control and move it over next to the tab
control.
- Move the Date Updated control up to be level with the bottom of the tab control.
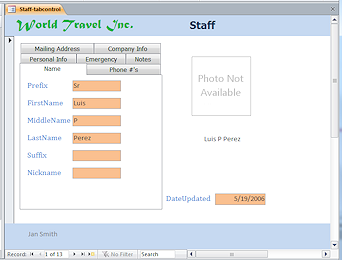
- Move the calculated field in the Form Header to be centered below the photograph control.
- Select each tab in turn and position the controls as needed to be similar to the illustrations.
Edit Property Sheet
You will be making the following changes in the steps below.
- Form Caption: Should match the new form name
- Photograph border and background: The border and colored background of the Photo control will show around the edges if the photo is not exactly square. You can make those transparent.
- Default image: You can pick out a default image to use until a photo can be added.
- Border of calculated name: Border does not need to show. The value is centered under the photograph.
- I
 f necessary, open the Property Sheet.
 - Select the calculated name control.
It's name is something like Text71, but the number part for yours may be different. - Change the Border Style to Transparent.
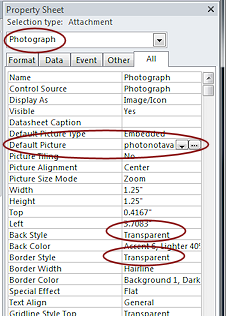
- Select the Photograph control.
- Change Back Style to Transparent.
- Change Border Style to Transparent.
- Click the ellipsis button for the property Default Picture.
The Insert Picture dialog opens. - Navigate to the databases resource files that you downloaded.
-
 Select the image photonotavailable.png and click on OK.
The name of this picture appears in the Property Sheet but the image does not show in Design View. The photo is now part of the database. Nothing you do to the original will affect it in the database. - Save the form.
[Staff-tabcontrol]
- Switch to Form View.
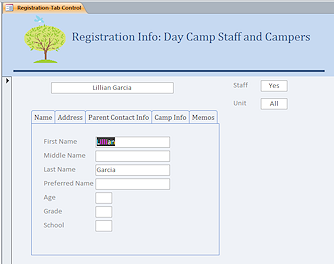
Resize Form and Inspect for Errors
Both scroll bars are showing in illustration of the Form View above. That means that the form itself is wider and taller than what shows in the window. We cannot tell if there are more controls that are out of sight. You need to resize the form.
You moved so many controls around that the tab order is probably out of sync.
 Switch to Design View.
-
Resize the form by dragging the edges until it is just large enough for the controls.
Problem: Form will not resize
A control is in the way, probably the dividing line.
Solution: Move or delete the control(s) that are blocking your resize.
- Switch to Form View.
- Inspect the form as you navigate through the records and the tab pages using the TAB key.
Remember that you need to use the key combo CTRL + TAB to switch tab pages, or else use the mouse to click on the page you want to see. -
Switch to Design View.
-
Make any corrections needed, such as to alignments and control size and tab order.
Verify Tab Order
The controls you moved should have kept the same tab order that you set earlier. That's not entirely what you need now. Make corrections as needed.
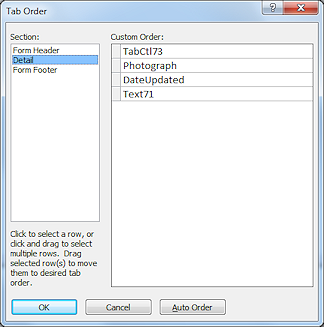 Tab Control: The tab control should be first in the form's tab order. Then Photograph and then DateUpdated.
- Calculated name: You should NOT be able to TAB to the calculated name below the photo but it will appear in the Tab Order list. Set its Tab Stop property to No.
- Tab order on a tab page: Each tab page has its own tab order. Select the page and then click the Tab Order button. These should be all OK since they follow the order they were put on the original form. They all show boring names like Text81 or Combo 118.
Hide Vertical Scroll Bars
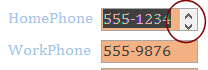 As you used TAB to move through the controls, some text boxes may show short vertical scroll bars that look like an up arrow and a down arrow. A drop list has only a down arrow. Scroll bars are needed for Memo fields like Hobbies and Notes but should not be needed for properly sized text boxes.
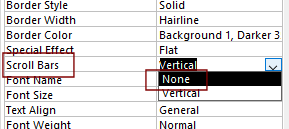 For text box controls that show scroll bars, set the property Scroll Bars to None.
 Save the form.
[Staff-tabcontrol]
|
|
| © 1997-2017 Jan Smith All Rights Reserved |
Site Map What's New |
Privacy Policy Terms of Service Copyright Acknowledgements |
~~ 1 Cor. 10:31 ...whatever you do, do it all for the glory of God. ~~
Last updated: March 22, 2017