
Jan's Working with Databases
Tables & Queries: Tables: Import Text
Working with text database files directly is a pain, but they are very useful for transferring data between programs, such as when Access cannot read the original file's format.
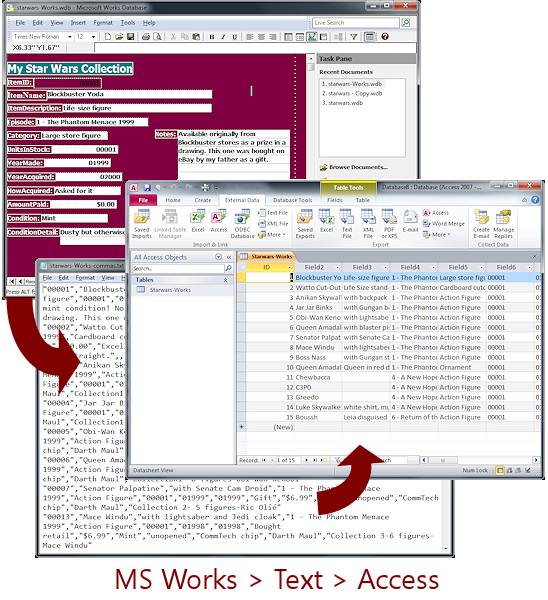
Problem: MS Access cannot import a
database from MS Works.
Solution: MS Works saves the database as Text
MS Access imports the text file.
A text database uses a TAB or comma or other special character as the delimiter, which separates the fields, and usually uses a line break to separate records. The Import Text Wizard can normally guess what the delimiter is. If it is wrong, you can pick the correct character yourself.
Methods of Importing Text Database File
A text database is a single table. You can import such data once you know how the fields and records are delimited (that is, separated).
You import from inside the database where you want the new data. You can append text data to an existing table, IF the fields are in the correct order and data type for the existing table.
- Copy and Paste:
Copy cells from a table or rows from a text file and paste into an Excel spreadsheet. Make corrections to data that failed to paste correctly. Copy and paste to an Access datasheet. If you are appending (adding new records) to an existing table, the data must have all of the fields in the same order with the same data types. If you are creating a new table, you can name and configure the fields after pasting.
- Import Wizard:
Ribbon tab External Data > Button for Text file
The Get External Data dialog opens. Browse to select a file. Choose whether to import into a new table or to append to an existing table. Click on OK to open the Import Text Wizard, which walks you through the choices to make the import work.
The problems are the same as with spreadsheet data:
Import Errors: If some or all of the records fail to import properly, they will be saved in a new table called Paste Errors. You should look at the records to see which ones caused a problem. You may be able to tell what the problem was just by inspecting the records.
Common Causes of Paste Errors:
- Different table structure: Missing or extra fields
Example: Source might have a person's name in 1 field while the destination table use 3 fields- Mismatched data types:
Example: Source may have zip codes in a Number field while the destination table uses a text field.- Different field names:
Example: Source may use FirstName, without a space, while destination uses First Name, with a space.- Field order: If the first row of imported data does not contain the field names, then the fields must be in the same order as in the Access table.
- Duplicates in primary key: Imported data may have duplicate values in the field that is the destination table's primary key.
| |
Step-by-Step: Import Text File |
|
| What you will learn: | to import data from text file: new table with wizard to modify table design: field sizes, data types, Attachment field to import and append new text data to an existing table |
Start with: ![]() , resource files, worldtravel-FirstnameLastname.accb
, resource files, worldtravel-FirstnameLastname.accb
You will add a table to
the
database worldtravel-Lastname-Firstname.accdb that you created in
the previous lesson ![]() .
.
Import Text Data: New Table
Access has a wizard to help you import text data similar to the wizard for spreadsheet data. A plain text database file must be constructed in a way that makes it easy to tell where one field stops and another begins and where a record stops. Tabs and commas are most often used to create the separations between fields. Line breaks most often indicate the end of a record.
The data that you will import was constructed from a table that included some columns that you do not want. The fields are similar to those in the Staff table, but are not quite the same. The Import Text Wizard lets you omit those. So helpful!
- From the ribbon tab External Data in the Import & Link tab group, click on
 .
.
The File Open dialog appears.
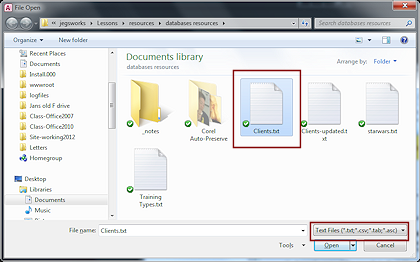 Navigate, if necessary, to where you stored the resource files and select the file Clients.txt file.
 Problem:
You do not see the file Clients.txt
Problem:
You do not see the file Clients.txt
Either the file type is not Text Files or you are not looking in the folder where you put the resource files. If necessary, you can download the Clients.txt file again. If the file opens in your browser, use the browser's own Save command.
 Importing Online File: You can import directly from an online site ONLY IF you have the correct username
and password for the web site as an administrator of the site. (You do not have that for this file!) Normally you will have to download first and then let Access import.
Importing Online File: You can import directly from an online site ONLY IF you have the correct username
and password for the web site as an administrator of the site. (You do not have that for this file!) Normally you will have to download first and then let Access import.
- Click on the Open button and then on OK.
The Import Text Wizard opens. This wizard is similar to the one for spreadsheets.
-
In step 1, choose Delimited.
Inspect the data. What character separates fields? In this text file the fields are separated by a comma.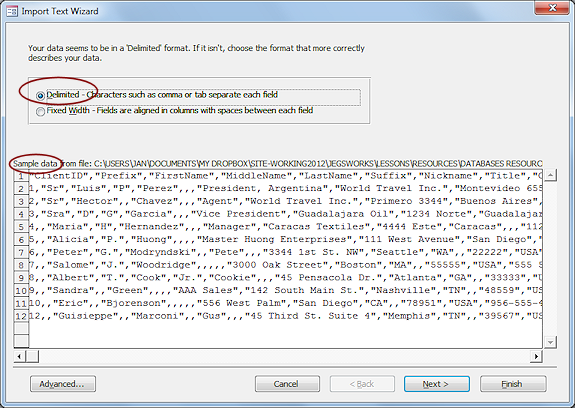 The wizard shows 'Sample data'. It will analyze only the first few records. This can sometimes cause problems if later records have a lot more characters in the field.
- Click on the Next > button.
-
In step 2 of the wizard, check the box for First Row Contains Field Names.
Inspect all of the fields to be sure they are lined up correctly. You will need to scroll sideways in the dialog window.
Access did a good job of figuring out the structure of the data. Leave the delimiter as comma and the Text Qualifier as the double quote (").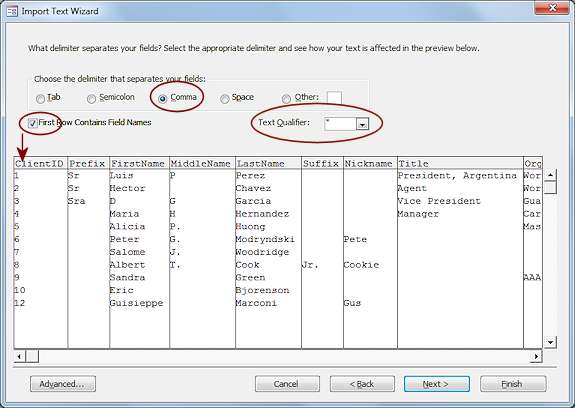 Data not lined up correctly under field names: You may need to change the delimiter or back up and try "Fixed
Width" instead of "Delimited". Or maybe your data was not originally input correctly.
Data not lined up correctly under field names: You may need to change the delimiter or back up and try "Fixed
Width" instead of "Delimited". Or maybe your data was not originally input correctly.
- Click on the Next > button.
- In
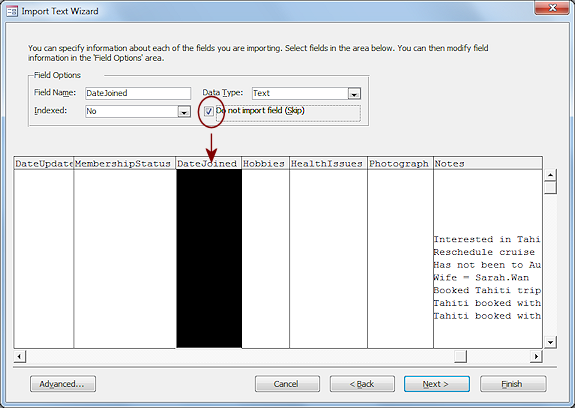
step 3 of the wizard, there are several fields that you do not want to import.
Select each of the following columns and check the box "Do not import field (Skip)"
ClientID
EmrgcyContactName
EmrgcyContactPhone
MembershipStatus
DateJoined
 I
I - Click on the Next > button.
-
In step 4 select "Let Access add primary key".
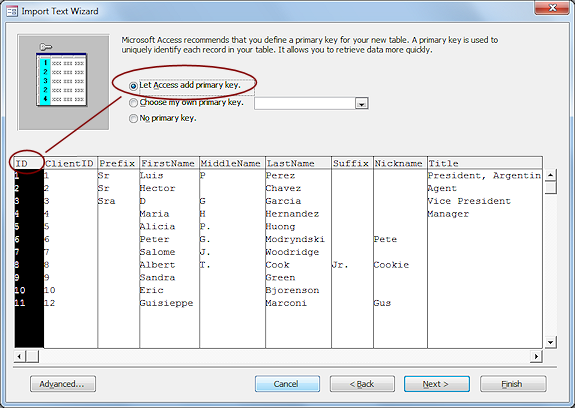
Just as in the case with a spreadsheet, to get an AutoNumber field we must let Access handle this transaction.
- Click on the Next > button.
-
In step 5 accept the default table name "Clients".
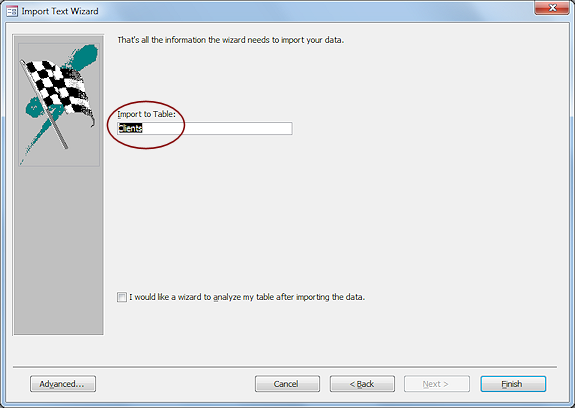
- Click on the Finish button and then click on OK to close the final dialog.
Modify Table Design
 Open the new table Clients in Design View.
-
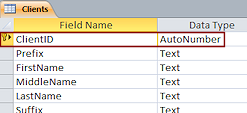 Rename the field ID as ClientID.
It is an AutoNumber field and the primary key. - Inspect the properties of the other fields.
All of the Text fields have field size of 255 again!
You have another set of changes to make. So many fields!
-
Change the following field sizes and/or data types:
Save the table along the way. You will see a warning about possible data loss due to changing the field sizes. There should not be a problem if you entered the values above correctly.Prefix and Suffix: 5
FirstName, MiddleName, Nickname: 20
LastName: 30
Title: 20
OrganizationName: 60
Address: 50
City: 30
State: 20
Region: 20
PostalCode: 15
Country: 30
HomePhone, WorkPhone, MobilePhone, FaxNumber, AlternativePhone: 20
EmailAddress: 75
Birthdate- Date/Time data type
Nationality: 50
DateUpdated - Date/Time data type
Hobbies - no change
HealthIssues: Memo or Long Text data type
Photograph: Delete. Save table. Create a new field named Photograph as Attachment data type. Move the field above the Notes field.
Notes: Memo or Long Text data type
 Save the table.
You will see a warning about possible data loss due to changing the field sizes. There should not be a problem if you entered the values above correctly.
Import Text Data: Append New Records
What do you do when your original text data source gets new records? How can you update the table in Access?
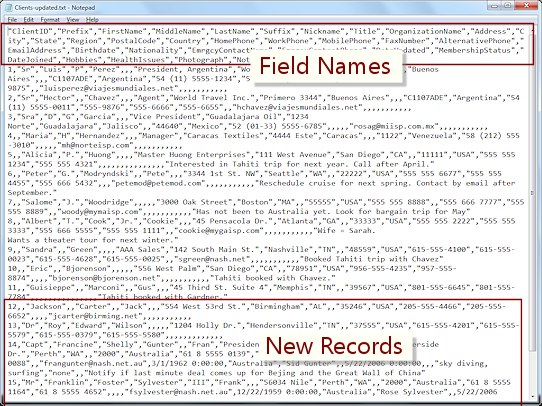
You can see from the illustration that a text database file is not easy to read!
- Delete and Import again: If the table is small and you did not have to make many changes, you could just delete it in Access and import the data all over again. But you don't want to do that if you made a lot of changes to properties like field sizes or validation rules or if you joined the table to other tables.
- Copy and Paste: Import the whole file to a new, temporary table in Access. Copy and paste the new records to the existing table
- Edit first: Create a file in the original program (if you have it!) that contains only the records that you want plus the field names. Then use the Access Import Text Wizard to append those records.
It is important that the data you are importing matches the fields and field properties of the table to which you want to append it. There are many opportunities for errors here!
-
 From the ribbon tab External Data in the Import & Link tab group, click on .
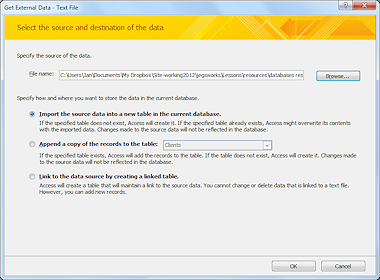
The Get External Data - Text File dialog appears.The File name box will show the path that you used last.
The default option chosen is "Import the source data into a new table in the current database."
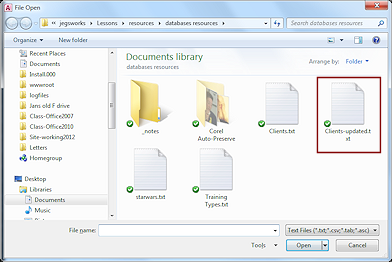 Browse to select the file Clients-updated.txt from the resource files.
- Click on Open.
You are back in the Get External Data dialog. - Click on OK.
The Import Text Wizard opens.
- In step 1 choose "Delimited".
- In step 2 check the box for "First Row Contains Field
Names".
- In step 3 do NOT import the ClientID field.
- In step 4, let Access create a primary key.
- In step 5 use the default table name, Clients-updated.
-
 Open the new table in Datasheet View and select the last 5 records, which are the new ones.
- Copy.
- Open the table Clients.
 Select the whole last row and Paste.
A message appears saying the value is not valid for the field, but it does not tell us which field! <grrrr!>
 Click on OK.
Another message asks if you want to suppress further error messages. You might get an error message for EACH record.
- Click on No.
This time there are only 5 records and it could help to see how many problems there are.
Another message like the first one appears.
-
 Keep clicking on OK in the error messages.
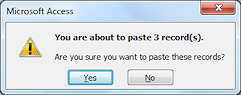
Finally a message says the you are about to "paste 2 record(s)." At last!

Click on Yes.
Two new records appear.Yet another message tells you that the records that failed to paste are in a new table, Paste Errors.
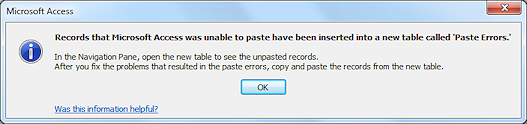
- Click on OK.
- Open both the Paste Errors and Clients tables in Design View.
- Compare the fields.
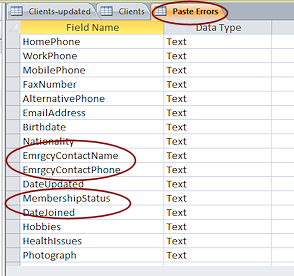
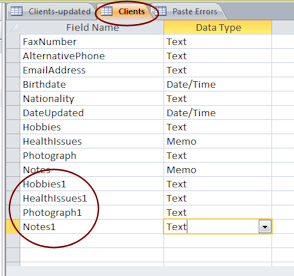
Ah ha! The Paste Errors table has the 4 fields that were not imported originally into the Clients table: EmrgcyContactName, EmrgcyContactPhone, MembershipStatus, and DateJoined. Access pastes the data into the fields in order and helpfully(?) added new fields when it ran out of fields to paste into. That's a surprise! The last four field names had already been used, so in the Clients table Access created names for the new fields by adding a 1, like Hobbies1. Not so helpful in this situation. There was no message about these freshly created fields! <sigh>
The paste errors came, not exactly from extra fields, but from a mismatch of data types. Records that had a value in the Text field EmrgcyContact created an error when Access tried to paste it into the Date/Time field named DateUpdated in the Clients table. The paste failed. That was a good thing to happen, but it certainly is annoying that Access did not tell us exactly where the problem was.
 Paste Errors:
Pasted into the Wrong Field
Paste Errors:
Pasted into the Wrong Field
You can have an apparently successful paste and still have paste problems. Access will allow some pastes that you really don't want. For example, a State value (which is text) will be accepted in a Postal Code field that is a Text type field. Access cannot read the actual values. You must carefully inspect the fields before you paste!
- In the Paste Errors table, delete the fields EmrgcyContactName, EmrgcyPhone, MembershipStatus, and DateJoined.
- In the Clients table, delete the last 4 fields: Hobbies1, HealthIssues1, Photograph1, and Notes1.
- Save the tables.
- Switch to Table Datasheet View of the Paste Errors table.
-
Select the 3 records in the table Paste Errors and Copy.

- Switch to the table Clients in Datasheet View.
 Select the bottom row, and paste again.
A message appears that you are about to paste 3 records. Hurrah!
- Click on Yes.
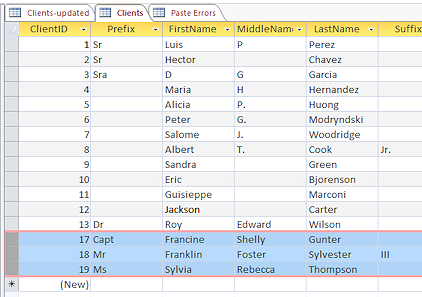 Now all five of the new records are in place.
Hurrah!
Gap in ID values: For some reason when a paste fails, Access acts like it had records and then deleted them. This creates a gap in the numbers. If you stopped the paste and tried it again, your numbers may have different gaps than what shows in the illustration.
Now all five of the new records are in place.
Hurrah!
Gap in ID values: For some reason when a paste fails, Access acts like it had records and then deleted them. This creates a gap in the numbers. If you stopped the paste and tried it again, your numbers may have different gaps than what shows in the illustration. -
Inspect the records in the Clients table.
Did all of the fields paste properly this time?
- Delete the extra fields that Access added - Hobbies1, HealthIssues1, Photograph1, and Notes1.
- Close all of the tables.
- Delete the tables Paste Errors and Clients-updated.
You are left with two tables in the database worldtravel-Lastname-Firstname.accdb, Clients and Staff.
Alternate Methods to Append New Records from Text File:
You may need to edit the data that you are importing first, to make sure that the fields match the fields in the existing Access table.
- Import selected records: Outside of Access, create a text file containing just the field names and the records that you want to append. Most programs can save their files in Text format. Use the Import Text Wizard to append records to an existing table.
- Copy/Paste selected records (Text to Excel to Access): Copying from a text file and paste directly to an Access table often fails. You cannot append if you need to select records far from the column headings in the first 'row'. A better method is to use Excel's Import Text Wizard to create the correct columns. Do any reorganizing that is needed, like deleting columns or changing the order of the columns to make them match the table in Access. Copy the records that you want in Excel. In Access, paste into bottom row of the datasheet view of the table to which you want to append the records. Be sure that the fields are in the correct order and data type before pasting!
|
|
| © 1997-2017 Jan Smith All Rights Reserved |
Site Map What's New |
Privacy Policy Terms of Service Copyright Acknowledgements |
~~ 1 Cor. 10:31 ...whatever you do, do it all for the glory of God. ~~
Last updated: March 27, 2017