Views
 Report View Report View
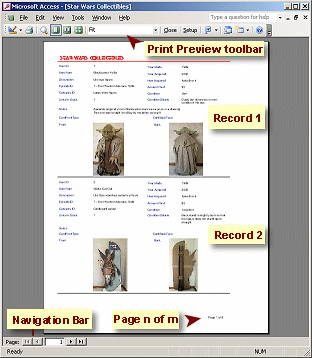 Since
a report is meant for printing, the Report View is actually a print preview. Since
a report is meant for printing, the Report View is actually a print preview.
The example at the right started as an AutoReport but has been modified.
This report can show two records per page.
The number of records that can fit on a page depends on the number of fields in each record and the space needed to
show the data. There may be several records on a page or
only one. It may even take two pages (or more!) per record. You really want to avoid that!
How many pages in the report? Access does not tell you directly. There are two
ways to see how many pages it will take to print the report:
- Best: Create a control that inserts the number of pages in the page header or page footer, like
"Page 1 of 8".
Access provides a menu command for this in Report Design View:
|
which opens a small dialog where you can choose "Page N of M"
- Navigate to the last page and look at its number in the Navigation bar.
 Formatting Delay:
Access must format the whole report before it
can display the last page. It may take a while. Awkward! Formatting Delay:
Access must format the whole report before it
can display the last page. It may take a while. Awkward!
For large reports on older computers or older versions of Access, this process can be worse than
"awkward". The whole program can hang when trying to format a large report
for printing. You might have to break your report up into smaller sets of
records, especially if there is an image with each record.
The Report View shows the Print Preview toolbar, which has many of the
same buttons as other Office programs, like Zoom and Setup.
 Report Design View Report Design View
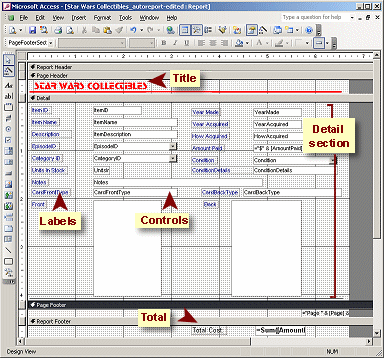 The
Report Design View is very similar to the Form Design View. The
Report Design View is very similar to the Form Design View.
The fields for the report are displayed in controls with labels.
The page header and
footer can hold a title or other information that you want to see
on each page.
The report header and
footer can hold totals and summaries that you want to see at the
beginning or end of all of the records.
The Detail section contains the fields for one record.
Quick Reports
Access provides two quick methods for creating a report: AutoReport and the
Report Wizard. Using one of
these quick methods to get your report started can be a real time-saver.
You definitely will want to edit a report created with these methods. They
are not particularly efficient in using the space on the page.
AutoReport
 On the
toolbar is a button for New Objects. This button is not available unless
you have a something open or selected in the Database Window that you can
use as the source for a report. If you
open the drop list of objects and choose AutoReport, then Access immediately creates a
report based on the selected object. On the
toolbar is a button for New Objects. This button is not available unless
you have a something open or selected in the Database Window that you can
use as the source for a report. If you
open the drop list of objects and choose AutoReport, then Access immediately creates a
report based on the selected object.
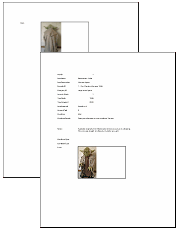 AutoReport
creates a simple set of pages with at least one page per record. The fields
will be listed in a column going down the page. You will
definitely want to edit such a report to save paper. AutoReport
creates a simple set of pages with at least one page per record. The fields
will be listed in a column going down the page. You will
definitely want to edit such a report to save paper.
The illustration shows the first record in an AutoReport. Because there was not
enough room at the bottom of the first page, the last field (a photo) is on
a second page. Report By Wizard
The link to the
Report Wizard is in the Database Window, in the Reports list.

The wizard walks you through a number of choices for your form. You can choose:
- Source for the data
- Which fields to show
- To group data (perhaps by year or region or postal code)
- To sort on up to 4 fields
- One of 6 layouts
- Page orientation
- One of 6 pre-installed styles plus any custom styles you have created for colors and formatting
This produces a report that may look better than the AutoReport, but it will
still need adjustments.
In this lesson we will use the AutoReport. You will work with the Report Wizard later.
 |
Step-by-Step: Create with AutoReport |
 |
What you will learn: |
to create a report with AutoReport
to navigate pages in a report
to zoom the report preview size
to change a control's properties with Property Dialog
to resize a control
|
Start with:
mytrips.mdb from previous lesson
Create a Report with AutoReport
A simple report is very easy to create with AutoReport. There are a number of
things you could do to improve the layout, but for this lesson we mostly will settle for what Access
provides. Later you will learn how to change all the characteristics of a
report.
-
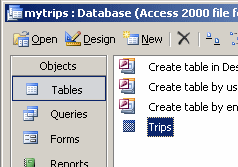 If
necessary, switch to the Database Window and select
Tables. If
necessary, switch to the Database Window and select
Tables.
The only table is Trips, so it will be selected automatically. This table
will be the source of records for the new form.
-
 On the
menu, click the arrow on the New Objects button and select
. (Your button may show a
different icon depending on what was used last.) On the
menu, click the arrow on the New Objects button and select
. (Your button may show a
different icon depending on what was used last.)
The screen may blink and you may briefly see a minimized window at the
bottom of your Access window while Access creates the report. Then the new
report will open automatically to the first page, which shows the first two
records. You cannot scroll to see more pages! You must use the navigation
buttons at the bottom.All fields in the Trips table are here and
use the default size for the control
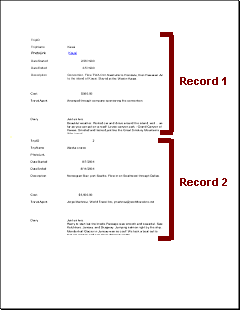
First page of Trips report created with
AutoReport
 Records out
of order or missing: Records out
of order or missing:
The report shows the records in the same way that the table does, including any
sorting or filtering that you left in place.
Simple Solution: (for AutoReports)
Close and delete the AutoReport. Open the table in Table Datasheet View, remove
any filters, sort in the order that you want, save the table. Recreate your
AutoReport.
Advanced Solution: (for complex or formatted reports that you don't want to
recreate)
Open the form in Report Design View. Open the Properties dialog for the form.
Remove the entry in the OrderBy property and change OrderByOn to No.
Report View: Navigate Pages
Print Preview shows one page at a time by default. You can use the buttons a
the top of the window to show 2 or more pages at a time. You can zoom in or out
as you wish.
The Navigation bar and the navigation keys on your keyboard can all help you get around in the
preview of your report. You cannot use the scroll bars or mouse wheel to change
to pages that are not already in the display.
- Use each of the navigation buttons at the bottom of the preview
window to navigate through the report's pages. Type in a page number. (There
are 4 pages in the report)

 Use
the navigation keys to move between pages: Use
the navigation keys to move between pages:
arrow keys, Home, End, Page Up, Page Down
- While you are navigating, inspect the fields for each record.
Problems appear!

The
Diary control is not tall enough to show all of
the text. Some of the diary entries have several paragraphs that are not
showing!
For the memo type fields you can dig into the Properties to make
the controls behave intelligently. So cool! You will fix this shortly.
Also, in Report Design View, you can resize and move the controls
for a report just like in the Form Design View. You can experiment with that
when you have finished the steps below.
Report View: Zoom
Sometimes you need to see a whole page at a time. Sometimes you need to read
the text. Access lets you adjust the size to suit your task using the Zoom box
or using the mouse.
-
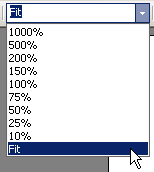 On
the toolbar, open the Zoom list by clicking the down arrow. On
the toolbar, open the Zoom list by clicking the down arrow.
- Click on . The window now
shows the whole page. The text will be very small! Too small to read.
- Move your mouse over the image of the page. The mouse
pointer changes to the Zoom In shape
 (larger
text) (larger
text)
- Click on the page. The size changes. The mouse pointer now
has the Zoom Out shape
 (smaller
text). (smaller
text).
Can you read the text now? That will depend on what Zoom size was used before.
- In the Zoom box on the toolbar, select 100%. Ah! Readable.
- Move the mouse pointer back over the page near its top and click
several times. The page size alternates between Fit and 100%.
Report Design View: Change Control's Properties
The Diary control is not tall enough to show the
longer entries. But some records do not have much text so setting a really tall height
would waste space for most records. You do not know how much space a future
trip diary might need.
Happily, you can set two of the properties for the control to allow it to
shrink and grow as needed. Such a smart idea!
- Switch back to Report Design View.
-
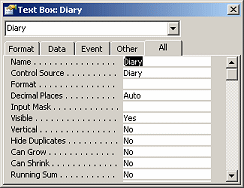 Click
on the Diary control to select it. Click
on the Diary control to select it.
The Properties dialog switches to show the properties for this control.
 Problem:
Properties dialog is not visible Problem:
Properties dialog is not visible
Solution: Click on
 the
Properties button on the toolbar. the
Properties button on the toolbar.
-
 Click
in the Can Grow property. A down arrow appears. Click
in the Can Grow property. A down arrow appears.
- Click the down arrow to open the list of choices and
choose Yes.
- Repeat for the Can Shrink property.
Nothing seems to change about the control Diary yet. You will have to look at
the report itself.
-
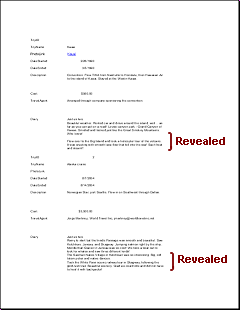 Switch
back to Report View and look at the pages. Now you can see all
of the text in the Diary entries. Switch
back to Report View and look at the pages. Now you can see all
of the text in the Diary entries.
Notice on page 3, the Diary entry for trip #5 is short and there is no wasted
space before trip #6 starts. But on page 4, there is only 1 trip (#7) because the
Diary text is much longer. There is not enough room on page 4 for all of the
controls for the last trip, #8, so there is a 5th page to the report now.
Save Report
In Print Preview, there is no Save button, but the File menu has the usual
Save and Save As commands.
-
  While
in Print Preview, from the menu select
| . While
in Print Preview, from the menu select
| .
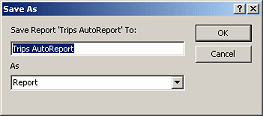
The Save As
dialog appears.
(You may not see the As box in your dialog)
- Type the name Trips AutoReport in the
first text box and be sure that the As box shows Report.
-
 Close
the report by clicking Close
the report by clicking
 its
Close button. its
Close button.
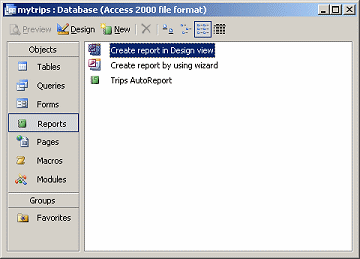
Your report is saved inside the database file and will show in the Reports
list in the Database Window.
Report Design View: Resize/Move Controls
- Switch back to Report Design View.
- Experiment.
Resize the controls. Move them to different locations. Try to improve the
layout of the form.
- When you are finished experimenting, either save your report with a
new name or close without saving.
|


 If
necessary, switch to the Database Window and select
Tables.
  On the
menu, click the arrow on the New Objects button and select
. (Your button may show a
different icon depending on what was used last.)
![]() Records out
of order or missing:
Records out
of order or missing: 
 On
the toolbar, open the Zoom list by clicking the down arrow.
 Click
on the Diary control to select it.
  Click
in the Can Grow property. A down arrow appears.
  Switch
back to Report View and look at the pages. Now you can see all
of the text in the Diary entries.
 Close
the report by clicking