|
Design View
The Table Design View lists all of the fields with their data types and
descriptions. You do not see the actual records in this view.
When a field is selected, an arrow at the left
 points to the
file name and the properties for that field are in
the bottom of the window. You will see different choices for different data
types. points to the
file name and the properties for that field are in
the bottom of the window. You will see different choices for different data
types.
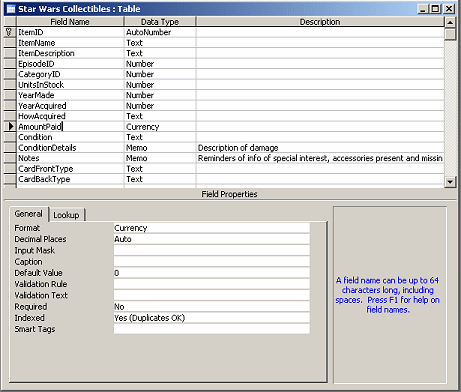
View: Table Design
Field Name
A field name, like other things in Access, can have up to 64 characters. It can contain letters,
numbers, and symbols except for a period (.), an exclamation point (!), an
accent grave (`), brackets ([ ]), and double quote mark ("). You cannot
start a field name with space(s). It will be safer to not use spaces at all.
 Avoid
using property names as field names: Access can get confused if your
field has the same name as
a property, such as Name, Caption, Format, or Height. Avoid
using property names as field names: Access can get confused if your
field has the same name as
a property, such as Name, Caption, Format, or Height.
Data Types
 You must choose a data type
for each field. The data type determines what
kind of data you can store in the field and how much disk space is reserved
for that data.
Most data types also have other properties for which you choose values, like the
number of decimal places or a default value. You must choose a data type
for each field. The data type determines what
kind of data you can store in the field and how much disk space is reserved
for that data.
Most data types also have other properties for which you choose values, like the
number of decimal places or a default value.
Types:
- Text - Can hold plain text or text combined with numbers as in
an address. Good to use for numbers that are not used in calculations like
phone numbers, part numbers, and postal codes. Will sort as characters,
where the order of numbers is like 1, 10, 100, 2, 20, 200...
- Text - less than 255 characters. Default field size is 50
characters.
You should choose a size that will hold the longest entry that you expect.
- Memo - Can hold over 60,000 plain
text characters. Cannot contain formatting.
- Numbers - For calculations and sorting as numbers instead of
text.
-
 Number
- Several number field sizes are available, like Byte, Integer, and Long
Integer. Number
- Several number field sizes are available, like Byte, Integer, and Long
Integer.
- Date/Time - Use this type in order to sort
and calculate with dates and times correctly. Dates are numbers
representing the number of days since December 30, 1899. Earlier dates
are negative numbers. See also Microsoft on
storing date/time
 . .
- Currency - Use for high accuracy
and for money. Avoids rounding. Can hold 15 digits to the left and 4
digits to the right of the decimal point.
- AutoNumber - Automatically assigns a
unique number to each record.
Great to use for an primary key.
- Yes/No - Use when there are only two choices
- Yes/No, On/Off, True/False
- OLE Object - OLE = Object Linking and
Embedding. Objects include formatted text, complete
documents, spreadsheets, images, sounds. Can be up to 1 GB in size if
there is enough disk space. Access databases are limited to 2 GB
altogether. The original program handles the display in Access, so
it must be installed on the computer where Access is installed.
- Hyperlink - Up to 2048 characters for a URL
(Uniform Resource Locator) or UNC (Universal Naming Convention) path
- Lookup Wizard - Starts a wizard that will
create a list of values to choose from for the field.
See also
Microsoft's
online list of Access data types 
Things to consider when choosing a data type:
You want to choose the data type that will use the least amount of space
on your hard disk without being too small for any future data. You must
think carefully!
- How many text characters are needed?
Example - Phone Numbers: If you know that all phone numbers are from the USA, you could
set the size to 10 and have the user type in the numbers without any
punctuation, like 5555551234. But, if a phone number might be from another country, you
cannot use size 10! How long is the longest phone number in the world???
I don't know. But it is longer than 10.
Example - Names: It is harder to know how many characters you will
need for names of people, cities, products, or companies. The default size
of 50 may not be enough! Do not choose a size less than 50 unless you are
VERY sure that you won't need more later. Be sure to count the spaces,
too.
Company names, in particular, can get long sometimes. My local phone book
has some long corporate entries:
Cumberland Country Medical Center Regional Cancer
Center = 56 characters
Cumberland Country Playhouse Production Shops &
Rehearsal Hall = 62 characters
Highland Federal Savings & Loan Assoc Fairfield
Glade Branch = 60 characters!
Even with some abbreviations, some names can be long!
Having separate fields for parts of a name helps, like FirstName,
MiddleName, and LastName for people. For companies you might use fields
like CompanyName, Department,
Branch, and Region.
- What kind of numbers: Some number data types are for whole
numbers only, like -123 or 1067. Others are for decimal numbers like
123456.987 or 0.00375. All data types for numbers have a maximum and minimum number
that can be held in the field. You will need to know what size numbers you can
expect in order to choose wisely.
Example - Number of People: These will always be a whole number so
you have 3 choices.
Data type Byte requires that values be between 0 and 255 and uses 1 byte
of storage.
Data type Integer can hold whole numbers between –32,768 and
32,767 in 2 bytes of storage.
Data type Long Integer can hold whole numbers between
-2,147,483,648 and 2,147,483,647 (over 2 trillion!) in 4 bytes of
storage.
Example - Gross National Product: This will be a very large
number. Possibly larger than the Long Integer type can hold.
Example - Scientific measurements: These might be very small
decimal numbers.
Data type Single can hold a 7 digit decimal number in 4 bytes.
Data type Double can hold a 15 digit decimal number in 8 bytes.
Data type Decimal can hold a 28 digit decimal number in 12 bytes.
 If a number has data type
Text, you won't be able to use it in calculations. If a number has data type
Text, you won't be able to use it in calculations.
 Display
Format vs. Data Type: The formatting of the data is not the same
as the data type. For example, you can type numbers in a field that has Text data
type and then align them to the right. Those numbers will look just like they
were Number type, but you won't be able to add with them. Another example
is Date/Time data type. You can format a date as 19-Jun-06 or 6/19/06 or
Monday, June 19, 2006. All of these formats represent the same date value.
If you want another format, like 06-19-2006, you must change the data type
to Text. Then you will not be able to calculate using the date. Display
Format vs. Data Type: The formatting of the data is not the same
as the data type. For example, you can type numbers in a field that has Text data
type and then align them to the right. Those numbers will look just like they
were Number type, but you won't be able to add with them. Another example
is Date/Time data type. You can format a date as 19-Jun-06 or 6/19/06 or
Monday, June 19, 2006. All of these formats represent the same date value.
If you want another format, like 06-19-2006, you must change the data type
to Text. Then you will not be able to calculate using the date.
 Changing data type
later: You may have difficulty changing a data type later. If there is
a relationship set up between your table and another one, you may have to
delete the relationship first, change the data type, and then recreate the
relationship. If you already have data in the field, any data that is too
large for the new field type will be cut short. Any data that is not
appropriate for the new data type will be tossed out. Changing data type
later: You may have difficulty changing a data type later. If there is
a relationship set up between your table and another one, you may have to
delete the relationship first, change the data type, and then recreate the
relationship. If you already have data in the field, any data that is too
large for the new field type will be cut short. Any data that is not
appropriate for the new data type will be tossed out.
Description
The Description appears in the Status bar when the cursor is in the field
in Datasheet View or in Form View. Its purpose is to help the user
enter the right data and enter it in the correct format.
- Format for entering: Should a phone number be entered as
123-555-1234 or as 1235551234 or as (123) 555-1234?
- Kind of entry: Should money be rounded to whole amounts ($525)
or must you include the decimal part ($525.33)?
- Choices or explanation of what to enter: What codes can be entered in the
field and what do they stand for? A drop list or scrolling list box is
often used to restrict the choices to the ones that work! The Description
message can add warnings or explanations about the choices.
Primary Key

Each table needs to have a field called a primary key
that will be unique for each record. Usually this is an AutoNumber
field, which automatically assigns a number when a record is created.
An AutoNumber will be of type Number: Long Integer.
Sometimes you can use existing data for your primary key, like a serial number or
identification number, or even a combination of fields, like first, middle, and last
names. Of course you must be VERY sure that what you have selected will ALWAYS be
different for EVERY record!
Design Issues
How will you use your table?
The order of the fields will be important if you will be working directly
in the table. If you plan to use a form instead, the order of fields in the
original table does not matter.
What type of data?
Think about the size of the field and the data type that you need. For
fields that will be shared with other tables, the data types should usually be
the same.
Undo Changes: Design View
In Design View, MS Access keeps a list of the last 20 actions. You can
use the
 Undo and Redo buttons on the toolbar to back up through the list of
actions, or use the commands at the top of the Edit menu.
 When you change views or
objects, the list is wiped out. There is no Undo list in Datasheet view! When you change views or
objects, the list is wiped out. There is no Undo list in Datasheet view!
Common Mistakes in Table Design
- Putting into one field data that should be in separate fields
Example: Using one field for the City, State, and Zip
Code is convenient to type. BUT, you cannot sort on State or filter to see
records for a certain zip code.
- Using the wrong data type.
Example: Zip codes - Zip codes start with 0 in some
areas. That leading 0 will be dropped by Access if a number data type is
used. 02234 is not the same as 2234 to the Postal Service! You don't do
arithmetic with those numbers anyway!
- Leaving field sizes at the default size
Example: The default size for a text field is 50. That
is far too large for the State field when you are using the 2 character
abbreviations for states. It may be too small for some company names or
other kinds of data. A text field can be up to 255 characters. A memo
field is needed when the entry may be longer than 255 characters. Memo
fields cannot be as easily sorted or filtered as Text fields, however.
Choose carefully!
- Trying to get all the data into a single table
Example: An invoice has information about the customer,
the ordered items, the information about each item ordered (how many,
color, size...), shipping information. The customer information has to be
repeated for each order. Shipping info might be the same for some orders
and different for others. Wasted space! All this information is too
much and too complex for a single table! It takes 3 - customers, orders,
orderdetails.
 |
Step-by-Step: Create a Table |
 |
What you will learn: |
to create a blank database
to create a table in Design View
to add fields and choose data types
to set a primary key
to save a new table
|
Start with: blank database
Create Blank Database
- If necessary, open Access
| or |
-
  Open
the File menu and select Open
the File menu and select
The New File task pane opens.
- Click the link for a new Blank Database.
The Save As dialog opens.
Did you remember this from the earlier lesson? The first thing you have to do is save the blank database.
 Save
as mytrips.mdb to your Class disk in the folder
databases project1. Save
as mytrips.mdb to your Class disk in the folder
databases project1.
Design Table
It is a good idea to figure out the basic fields that you will need before
you ever start creating the table.
What fields do you need to record the details of a trip?
Who went, where you went, what you did, what it cost, how you traveled, where
you stayed, what special happened....?
You need fields for the following information:
- Trip name
- Beginning and ending dates
- Description of the trip
- Cost
- Travel Agent
- Memo of special events or favorite activities
Create Table
The blank database opens with Tables selected in the list of objects, ready
for you to get started creating your first table.
-
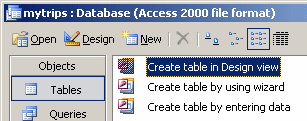 Double-click
the link in the right pane of the Database Window: Create table in Design
view. Double-click
the link in the right pane of the Database Window: Create table in Design
view.
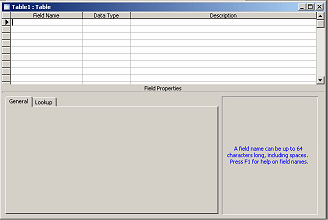 The Design
view opens with no fields yet added. The Design
view opens with no fields yet added.
- Field Name: In the first line, type
TripID.
-
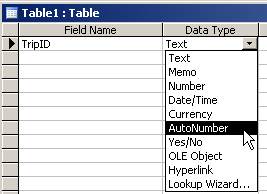 Click
in the column Data Type, in the first cell. An arrow appears. Click
in the column Data Type, in the first cell. An arrow appears.
- Click the down arrow to open the list of types.
- Data Type: Choose AutoNumber.
Primary Key
-
 With
the cursor still in the first row somewhere, click the Primary key
button With
the cursor still in the first row somewhere, click the Primary key
button  on
the toolbar to make this field the primary key for
the table. on
the toolbar to make this field the primary key for
the table.
An icon of a key appears to the left of the field name.
Add Fields
- Enter the remaining fields, their data types, and
descriptions, as shown in the illustration. Accept the default values for the
properties for the data types.

- Click on each field name in turn and look at the various properties of
each data type at the bottom of the dialog. Isn't it nice that the default values will usually work?!
Save Table
-
 Click
on Click
on  the
Save button on the toolbar. the
Save button on the toolbar.
 A
Save As dialog appears. This one looks different from the one you usually see
when you save a document. It is for saving an object in the database. A
Save As dialog appears. This one looks different from the one you usually see
when you save a document. It is for saving an object in the database.
Notice that the dialog tells you what kind of object you are saving. This can
be helpful!
-
Type
the name Trips and click the OK button to save your
new table.
 Now
the Table Design view's title bar shows the table's new name. Now
the Table Design view's title bar shows the table's new name.
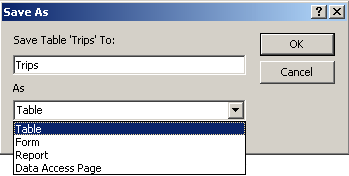  Save
As (later): Once you have saved your new table the first time, if you
choose Save As from the File menu later in Table Design view, the dialog will be a bit different. You can choose to save your
table as another kind of object or as a table with a different name. Choose a
name for your new object carefully so you won't confuse the original with the
new. Save
As (later): Once you have saved your new table the first time, if you
choose Save As from the File menu later in Table Design view, the dialog will be a bit different. You can choose to save your
table as another kind of object or as a table with a different name. Choose a
name for your new object carefully so you won't confuse the original with the
new.
Oddly, if you are in Table Datasheet view when you choose Save As, your choices
will not include "Table".
-
 Close
the database without closing Access by clicking Close
the database without closing Access by clicking
 the
Close button on the Title bar of the Database Window. the
Close button on the Title bar of the Database Window.
Your table is now ready to receive some records, which you will do in the next
lesson.
|


 Open
the File menu and select
  Double-click
the link in the right pane of the Database Window: Create table in Design
view.
 The Design
view opens with no fields yet added.
 Click
in the column Data Type, in the first cell. An arrow appears.
  With
the cursor still in the first row somewhere, click the Primary key
button
 A
Save As dialog appears. This one looks different from the one you usually see
when you save a document. It is for saving an object in the database.
![]() Save
As (later): Once you have saved your new table the first time, if you
choose Save As from the File menu later in Table Design view, the dialog will be a bit different. You can choose to save your
table as another kind of object or as a table with a different name. Choose a
name for your new object carefully so you won't confuse the original with the
new.
Save
As (later): Once you have saved your new table the first time, if you
choose Save As from the File menu later in Table Design view, the dialog will be a bit different. You can choose to save your
table as another kind of object or as a table with a different name. Choose a
name for your new object carefully so you won't confuse the original with the
new. Close
the database without closing Access by clicking