
Jan's Working with Numbers
Excel Basics: Arrange: Sort
 Data is often entered on the sheet in an order that is awkward for answering certain questions. In fact, you may need to look at the same data in different ways at different times. Sorting can help rearrange your data so you can use it more efficiently.
![]() Sorting can break formulas: If any of the sorted cells contain a formula, you may not be able to sort without breaking the formula. The simplest solution is for the formula to use cells that are in the same row. Otherwise it gets complicated!
Sorting can break formulas: If any of the sorted cells contain a formula, you may not be able to sort without breaking the formula. The simplest solution is for the formula to use cells that are in the same row. Otherwise it gets complicated!
Example: Sorting a list of names
Starting with a list of names in a spreadsheet, you can sort the list in several different orders.
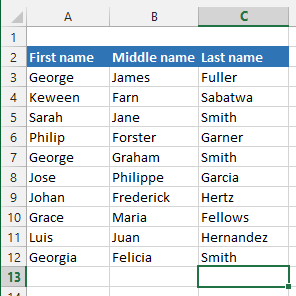
List before sorting
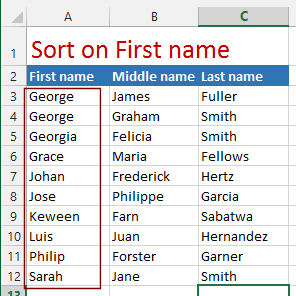
First column: Sorting in A-Z order on the first column is the default sort. In this case that puts the first names in alphabetical order. This is not usually very useful!
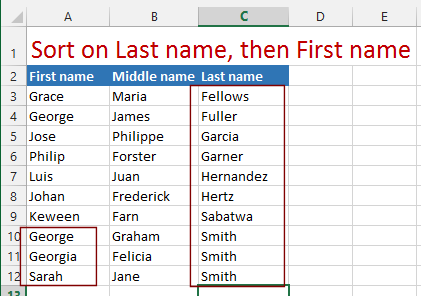
Last name, then First name: You can use a custom sort for this sort of combination sort. This is the way we usually want names to be organized. All of the Smiths together!
Sorting
There are sorting tools on both the Data and Home ribbon tabs.
One button sort: Excel allows you to sort in regular alphabetic order and in reverse order with
the buttons Sort A-Z ![]() and Sort Z-A
and Sort Z-A ![]() on the Data ribbon tab. These
used to be known as Sort Ascending and Sort Descending. These commands sort based on the first column of the selection. You can sort whole rows or just selected cells.
on the Data ribbon tab. These
used to be known as Sort Ascending and Sort Descending. These commands sort based on the first column of the selection. You can sort whole rows or just selected cells.
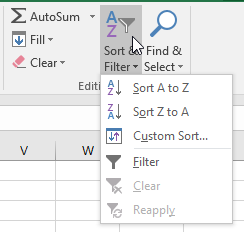 These commands are also on the menu from the Sort & Filter button on the Home ribbon tab.
![]() Sort ONLY related cells: Whatever you select to sort, be sure you have ALL of the related cells and NO cells that are not related. Otherwise your data will get scrambled. (Yes, I am going to remind you of this many times!)
Sort ONLY related cells: Whatever you select to sort, be sure you have ALL of the related cells and NO cells that are not related. Otherwise your data will get scrambled. (Yes, I am going to remind you of this many times!)
Sort
dialog: The
Sort button ![]()
![]() on the Data ribbon tab and the Custom Sort... command from the Home ribbon tab's Sort & Filter button both open the Sort dialog, which is more flexible than
sorting with the buttons.
on the Data ribbon tab and the Custom Sort... command from the Home ribbon tab's Sort & Filter button both open the Sort dialog, which is more flexible than
sorting with the buttons.
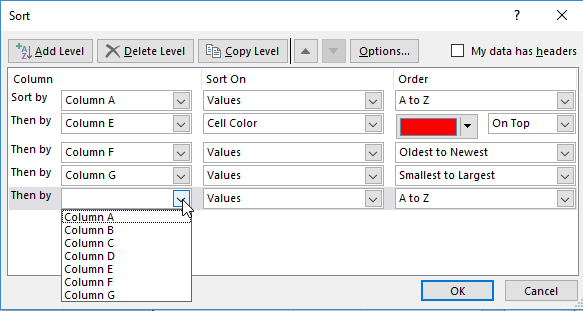
The dialog allows you to select one or more columns to use as the basis of the Sort and to choose on what feature to sort: values, cell color, font color, or cell icon. For values, Excel recognizes the type of data in the column - text (A to Z), numbers (smallest to largest), dates (oldest to newest).
You can set up to 64 levels of Sort. That is far more than you will likely ever need! Excel will first sort all the selected rows based on the first column you chose. Then Excel sorts rows that all had the same value in that first Sort column, using the second column you chose and so forth.
Example: You have lists of names where each part of the name is in its own cell - First Name, Middle Name, Last Name. To put the names in correct alphabetical order, you could use a three column sort in the order Last Name, First Name, Middle Name.
Custom Lists: Alphabetical order is not always what you want. Excel includes some Custom Lists for the Order part of the Sort dialog to help you sort by Days of the Week or Months of the Year. In most (all?) languages, arranging the days of the week or the months in alphabetical order is not much help! You want the order that they are on the calendar!
You can also create your own Custom List when the order you wish to sort by is neither alphabetic nor reverse alphabetic. These occur more often than is convenient! Drop the list under Order in the Sort dialog and put in the values or terms in the order you want to see them. Excel will keep your list in its list of Custom Lists.
| |
Step-by-Step: Sort |
|
| What you will learn: | to sort rows with ribbon button to sort with the Sort dialog to create a custom list and sort with it |
Start with: ![]() trips-Lastname-Firstname.xlsx (created in previous lesson)
trips-Lastname-Firstname.xlsx (created in previous lesson)
Sort: Button
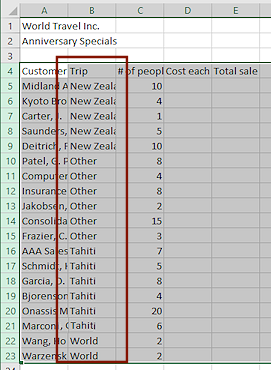
- If necessary, open trips-Lastname-Firstname.xlsx from your Class disk in the excel project2 folder.
 Save
As trips2-Lastname-Firstname.xlsx on
your Class disk in the folder excel project2.
Save
As trips2-Lastname-Firstname.xlsx on
your Class disk in the folder excel project2.
If you use the Save button on the Quick Access Toolbar, the file you saved before is overwritten. Normally that might be fine, but sometimes you wish later that you could go back to the previous version. In these lessons you will usually be told to save the results of each lesson under a new name.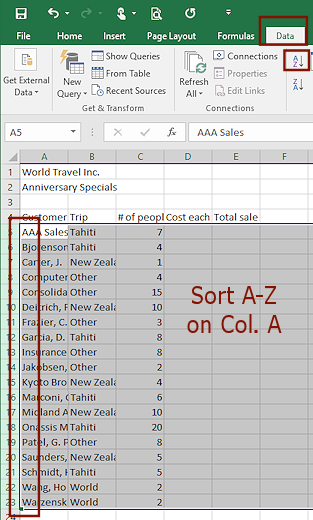 Select rows 5 - 23, which contain the records of trips sold. (Be sure to select whole
rows.)
Select rows 5 - 23, which contain the records of trips sold. (Be sure to select whole
rows.)- On the Data tab, click on
 the Sort A-Z button.
The selected rows are sorted in alphabetic order based on the first column.An alphabetic listing of customers would be useful for many tasks. There are other useful sorting orders, however.
- Undo.
Sort: Sort Dialog
-
 If necessary, select the data rows- Rows 4 - 23.
-
On the Data tab, click on the Sort button

 .
.
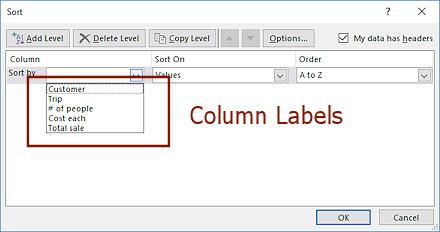
The Sort dialog opens. By default, at the top the check box by 'My data has headers' is checked. Now Excel knows that there are labels for the columns.The column labels are listed in the drop lists instead of the boring Column A, Column B, etc. This helps you pick out which columns to use for sorting.
-
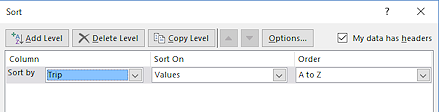 In the Sort by text box select from the drop list Trip instead of Customer.
Leave the other text boxes as Values and A to Z.
-
 Click on OK. The selected rows are sorted, putting together the rows with the same value for Trip.
This alphabetic order of trips seems awkward. It would be more useful to have the Special Offers all together and the Other category at the end. Other is for all the trips that weren't one of the Special Offers. Also, it would feel more natural to sort the trips in the order they appeared on the announcement flyer. That means that the order we want is:
Tahiti, New Zealand, World, Other.
You will need to create a Custom List.
Create and Use a Custom List
- On the Data tab, click on
the Sort button .
The Sort dialog opens.
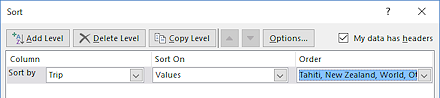
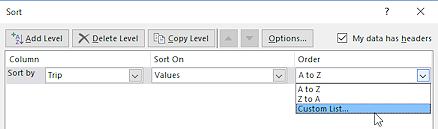 Click the arrow for the Order text box and click on Custom list...
The Custom Lists dialog opens. There are 4 lists here by default, which match the days of the week and months of the year for the default language.-
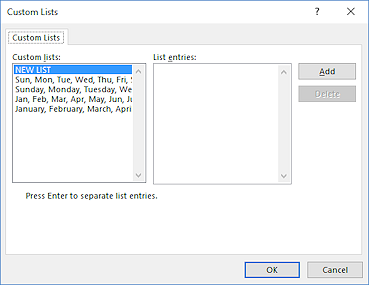 With New List selected on the left, click in the box List entries.
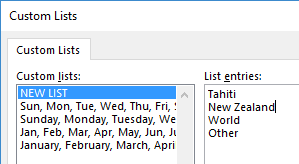
- Type the Trip categories as shown,
one per line.
Use the ENTER key to create a new line. (If you are sharing this computer with other students, this custom list may already be there.)Tahiti
New Zealand
World
Other
-
 Click on the Add button to add this list to the Custom lists box on the far left.
-
 Click the OK button to close the dialog.
You are back in the Sort dialog with the Order box now showing the new custom list. 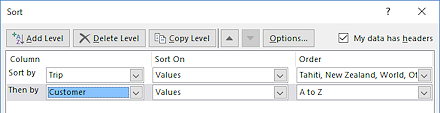 Click on the button Add Level.
Another row appears to sort with.- Select Customer, Values, A to Z.
-
 Click on OK to apply the new sort order.
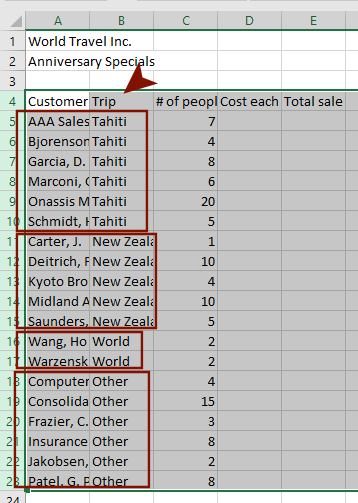
The selected rows are now sorted in the order of the Custom List so the different trips are grouped together. The Customers for each trip are listed alphabetically. How neat!
Notice that all of the customer names were entered as 'Last name, First name' or were company names. That allowed you to use the column for sorting.
If you enter names in different orders, like having both 'James Madison' and 'Whittier, John', then you cannot use that column for sorting. Good design would usually use separate cells for Lastname and Firstname and Company Name.
- Save
As trips2-Lastname-Firstname.xlsx on
your Class disk in the folder excel project2.
If you use the Save button, the file you saved before is overwritten. Normally that would be fine, but sometimes you wish later that you could go back to the previous version. In these lessons you will usually be told to save the results of each lesson under a new name.
|
|
| © 1997-2017 Jan Smith All Rights Reserved |
Site Map What's New |
Privacy Policy Terms of Service Copyright Acknowledgements |
~~ 1 Cor. 10:31 ...whatever you do, do it all for the glory of God. ~~
Last updated: March 22, 2017