 |
Data is often entered on the sheet in an order that is awkward for answering certain questions. In fact, you may need to look at the same data in different ways at different times. Sorting can help rearrange your data so you can use it more efficiently.
 If your rows contain a formula, you must be extra careful when constructing the formula. Be sure that after a Sort, the formula will still work. Moving cells around can destroy some formulas. If your rows contain a formula, you must be extra careful when constructing the formula. Be sure that after a Sort, the formula will still work. Moving cells around can destroy some formulas.
|
 |

Where you are:
JegsWorks >
Lessons >
Numbers
Before
you start...
Project 1: Excel Intro Project 2: Excel Basics
Getting Started
Arrange

 Sort Sort
 Columns Columns

 Rows Rows

AutoFill
Finish
Summary
Quiz
Exercises
Project 3: Format & Arrange
Project 4: Groups & Formulas
Project 5: Design
Search
Glossary
Appendix
|
|
Buttons

Excel allows you to sort in regular alphabetic order and in reverse order with
the buttons Sort Ascending and Sort Descending.
You can sort whole rows or sort just selected cells, based on the first column of the selection. Of course, if your data consists of rows of related facts, sorting by whole rows is safer. Your records can easily get
scrambled otherwise!
Dialog
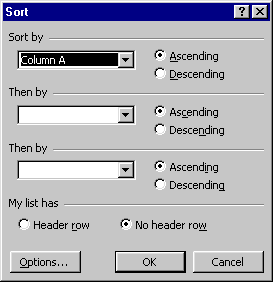 The Sort dialog is more flexible than
sorting with the toolbar buttons.
The dialog allows you to select which column(s) to use as the basis of the Sort. The Sort dialog is more flexible than
sorting with the toolbar buttons.
The dialog allows you to select which column(s) to use as the basis of the Sort.
You can set three levels of Sort. Excel will first sort all
the selected rows based on the first column you chose. Then Excel sorts rows
that all had the same value in that first Sort column, using the second column
you chose. Finally Excel sort rows that had the same first and second sort
column values, using the third column you chose.
Example: You have lists of names where each part
of the name is in its own cell - First Name, Middle Name, Last Name.
To put the names in correct alphabetical order, you could use a three column
sort in the order Last Name, First Name, Middle Name.
There are some Custom Lists that are useful
when you want to sort by Days of the Week or Months of the Year.
In most languages, arranging the days of the week or the months in alphabetic
order is not much help! You want the order that they are on the calendar!
You can also create your own Custom List under | | when the order you wish to sort
by is neither alphabetic nor reverse alphabetic. These occur more often than is
convenient!
 |
Step-by-Step: Sort |
 |
What you will learn: |
to sort selected cells
to sort rows
to sort alphabetically
to create a custom list and sort with it
|
Start with:
 trips.xls
(created in previous lesson) trips.xls
(created in previous lesson)
Sort: Button
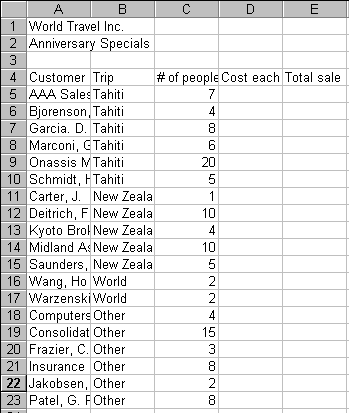
- Open trips.xls from your Class disk.
- Select rows
5 - 23, which contain the records of trips sold. (Be sure to select whole
rows.)
- Click on
 the Sort Ascending button on the Standard toolbar.
The selected rows are sorted in alphabetic order based on the first column.
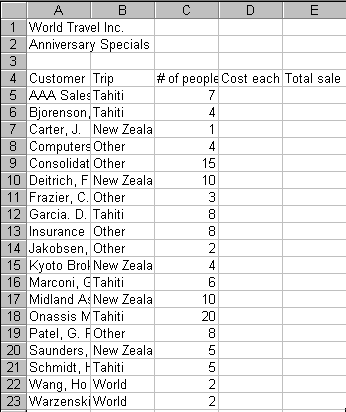
An alphabetic listing of customers would be useful for many tasks. There are other useful sorting
orders, however.
- Undo.
Sort: Sort Dialog
- If necessary, select again the data rows- Rows 5 - 23.
-
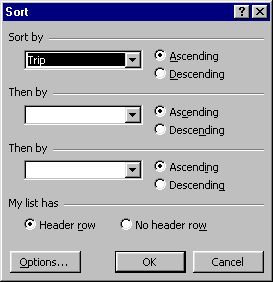 Select | The Sort dialog opens.
By default, at the bottom Header row is selected. So, Excel assumes that the first row you selected contains labels for the columns.
These labels are listed in the drop lists to help you pick out which columns
to use for sorting. Select | The Sort dialog opens.
By default, at the bottom Header row is selected. So, Excel assumes that the first row you selected contains labels for the columns.
These labels are listed in the drop lists to help you pick out which columns
to use for sorting.
- In the Sort by text box select from the drop list
Trip and click on Ascending. Leave the other text boxes blank.
This time you will sort just on the Trip column.
Be sure Header row is selected. (the default)
-
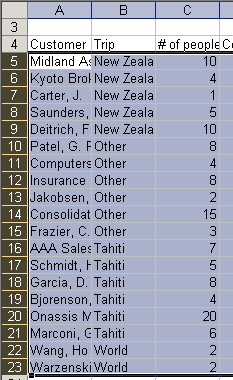 Click on OK. The selected rows are sorted, grouping rows with the same value in the Trip column. Click on OK. The selected rows are sorted, grouping rows with the same value in the Trip column.
This alphabetic order of trips seems awkward. It would be more useful to have the Special Offers all together
and the Other category at the end. Other is for all the trips that weren't one of the
Special Offers.
Also, it would feel more natural to sort the trips in the order they appeared on the announcement
flyer. So the order we want is: Tahiti, New Zealand, World, Other. You will need to create a Custom List.
Create Custom List
- Select from the menu | | .
- Click in the List entries box. The cursor appears in the List entries box.
-
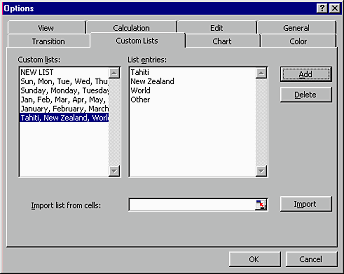 Type the Trip categories as shown. Use the
ENTER key to create a new line. (If you are sharing this computer with other
students, this custom list may already be there.) Type the Trip categories as shown. Use the
ENTER key to create a new line. (If you are sharing this computer with other
students, this custom list may already be there.)
Tahiti
New Zealand
World
Other
- Click on the Add button to add this list to the Custom lists box on the far left.
- Click the OK button to close the dialog.
Sort: Custom List
-
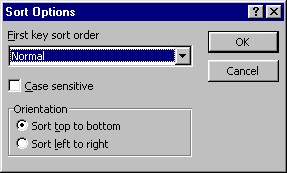 With Row 5-23 still
selected, again open the Sort dialog. ( Data |
Sort ) With Row 5-23 still
selected, again open the Sort dialog. ( Data |
Sort )
- Click on the Options button. The Sort Options dialog opens.
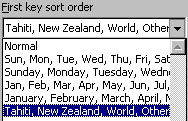
- Select from the drop list, the custom list of trips: Tahiti, New Zealand, World, Other.
- Leave Orientation set at Sort top to bottom and click on OK.
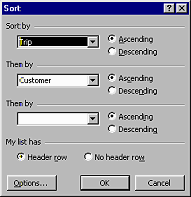
- Select for the second text box Customer. Make sure the Sort dialog is still showing Trip in the first text box and Header row is selected. Click on OK.
The selected rows are now sorted in the order of the Custom List so the
different trips are grouped together. The Customers for each trip are listed alphabetically.
How neat!
 Save
As trips2.xls . If you use the Save
button, the file you saved before is overwritten. Normally that would be fine,
but sometimes you wish later that you could go back to the previous version.
You will be instructed to save the results of each lesson under a new
name. Save
As trips2.xls . If you use the Save
button, the file you saved before is overwritten. Normally that would be fine,
but sometimes you wish later that you could go back to the previous version.
You will be instructed to save the results of each lesson under a new
name.  How to handle a full disk How to handle a full disk
   
~~ 1 Cor. 10:31 ...whatever you do, do
it all for the glory of God. ~~
Last updated:
02 May 2012 |

![]()
![]() trips.xls
(created in previous lesson)
trips.xls
(created in previous lesson)
 Select | The Sort dialog opens.
By default, at the bottom Header row is selected. So, Excel assumes that the first row you selected contains labels for the columns.
These labels are listed in the drop lists to help you pick out which columns
to use for sorting.
 Click on OK. The selected rows are sorted, grouping rows with the same value in the Trip column.
 Type the Trip categories as shown. Use the
ENTER key to create a new line. (If you are sharing this computer with other
students, this custom list may already be there.)
 With Row 5-23 still
selected, again open the Sort dialog. ( Data |
Sort )

