
Jan's Working with the Web
HTML & CSS Basics: Exercise Web 2-4
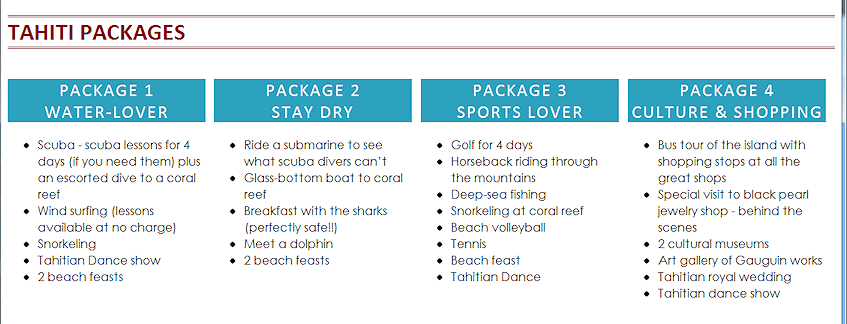
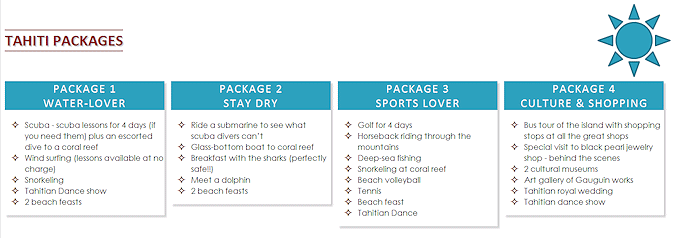
In this exercise you will take the text from a Word document and use it to create a web page. You will duplicate a lot of the formatting of the original. You will position and format sections of the page into side-by-side columns. You will be using part of the trip planner document from Working with Words: Project 2 - the list of special packages available for the Tahiti trip that World Travel Inc. is offering for its 10th Anniversary
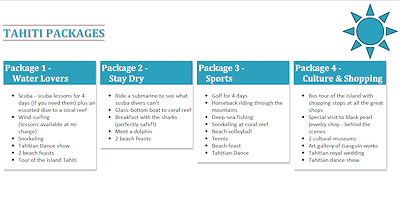
Original Formatting
The original Word document had a lot of formatting that you can duplicate. What formatting features do you see?
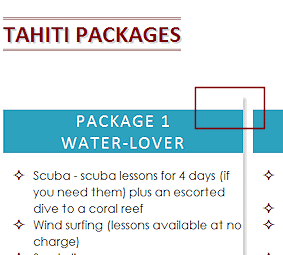
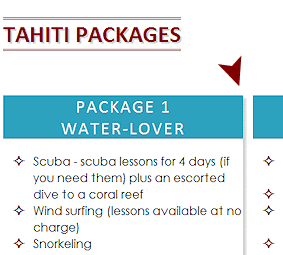
- Positioned image
- Heading: color, top and bottom border, all caps, font Calibri
- Package headings: font Calibri, small caps, white text, background color
- Bullet lists with a symbol for the bullet, font Century Gothic
- Columns
You can duplicate everything there! It will be easier and will look better to put the packages into side-by-side columns instead of two columns for each package list. This will let viewers compare the activities in each package without having to scroll. We could have done of that for the original!
Exercise Web 2-4: Position Columns
| What you will do: | Use text to create a new web page Use CSS to format text, elements, DIVs, list Use positioned DIVs to arrange text into side-by-side columns Print in Landscape orientation with @media print formatting Use multiple selectors for the same style |
Start with: ![]() Notepad, resource files
Notepad, resource files
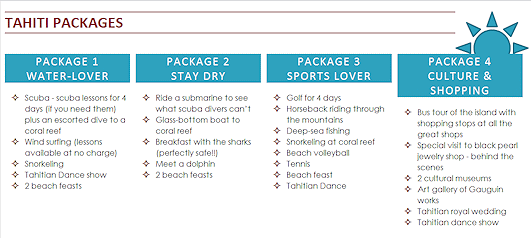
You will start with a web page that already has the descriptions of the four tour packages that are available for the Tahiti trip. You will finish with the four packages lined up side-by-side across the page. Along the way you will add formatting. Some styles will duplicate the formatting of the original page but others will be fresh. You will see several new CSS properties.
Create Web Page
-
 In File Explorer, create a new folder on your Class disk in the web project2 folder and name it tahiti.
 - Open a blank document in Notepad.
-
Save As ex4-tahiti-Lastname-Firstname.htm to the new tahiti folder.
-
Add the required tags for a web page and then type the text below between the opening and closing BODY tags.
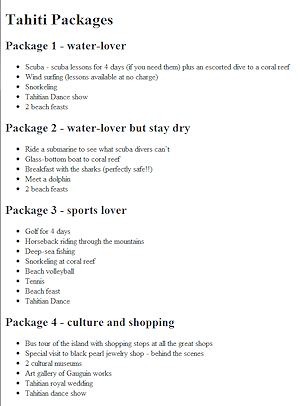
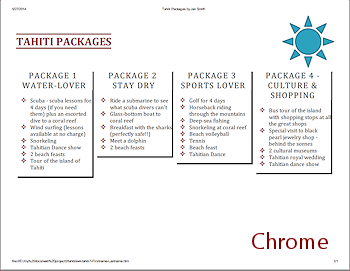
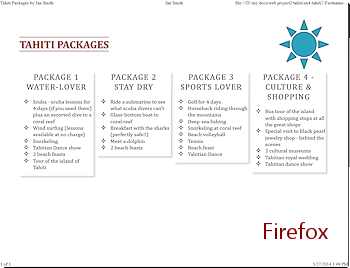
(The Package titles have been shortened compared to the original Word doc to fit better in the columns you will create.)Tahiti Packages
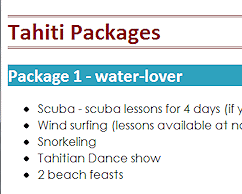
Package 1 - water-lover
Scuba - scuba lessons for 4 days (if you need them) plus an escorted dive to a coral reef
Wind surfing (lessons available at no charge)
Snorkeling
Tahitian Dance show
2 beach feasts
Tour of the island of Tahiti
Package 2 - water-lover but stay dry
Ride a submarine to see what scuba divers can’t
Glass-bottom boat to coral reef
Breakfast with the sharks (perfectly safe!!)
Meet a dolphin
2 beach feasts
Package 3 - sports lover
Golf for 4 days
Horseback riding through the mountains
Deep-sea fishing
Snorkeling at coral reef
Beach volleyball
Tennis
Beach feast
Tahitian Dance
Package 4 - culture and shopping
Bus tour of the island with shopping stops at all the great shops
Special visit to black pearl jewelry shop - behind the scenes
2 cultural museums
Art gallery of Gauguin works
Tahitian royal wedding
Tahitian dance show
-
 Add the following HTML
tags:
Add the following HTML
tags:-
<title>Tahiti Packages by Your Name</title> (using your own name, of course)
-
H1 around the line "Tahiti Packages"
-
H2 around each "Package" line
-
Bullet list for each package using UL and LI tags
-
-
Save.
[ex4-tahiti-Lastname-Firstname.htm] -
Open the new page in your browser.
This is a plain page that uses the default fonts. There is a lot of white space.
Format Page
The first goal in formatting this page is to duplicate the original formatting as closely as possible. That's not always a good plan since what works well in print does not always work well on a screen. We will just have to wait and see how it works out for this document.
-
Switch back to the web page ex4-tahiti-Lastname-Firstname.htm in Notepad.
-
Save As ex4-tahiti2-Lastname-Firstname.htm to the new tahiti folder.
-
Create a STYLE section in the document's HEAD.
-
Add a BODY style with font-family:"Century Gothic", Calibri, Arial, Helvetica, sans-serif;
The original document used the font Century Gothic for the lists. That font comes with Office, so many computers have it. But not all! Calibri is one of Microsoft's new fonts, so many computers will have it.
-
Add a H1 style to set the font, color, and a double border top and bottom:
font-family:Calibri, Arial, Helvetica, sans-serif;
color:darkred;
border-bottom:medium double darkred;
border-top:medium double darkred;
Note: To get a double border you must use a width that gives enough space for the two lines. "Thin" won't do!
-
Add a H2 style to set the font and color:
font-family:Calibri, Arial, Helvetica, sans-serif;
color:white;Now we need to figure out what that background color is behind the Package titles is in Word. Otherwise we will have white text on a white background!
It's not one of the named colors. It matches the inside color of the sun image. Paint to the rescue!
-
Find Color Values Using Paint:
-
In File Explorer, right click on the file sun.gif in your web project2/HTML/Exercises folder.
-
In the context menu hover over Open with... and then click on Paint.
The image opens in Paint. -
Click on the Color Picker tool (eye dropper) and click in the middle of the sun shape.
The color is now on the palette as Color 1. -
Open the Edit Colors dialog and, if necessary, click on the button Define Custom Colors to expand the dialog to show the rainbow palette.
The colors RGB values show at the right of the dialog.
-
-
 Add to the H2 style the background-color property, using the RGB values you
found.
Add to the H2 style the background-color property, using the RGB values you
found. -
Save.
[ex4-tahiti2-Lastname-Firstname.htm] -
Switch to your browser and edit the Address box to show the new version, tahiti2, and press ENTER.
The new version loads. -
Inspect and fix any errors.
 Problem: Browser did
not use all of your
styles
Problem: Browser did
not use all of your
stylesSolution 1: Check the code for the styles for spelling or punctuation errors, especially for missing braces, quotes, or semi-colons.
Solution 2: If the first font named is not used, check what fonts are installed on your computer with one of the following methods:
-
Open Word and scroll through the drop list of fonts.
OR -
Open File Explorer to the folder C:\Windows\Fonts and look through the list of installed fonts.
-
- Evaluate: What do you think of the style choices? Font, font size, color, background color, border?
New CSS Properties
There are many, many CSS properties that you have not seen yet. You will use some new ones now to continue formatting the web page to look like the original Word document.
-
Switch back to Notepad.
-
Save As tahitipackages3-Lastname-Firstname.htm to the tahiti folder.
- Edit the H1 style to add a property to turn the text into all capital letters
automatically:
text-transform:uppercase;Other values for text-transform are "lowercase" and "capitalize" (which makes the first letter of every word a capital letter).
-
Add to the H2 style a property to make all letters uppercase:
 Add to the H2 style properties to spread the
letters apart and be normal weight instead of bold:
Add to the H2 style properties to spread the
letters apart and be normal weight instead of bold:
letter-spacing:2px;
font-weight:normal;-
Save.
[ex4-tahiti3-Lastname-Firstname.htm] - Switch to your browser, edit the file name, Refresh, and inspect.
Did all of your styles get used? Arial makes the Package titles much wider than Calibri, the first font in the font-family.
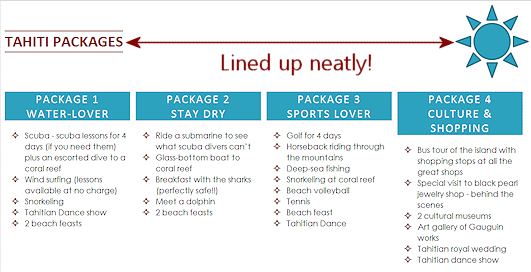
Create Columns
Since most monitors are now quite wide, this page is a good candidate for putting the packages into separate columns with positioning.
Recall that you need a container DIV plus a positioned DIV for each positioned list.
-
Switch back to Notepad.
-
Save As ex4-tahiti-4-Lastname-Firstname.htm to the new tahiti folder.
-
Add a DIV with attribute id="packages" that surrounds all of the Package headings and lists.
-
In the STYLE section, add a style for #packages that sets a relative position, 100% width, top and left at 0px.
This style creates the container of the positioned DIVs that create the effect of columns. - Surround each
package section with a DIV, with IDs of package1, package2,
package3, and package4.
These DIVs will be positioned absolutely within the container DIV.Thinking about how to create four same-width columns:
Each column needs to be a little bit narrower than 25% of the available width. The tops need to level with each other at zero pixels. So you will need to set an absolute position and 24% width for all four package DIVS. Each DIV needs a different LEFT position, which is a percent that scoots each package over enough to clear the previous columns and leave a bit of empty space. By using percentage widths, the columns will resize as the window is resized. If you set the width in pixels, the columns cannot resize at all. Sometimes that is what you want! -
In the STYLE section, add the style:
#package1 {This puts the first package list at the top left of the container DIV.
position:absolute;
left:0px;
top:0px;
width:24%;
}
-
Similarly, add styles for the other three packages with the same properties except that the LEFT values should be 25%, 50%, and 75%. This will leave 1% as white space between DIVs and 1% at the right of the fourth DIV.
-
Save.
[ex4-tahiti4-Lastname-Firstname.htm] - Switch to your browser and view the new version.
Did all of the styles get used? What can be improved?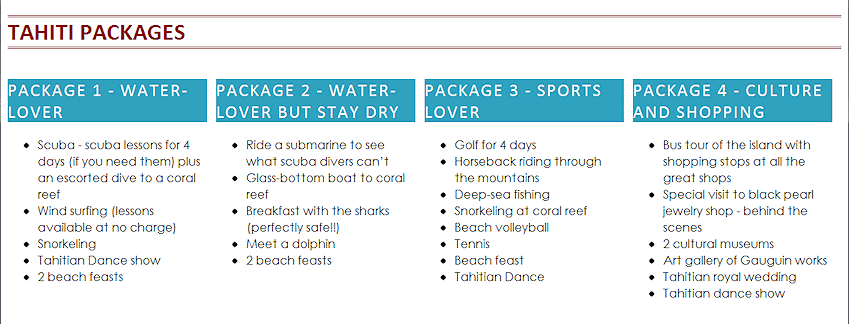
The wrapping looks odd and the package titles look crowded. How would you improve this?
How about breaking the heading into two lines, removing some of the text so all will fit, and centering within the column?
-
Switch back to Notepad.
-
Edit the package titles as follows, adding a line break and removing some text:
Package 1<br>water-loverRemember that the text-transform property is handling the capitalization.
Package 2<br>stay dry
Package 3<br>sports lover
Package 4<br>culture & shopping
- Edit the style for H2 to include the property text-align:center;
-
Save.
[tahitipackages4-Lastname-Firstname.htm] -
Switch to your browser and Refresh.
-
Resize your browser window to be wider and then narrower.
What happens to the columns and column titles? Is this acceptable? It is rare to have an arrangement that works great at EVERY window size. We must compromise!
Images
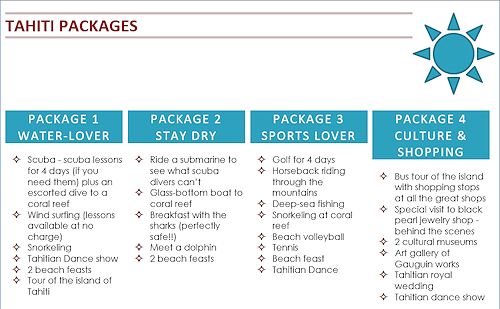
There are two features of the original document that you have not duplicated yet - the bullet symbol and the sun image logo.
Bullet Symbol: HTML only has 3 basic bullets
available, ![]() , a solid disc, an open circle, a
solid square. But, you can use an image as a bullet. That's what you will
have to do to change the bullet to a 4-pointed red star
, a solid disc, an open circle, a
solid square. But, you can use an image as a bullet. That's what you will
have to do to change the bullet to a 4-pointed red star ![]() .
.
Sun: It is easy enough to add the image, but getting it to line up with the H1 with the sun's middle ray pointing to the middle of the H1 text is trickier.
-
In File Explorer, copy the files bullet-star.gif and sun.gif from your resource files or the Exercises folder on your Class disk and paste to the tahiti folder on your Class disk.
-
Note the actual width and height of the sun image.
-
Switch to Notepad.
-
Save As ex4-tahiti5-Lastname-Firstname.htm to the tahiti folder.
-
Create a style for the list items, LI which has the following property:
li {
list-style-image:url('bullet-star.gif');
}
Be careful when formatting lists for web pages that you really want to format ALL lists that way. You can always create a class instead of formatting the LI tag.
-
Add an IMG tag for the sun image above the H1 element. Include the width, height, an ALT attribute, a TITLE, and a STYLE attribute that floats it on the right.
-
Save.
[ex4-tahiti5-Lastname-Firstname.htm] -
 Switch to your browser and edit the Address to show the new version, and Refresh.
Whoops. The bullets are fine and the image floats at the right. But, the sun image is partially hidden by the positioned DIV for package 4. That's what is supposed to happen by default, but it's not what needs to happen for this page.
In addition, the middle sun ray is not pointing at the title, Tahiti Packages, like it did in the original document.
Happily, you can use positioning to fix all of these issues!
Position Sun Image
The Plan: You will create a new positioning container for the H1 element and the IMG element so that you can position those elements precisely. You will pick the height of this DIV to keep the sun off the package lists below. The DIV must be tall enough to hold the whole image (147 x 147) and allow a little bit of space below the image. Then you will create positions for the H1 and IMG tags inside the container.
-
Switch back to Notepad.
-
Add a DIV named "heading" that surrounds the source code for the image and the H1 element.
This will be the container element for the elements you will position. -
In the STYLE section, add a style for this DIV:
div#heading{
position:relative;
height:155px;
}The default values for TOP and LEFT are zero pixels, which is fine.
-
Save.
[tahitipackages5-Lastname-Firstname.htm] -
 Switch to your browser and Refresh.
Better! No more overlapping. But that sun ray is still not lined up with the middle of the heading.
You need to move the heading down on the page to get the alignment we are looking for.
-
Switch to Notepad.
-
Edit the H1 style to add:
position:absolute;
left:0px;
top:30px;The value 30px was found by experimenting.
-
Save.
[tahitipackages5-Lastname-Firstname.htm] -
 Switch to your browser and Refresh.
Now the sun's middle ray is pointing at the middle of the heading text.
It is interesting that getting the sun in this position keeps the H1 border from extending past the text. Unexpected!
Shadows
CSS has two kinds of shadows - text and box. You will use one to create a shadow for the H1 text and the other to shadow the DIVs for the lists, like they were cards floating on top of the web page. It's a cool effect. IE9 and earlier won't render either one!
Both types of shadow have the same syntax. They require you to set the horizontal and vertical shadow distances. You may also set the blur and spread for the shadow, its color, and whether to inset it (an inside shadow instead of outside the object).
Syntax: box-shadow: h-shadow v-shadow blur spread color inset;
-
Switch to Notepad.
-
Save As ex4-tahiti6-Lastname-Firstname.htm to the new tahiti folder.
-
 Edit the H1 style to include the property
text-shadow:2px 2px 2px lightgray;
-
Edit each of the package styles to include the property box-shadow:4px 4px 4px lightgray;
-
Save.
[ex4-tahiti6-Lastname-Firstname.htm] -
Switch to your browser and Refresh.
Hmmm. The shadow starts higher than the H2 background color. That's because a heading element has a built-in margin and background does not show in the margin. You just need to remove the default margin by setting a 0px top margin of your own.
-
Switch to Notepad.
-
Add to the style H2 the property margin-top:0px;
-
 Save.
Save.
[ex4-tahiti6-Lastname-Firstname.htm] - Switch to your browser and Refresh.
- Inspect the page and fix any
errors.
The package headings have white text on a colored background. Backgrounds don't print, by default. What will your browser do with that white text? White on white would not show! You could let the browser figure it out, but it is probably better to create an @media print section to control exactly how this page prints.
For practice, you will also change the fonts for printing.
-
Open Print Preview in your browser.
Change to Landscape orientation.
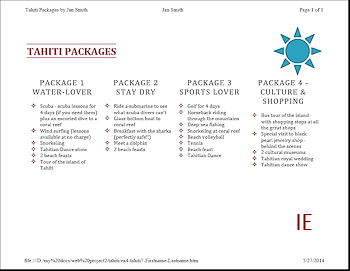
The three browsers do not quite agree on how to handle the white text.
 IE: Has text shadow but not box shadow. White text is gray.
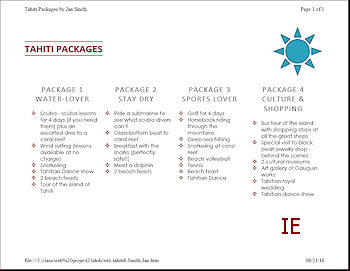
 Chrome: No text shadow. Box shadow is not blurred. White text
is light gray.
Chrome: No text shadow. Box shadow is not blurred. White text
is light gray.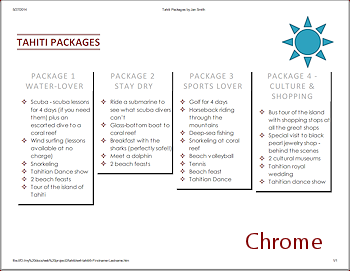
 Firefox: Both shadows show. White text is black.
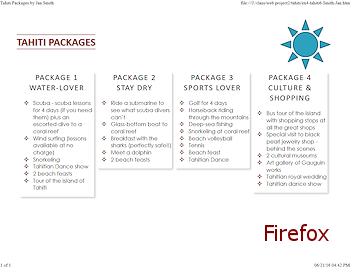
- Switch back to Notepad.
- Create a @media print section in the internal style sheet.
- Multiple selectors for same style: In the @media print section, add styles for BODY,
H1, H2 that change the fonts used:
body, h1, h2 {font-family:Cambria, Georgia, Times, serif;}
Note: Separate selectors with commas to apply the same properties to several selectors at once. This is very handy when there are several properties that should be the same for several selectors or when the property is complicated.
- Set the color for H2 separately in the @media print section, with h2 {color:#000000;} which is the HTML code for
black.
- Save As ex4-tahiti7-Lastname-Firstname.htm to the tahiti folder.\
-
Switch back to your browser, edit the Address box to show the new name and press ENTER.
There is no change in the browser's display of the page. Your changes only apply to Print Preview. -
Open Print Preview and make sure your changes are applied - new serif fonts and black text for H2 headings.
-
 Print.
Be sure you are printing in Landscape orientation.
|
|
| © 1997-2017 Jan Smith All Rights Reserved |
Site Map What's New |
Privacy Policy Terms of Service Copyright Acknowledgements |
~~ 1 Cor. 10:31 ...whatever you do, do it all for the glory of God. ~~
Last updated: March 27, 2017
You need some resource files to create the web pages in the exercises. If you have not already installed these on your Class disk, do so now.
Individual files can be downloaded as you need them from http://www.jegsworks.com/Lessons/resources/web resources/HTML/Exercises/ They should be saved to your Class disk in the folder
<drive for Class disk>:\classs\web project2\Exercises