
Jan's Working with the Web
Images: Align Image
You learned in the previous lesson how to align or float an image to get text to wrap around it and how to include white space around the image. You haven't actually done that yet! Also, how do you turn off wrapping? There's an old way and a new way, of course!
Line Wrapping in Large Windows
Viewing your HTML pages in different window sizes can often reveal unhappy surprises. For example, at 640 x 480 or smaller, a paragraph might neatly start on the left margin below an image. But at 800 x 600 or larger, the heading is wrapping to the right of the image! You can (and should!) find and fix the problem, even if your own monitor cannot hold a window large enough to show the problem.
Stop Text Wrapping
 This paragraph is
wrapping around the balloons that float at the left. The next
paragraph has a
STYLE attribute that stops text wrapping. The text jumps down below anything that floats at the left. In this case that is the balloons and the ad at the left. Cool feature!
This paragraph is
wrapping around the balloons that float at the left. The next
paragraph has a
STYLE attribute that stops text wrapping. The text jumps down below anything that floats at the left. In this case that is the balloons and the ad at the left. Cool feature!
You have three choices, depending on which margin your image is on or whether you have images or other floating objects on both sides.
-
Old HTML way: Add a CLEAR attribute to the BR (break) tag.
- <br clear="left">
- <br clear="right">
- <br clear="all">
-
New CSS way: Add a STYLE with a CLEAR property to the first tag that you do not want to wrap around the image.
- <br style="clear:left">
- <p style="clear:right">
- <h2 style="clear:both">
The attribute clear="all"or style="clear:both" pushes the text down below anything aligned/floating on either margin.
| |
Step-by-Step: Align & Space Images |
|
| What you will learn: | to add image to page to float and space image to stop text wrapping to center image |
Start with: ![]() , hector11-Lastname-Firstname.htm, resource
files
, hector11-Lastname-Firstname.htm, resource
files
The bottom part of Hector's page looks bare. You will insert some images to make it more interesting and then set the alignment and spacing for a more attractive look.
The screenshots of HTML code are going to be from EditPad Pro 7. I ran HTML Tidy earlier to get neat indentions. The color coding and indentions should make the HTML code easier to read and edit. Keep in mind that the wrapping depends on the window's size. If you are using Notepad or another editor, you won't see the same colors or indentions.
Insert Image
 Save the page with the name hector12-Lastname-Firstname.htm in the web project2 folder of your Class disk.
- Put your cursor at the right of the DD tag under Travel.
- Type an IMG tag for
the image travel.gif that is in the web/HTML folder on your Class disk.
<dl>
<dt>Travel</dt>
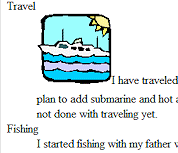
<dd><img src="HTML/travel.gif" width="100" height="94" alt="Icon: Travel">I have traveled to 14 countries on three continents. I have traveled by plane, helicopter, train, ship, car, bus, and canoe. I plan to add submarine and hot air balloon to the list. I have not seen <a href="http://touregypt.net/"><img src="HTML/pyramids2.gif" width="37" height="17" alt="Icon: Pyramids of Egypt" title="Link: TourEgypt.net"></a> <a href="http://touregypt.net/">the pyramids in Egypt</a> or <a href="HTML/china.jpg"><img src="HTML/china2.jpg" width="31" height="20" alt="Icon:The Great Wall of China" title="Photo: Great Wall of China"></a> <a href="HTML/china.jpg">the Great Wall of China</a>, so I am not done with traveling yet.</dd>Be sure to include the dimensions and appropriate ALT text. (You should know how to do this now!)
-
Save.
[hector12-Lastname-Firstname.htm] -
 Switch to your browser and change the Address bar to show the edited page, hector12-Lastname-Firstname.htm.
The bottom of the image lines up with the baseline of the text. This does not look very nice.
Float and Space Image
Now that you have an image in place, it is time to use some of what you learned in the last lesson about aligning images.
-
Switch back to your HTML code editor.
- Edit the IMG tag for travel.gif to add an inline style:
<img src="HTML/travel.gif" style="float:left" width="100" height="94" alt="Icon: Travel">
-
 Save.
Save.
[hector12-Lastname-Firstname.htm] - Switch back to your browser and Refresh.
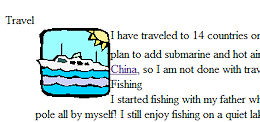
The text now wraps around the image, but is bumping up against the text.
- Switch back to your editor.
- Add to the STYLE tag to add spacing at the right of the image:
<img src="HTML/travel.gif" style="float:left;margin-right:4px" width="100" height="94" alt="Icon: Travel">
- Save.
[hector12-Lastname-Firstname.htm] 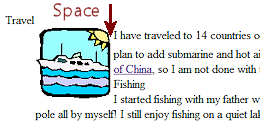 Switch back to your browser
and Refresh.
Switch back to your browser
and Refresh.
The image is pushed away from the text just a bit. Success!
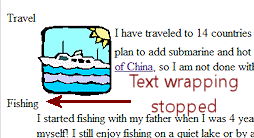
Stop Text Wrapping
In the illustration above the section for Fishing starts beside the image travel.gif. Whoops. We need that section to start below that image. You must put in a style that stops the text wrapping.
-
 Switch back to your
HTML editor.
Switch back to your
HTML editor. -
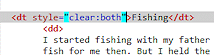
In the DT tag before the word Fishing, add style="clear:both"
-
 Save.
Save.
[hector12-Lastname-Firstname.htm] -
Switch back to your browser and Refresh.
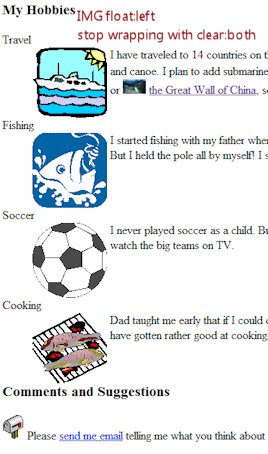
The word Fishing and its paragraph is back where it belongs at the left below the Travel paragraph and image.
Add More Images
Next you will add images for each of the other items in Hector's list: Fishing, Soccer, and Cooking.
-
At the left of the paragraph that follows the heading Fishing, add an IMG tag for:
-
fish.gif that is in your web/HTML folder.
-
the exact dimensions
-
appropriate ALT text
-
float left
-
margin-right of 4 pixels
-
-
Make the text stop wrapping after Hector's paragraph on Travel:
Add style="clear:both" to the DT tag that follows (Soccer).
- Continue, adding ball.gif beside the Soccer paragraph and grill.gif beside the Cooking paragraph.
-
Make the text stop wrapping so that each image is beside only its own paragraph.
Your HTML code may be laid out differently, depending on what editor you are using and the window size.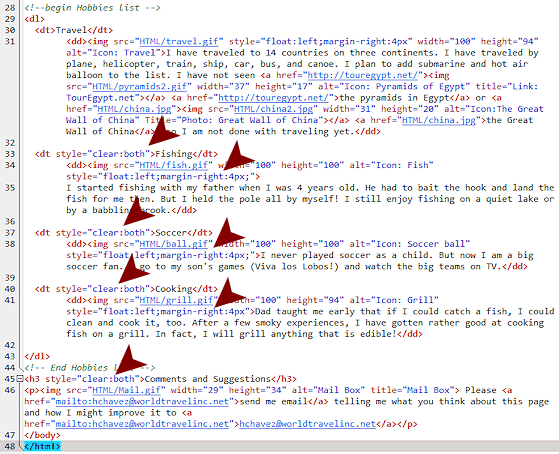
HTML code to float the images at left and to stop text wrapping (EditPad Pro 7)
-
Save.
[hector12-Lastname-Firstname.htm] -
 Switch to your browser and Refresh.
All of the new images should be floating at the left. The text about each hobby should wrap around the matching image only.
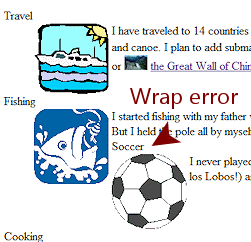
 Problem: Images and/or text continue to wrap
Solution: Add style="clear:both" to the first tag that should not wrap.
Center Images
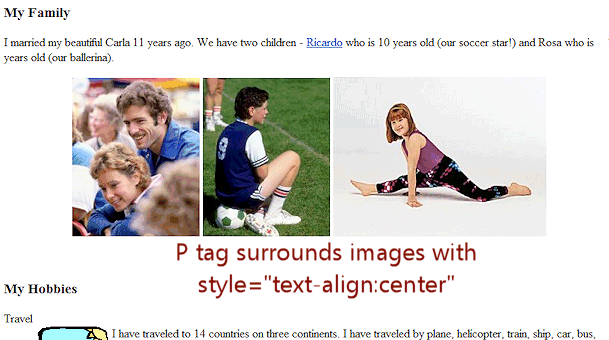
The FLOAT attribute does not have a choice that centers an image on the page. To center an image on the page you must center the whole paragraph that contains the image. Awkward!
- Switch back to your HTML editor.
- Move your cursor to the left of the IMG tag for the image of Hector and Carla.
- Delete the non-breaking spaces you put in earlier.
- Add a paragraph tag that surrounds the three IMG
tags.
-
Edit the P tag to add style="text-align:center"

-
Save.
[hector12-Lastname-Firstname.htm] -
Switch to your browser and Refresh.
The whole paragraph is centered horizontally, so all three images are centered as a group. If the window is too narrow for all three, the last one moves down below, but it is still centered.
|
|
| © 1997-2017 Jan Smith All Rights Reserved |
Site Map What's New |
Privacy Policy Terms of Service Copyright Acknowledgements |
~~ 1 Cor. 10:31 ...whatever you do, do it all for the glory of God. ~~
Last updated: March 22, 2017