
Jan's Working with the Web
HTML Code: List
There are several ways to create a list with HTML. A list can use bullet symbols or numbers, with a variety of types for each.
Or, a description list can be arranged as terms and descriptions. The term is on a line by itself. The
description starts on the next line and is indented. In HTML 4 and earlier this kind of list was called a definition list. Other types exist but
are being phased out. These three are enough to handle most of your needs.
| Bullets | Numbers | Descriptions |
|---|---|---|
|
|
|
Code for Lists
In the steps below you will practice with three basic types of lists.
A bulleted or numbered list requires two kinds of tags -
-
a tag pair that starts and stops the list - either:
<ul> </ul>for an unordered list using bullets
or
<ol> </ol>for an ordered list using numbers
<li> </li>for each list item in either kind of list
A description list needs three different tags -
-
<dl> </dl>to start and end a description list -
<dt> </dt>for each term -
<dd> </dd>for each description of the term.(Yes, a term might have more than one description or definition, like many dictionary words do.)
All of the listed items must come between the start and close tags for the whole list. A logical arrangement! The ending tags for DT and DD were optional in HTML 4. But, if you have lists inside of lists, it is important to close all the tags to keep the browser from getting confused.
Fonts for Code
Programming code is usually viewed in some kind of monospaced font. In this kind of font every character takes the same amount of horizontal space, like typewriter characters do. (Have you ever actually typed on a typewriter??)
Using a monospaced font makes it easier to read each character, especially punctuation, when you are looking for a typing error.
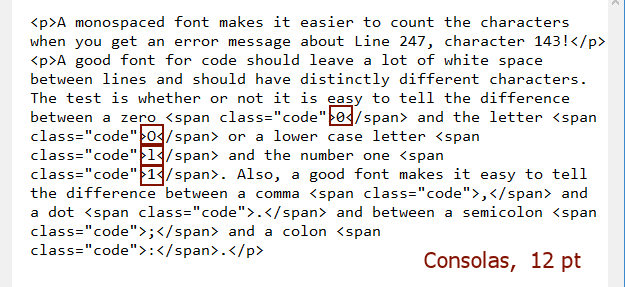
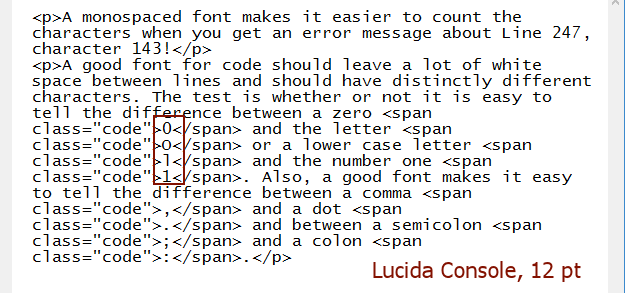
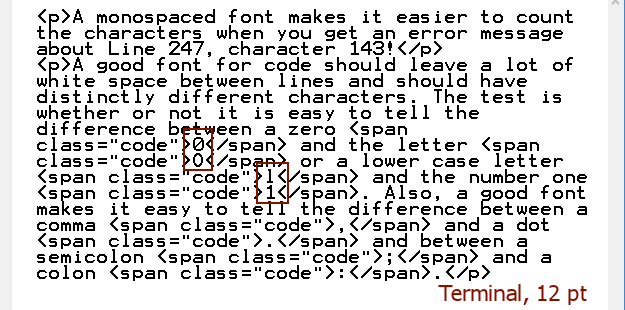
A monospaced font makes it easier to count the characters when you get an error message about Line 247, character 143!
A good font for code should leave a lot of white space between lines and should have distinctly different characters. The test is whether or not it is easy to tell the difference between a zero 0 and the letter O or a lower case letter l and the number one 1. Also, a good font makes it easy to tell the difference between a comma , and a dot . and between a semicolon ; and a colon :.
Examples of Monospaced Fonts:
Inspect the examples below. The key characters (number zero, letter O, letter l, and number 1) have been marked.
Which font has the best line spacing? the best character differences?
The original code was aligned while in the font Consolas and then formatted with the other fonts with word wrap turned on. This changes the way the text wrapped in the window. You can tell better this way which font will take more space on the screen and on a print out.

| |
Step-by-Step: Create & Modify a List |
|
| What you will learn: | to configure Notepad to create an HTML document in Notepad to create a bulleted list to print source code and HTML page to create a numbered list to create a terms and definitions list |
Start with: ![]()
![]()
Starting with this lesson you will build a web page for Hector Chavez. You will be working directly with the HTML code. No fancy editors needed! You can do it yourself!!
Configure Notepad
 Open Notepad or another plain text editor to a new blank document.
(DO NOT try to use a word processing program like Word for this lesson! Anything besides a plain text editor will add hidden characters that will totally confuse a browser.)
-
 Click on on
the Menu bar and then on .
Click on on
the Menu bar and then on .
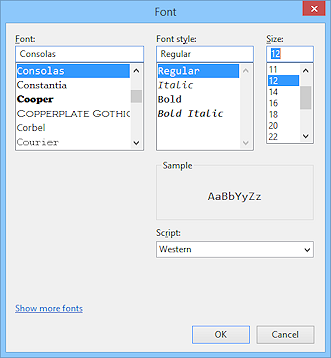
The Font dialog opens.
- If necessary, select the Font Consolas and the Font Size 12.
(It does not really make a difference, but these are the settings used in the illustrations.) Problem: Consolas is not in list
Consolas is a font that comes with recent versions of Windows and of Microsoft Office. It is also available in the free PowerPoint 2007 Viewer!Solution 1: Download PowerPoint 2007
Viewer .
.
Solution 2: Use a different font of your choice or your teacher's choice.
You almost certainly have some kind of monospaced font on your computer like Courier or Courier New, but it's your own choice. If you use a different font, your code will probably not wrap the same as the illustrations. But that is not important!
Create HTML Document in Notepad
- Type the following code to create the basic document parts,
replacing 'your name' in the TITLE tag with your own name:
<!DOCTYPE html>
<html>
<head>
<title>Home of Hector Chavez - your name</title>
</head>
<body>
</body>
</html>
-
 Save the document to the web project2 folder on your Class
disk as hector1-Lastname-Firstname.htm .
Save the document to the web project2 folder on your Class
disk as hector1-Lastname-Firstname.htm .
The full path is g:\class\web project2\hector1-Lastname-Firstnamehtm if G is the drive letter for your Class disk.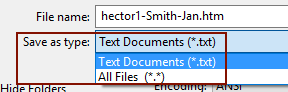
 Open and Save As dialogs: By default these dialogs only show text files (with extension txt). The HTM file you just saved won't show up! It is quite a shock when you know you have files that Notepad will open but you cannot see them! Happily, the dialog will let you change the file types box to 'All Files (*.*)'.
List: Bullets
You will now enter some text and make a list. To show a bullet in front
of each item in the list, you start the list with the tag <ul>,
from "unordered list" in English. End the list with </ul>.
Each item in the list starts with the tag <li>, from "list item" in English, and ends with </li>. The tag <li> does not actually require an ending tag but it is
a good idea as it makes it clearer to the browser what you want to see. It is likely that closing tags will required in
future HTML versions. In complex nested lists, having an ending </li> is definitely important even now.
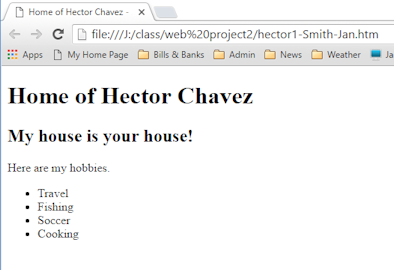
- Below the <body> tag, type as an H1 heading:
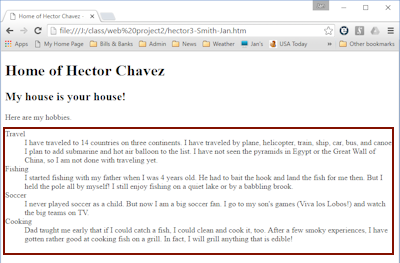
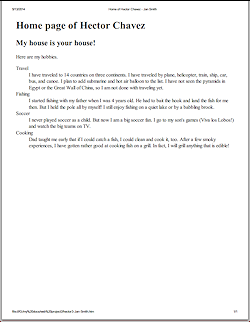
<h1>Home page of Hector Chavez</h1>
Do not forget the closing tag!
- Below the H1 heading, type the second level heading:
<h2>My house is your house!</h2>
- Below the H2 heading, type the paragraph:
<p>Here are my hobbies.</p>
- Below the paragraph, type the code below to create a bulleted
list:
<ul>
<li>Travel</li>
<li>Fishing</li>
<li>Soccer</li>
<li>Cooking</li>
</ul>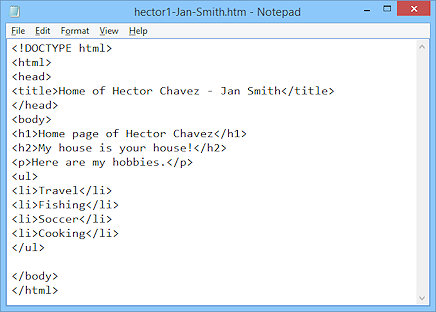
- Save.
[hector1-Lastname-Firstname.htm]
Print Source Code and HTML Page
-
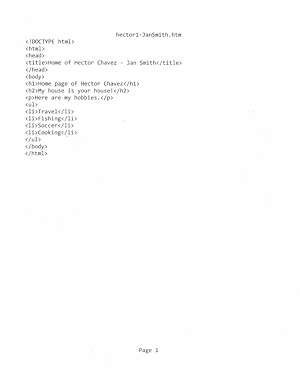
 Print the page of HTML code by choosing from Notepad Menu:
>
Print the page of HTML code by choosing from Notepad Menu:
>
The default page margins are 0.75" left and right, 1 inch top and bottom.Your own name should be in the
<title>tag and it should show in the file name in the header.
- Switch to your browser window.
- In the Address Bar of your browser, type the path
g:\class\web project2\hector1-Lastname-Firstname.htm
using your own name and the drive letter for your Class disk. - Press the ENTER key.
Your new document loads.If your page does not look right, open the page in Notepad again and check the typing of the tags. Did you close the ones that must be closed? Did you include the required tags <html>, <body>, and their closing tags? Are all the parts in the right order?
-
 Check the Print Preview for the browser.
Are the margins and header and footer acceptable?
Each browser handles the header and footer differently.
- Print the page from your browser.
List: Numbered
To number the items in a list, start the list with the
tag <ol> from "ordered list" in English. End the list with </ol>. The items in the list are the same as in the bulleted
list. You can change an existing list from bullets to numbers or vice
versa by changing the start and end tags.
- Switch back to the Notepad window.
- Replace the tag
<ul>with<ol>and the tag</ul>with</ol>.
-
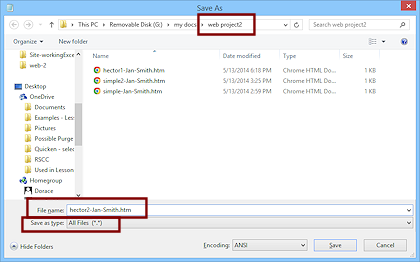 >
with the name hector2-Lastname-Firstname.htm .
>
with the name hector2-Lastname-Firstname.htm .
This will save the revised document with a new name instead of overwriting the previous version.
Remember that the Save As dialog will only display files with the extension txt unless you change the Save as type box to All Files.Since you just saved to the web project2 folder, the dialog should show the web project2 folder still. If you took a break and the correct folder is not showing, you can navigate to the correct folder or you can type in the full path g:\class\web project2\hector2-Lastname-Firstname.htm where you should replace 'g' with the correct drive letter for your Class disk and use your own name.
- Switch to your browser.
- Change the file name in the address bar to hector2-Lastname-Firstname.htm and press the ENTER key. Your revised page appears.
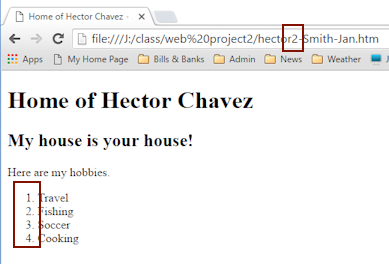 Print the page from the browser.
List: Description or Definition
In a list of definitions or descriptions, the term or phrase is on one line and the definition or description is on the next line but indented from the margin. So a description list needs three different tags instead of just two:
<dl> </dl>to start and end the list.<dt> </dt>for the term.<dd> </dd>for the description or definition of the term. This line must come immediately after the term line.
This kind of list was formerly called a definition list but was used more often for other things. So HTML5 calls this kind of list what is was being used as, a description list.
You will now add some text and change your numbered
list to a description list.
Later you will fix this up with CSS styling.
-
 Switch back to Notepad.
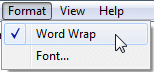
- Click on the menu and if necessary, click on to verify that Word Wrap is on. You should see a check mark beside Word Wrap.
If you don't wrap the text, the window will have to scroll sideways for the long lines you are going to type below.
- Change
<ol>and</ol>to<dl>and</dl>
- Change
<li>Travel</li>to<dt>Travel</dt>
- Move the cursor to the end of the line
and press the ENTER key to start a new line.
- Similarly, change the remaining
<li></li>tags to<dt> </dt>and create a blank line below each one.
- On the new line below
<dt>Travel</dt>type:<dd>I have traveled to 14 countries on three continents. I have traveled by plane, helicopter, train, ship, car, bus, and canoe. I plan to add submarine and hot air balloon to the list. I have not seen the pyramids in Egypt or the Great Wall of China, so I am not done with traveling yet.</dd> - On the new line below
Fishingtype:<dd>I started fishing with my father when I was 4 years old. He had to bait the hook and land the fish for me then. But I held the pole all by myself! I still enjoy fishing on a quiet lake or by a babbling brook.</dd> - On the new line below
Soccertype:<dd>I never played soccer as a child. But now I am a big soccer fan. I go to my son's games (Viva los Lobos!) and watch the big teams on TV.</dd> - On the new line below
Cookingtype:<dd>Dad taught me early that if I could catch a fish, I could clean and cook it, too. After a few smoky experiences, I have gotten rather good at cooking fish on a grill. In fact, I will grill anything that is edible!</dd>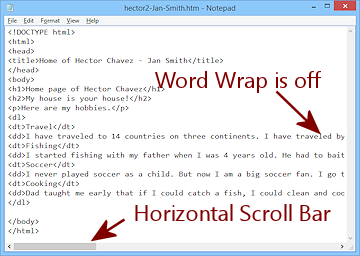 Word Wrap: When Word Wrap is off, your lines
run off to the right until you start a new line!
Word Wrap: When Word Wrap is off, your lines
run off to the right until you start a new line! -
 From the menu select > and use the name hector3-Lastname-Firstname.htm for the filename.
This will save the revised document with a new name instead of overwriting the previous version.Since you recently saved to the web project2 folder, the dialog should show the web project2 folder still. If it does not, you may type in the full path g:\class\web project2\hector3-Lastname-Firstname.htm where you must replace 'g' with the drive letter for your Class disk and use your own name.
 Switch to your browser and change the filename in the address bar to hector3-Lastname-Firstname.htm and press the ENTER key.
The browser will display the revised page. Your window may not be large enough to show the entire page at once.- Print the page from the browser.
Nested Lists
It is pretty common to have a list that contains other lists. For example, in a weekly To Do list you would expect to see each day of the week with its own list of tasks for that day. And some of those tasks might be lists themselves! HTML handles that quite nicely. You can even pick different styles for the nested lists.
You can nest a list inside a different kind of list, like having a numbered list inside a bulleted list.
![]() Closing
Tags: Be
extra careful about including your ending tags in nested lists. If you leave one out,
the browser will think that the text that follows is part of the list. You
may have a lot more bullets or numbers than you intended.
Closing
Tags: Be
extra careful about including your ending tags in nested lists. If you leave one out,
the browser will think that the text that follows is part of the list. You
may have a lot more bullets or numbers than you intended.
| Examples of nested lists | ||
|---|---|---|
| Bullets | Numbered | Mixed |
|
|
|
|
|
| © 1997-2017 Jan Smith All Rights Reserved |
Site Map What's New |
Privacy Policy Terms of Service Copyright Acknowledgements |
~~ 1 Cor. 10:31 ...whatever you do, do it all for the glory of God. ~~
Last updated: March 22, 2017