|
A
framed web page is
actually a combination of several HTML documents. Saving such
a page yourself is more complicated than saving an unframed page.
A frameset document sets the sizes and characteristics of the
frames. Each frame contains its own HTML document. To see a framed page
just like it appeared on the Internet, you need:
- the frameset
page
- an HTML page for each frame
- all images and other attached files for
each framed document
-
the correct folder structure
|
|

Where you are:
JegsWorks >
Lessons > Web
Before you start...
Project 1: Browser Basics
Connecting
IE
Interface
Navigating
Printing
Saving 
 Subscribe Subscribe
Save yourself
Save framed
Searching
Summary
Quiz
Exercises
Project 2: HTML Basics
Search
Glossary
Appendix
|
|
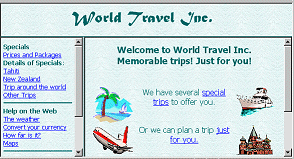
 Example: Example:
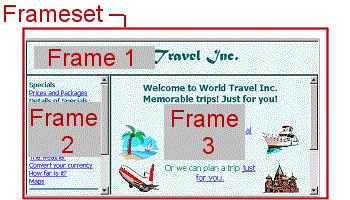
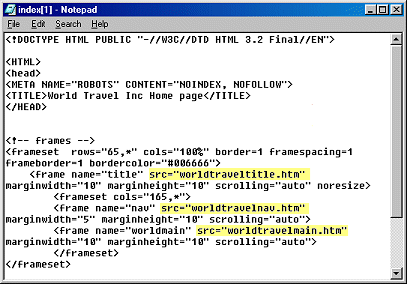
The
frameset page for our World Travel Inc. opening page defines (Frame 1) a
title frame at the top, (Frame 2) a left navigation frame, and (Frame
3) a main document frame on the right.
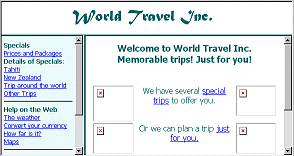
To save this framed page you must save the frameset page
and the three framed documents, plus the four images in the main document and
the background image. That's 8 different things to save for this one page.
If you want to have the other documents that can show up in the right frame,
like the Tahiti page and the Prices and Packages page, you have to save each
of them ... and their graphics!
  IE5/6 makes
it much easier to save a single framed page. Saving
with the file type Web page, complete or Web
Archive, single file automatically saves the required files and
images with just one click! Unfortunately this only saves the one
combination of framed documents. Suppose you also want the other pages on
the World Travel site and you want them to display in the frames as they
did on the web site. You have to save manually. What a lot of work! IE5/6 makes
it much easier to save a single framed page. Saving
with the file type Web page, complete or Web
Archive, single file automatically saves the required files and
images with just one click! Unfortunately this only saves the one
combination of framed documents. Suppose you also want the other pages on
the World Travel site and you want them to display in the frames as they
did on the web site. You have to save manually. What a lot of work!
 |
Step-by-Step: Save Framed |
|
|
What you will learn: |
to save a frameset page
to find the correct path for framed documents
to save a framed
document
to save images for framed
documents |
Start with:

 
Save Frameset
- Open the World Travel
Inc. home page from your resource
files or from
the Internet
http://www.jegsworks.com/Lessons/web/worldtravel/index.html
The page contains 3 frames - top, left, and
right.
-
Select
| from the browser menu. The Save Web Page dialog appears.
-
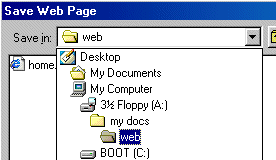 Use the
Save In drop list to show the web folder on your Class disk. Use the
Save In drop list to show the web folder on your Class disk.
-
 Create a new folder: In the Save Web Page dialog, click Create a new folder: In the Save Web Page dialog, click
 the New Folder button. A
new folder appears in your web folder. Name the new
folder worldtravel the New Folder button. A
new folder appears in your web folder. Name the new
folder worldtravel
- In the Save Web Page dialog,
change the file name from the suggested World Travel Inc Home
page (which is the Title of the page) to index.html
 Choose file type: HTML
document. Choose file type: HTML
document.
Choose file type: Web Page, HTML only
-
Click on the Save button. The frameset page is
now saved to your floppy disk.
-
 View saved page:
Type in the Address Bar the address of your saved
file View saved page:
Type in the Address Bar the address of your saved
file
a:\my docs\web\worldtravel\index.html and press
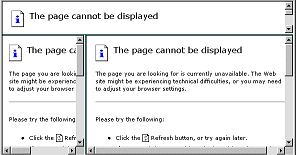
ENTER. The page loads, sort of!
What happened? You
only saved the frameset page. The frames are in place, but the source code
cannot find the documents that go in the frames because you did not save
them.
- Click the Back button to
return to the original World Travel Inc. home page.
Finding paths for documents
Since the menu command | saves the frameset document, you cannot use it to save the individual
frames. You can use Notepad to get around this problem. But, first, you must
find out the paths to the pages that the frameset will be
looking for.
Start with:
the original World Travel Inc. home page
-
 From the browser menu
select | . Notepad opens and shows
the source code for the frameset page. From the browser menu
select | . Notepad opens and shows
the source code for the frameset page.
Nothing in this code
displays on the screen. It just sets the frame sizes and
characteristics and the source for what is displayed in each frame.
- Read through the code to find
the path to the source files for each frame. These are highlighted in the
illustration. It looks like they are all in the same folder as the
frameset page. Easy!
- Write down these names to use later when you save the documents for
each frame. (If there are more frames that this, it can be hard
to tell from the code which source goes with which frame in the browser! It
helps when the author picked
helpful names for the frames. )
- Close Notepad.
Save framed documents:
Start with:
the original World
Travel Inc. home page
- Right click in the
title frame and from the popup menu choose
Notepad opens again and shows the source code for the title
frame.
-
From the Notepad menu
select
| and save the document to your
worldtravel folder with the name
worldtraveltitle.htm , matching
what the frameset code said.
- Repeat for the left and right frames, using the
names worldtravelnav.htm
and worldtravelmain.htm
-
 Click the Forward button to return to the saved page on your
Class disk. You now have documents. Click the Forward button to return to the saved page on your
Class disk. You now have documents.
It's
getting better, but you are still missing some parts - the images and
background.
- Click the Back button to return to the original World
Travel Inc. home page.
Save Images
Start with:
the original World
Travel Inc. home page
-
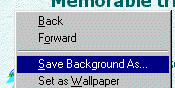 Right
click on the background of the
right frame. From the popup menu select Right
click on the background of the
right frame. From the popup menu select
-
Save the file to your Class disk in the
worldtravel
folder with the suggested name - paper.jpg
-
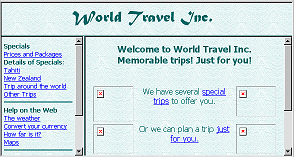 Click the Forward button to look at what
you saved. The background is now in place for
all the frames! It's nice that they all used the same background! Click the Forward button to look at what
you saved. The background is now in place for
all the frames! It's nice that they all used the same background!
- Click the Back button to return to the original World
Travel Inc. home page.
- Right click on the
image of the palm tree.
- From the popup menu
select
-
Save the picture to your Class disk in the
worldtravel
folder, using the suggested name island.gif .
-
 Repeat for the other three images, using
the suggested name and saving to the
worldtravel
folder. Repeat for the other three images, using
the suggested name and saving to the
worldtravel
folder.
- Use the Forward button to return to your saved version of the World Travel Inc. page. TaDa! All parts show up!!
|