
Jan's Working with Windows:
Views: Manage Details
Sometimes the file's name is not all you want to know. A thumbnail image might let you pick out the right image or document, but Windows cannot produce a thumbnail for all types of documents or images. Other properties of a file might help.
A Word document has properties like file type, date created, last date modified, file size, authors, category, subject, title, and pages. Image files have properties for dimensions, camera maker and model, date taken, rating. Other types of files have their own properties.
You can use a property to sort and group the files in the Contents pane of a Computer or File Explorer window.
In this lesson you will learn how to see a file's properties using a ScreenTip, the Details pane, Details view, the Properties dialog, and (WinXP, Win8) the Status bar.
Examples:
![]() WinXP: Details section
WinXP: Details section
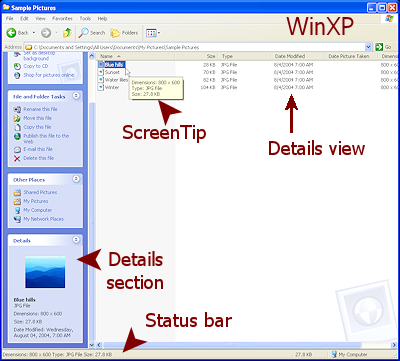 Properties show in:
- Details view
- ScreenTip
- Details section of Common Tasks
- Status bar
The Status bar shows the file size and file type. For images it shows the dimensions.
![]()
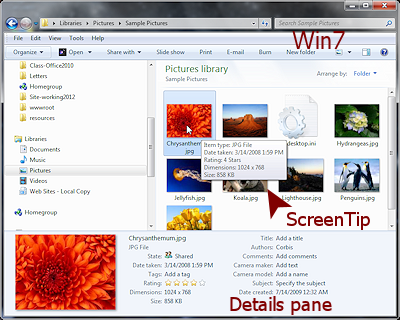
![]() Vista, Win7: Details Pane
Vista, Win7: Details Pane
The Details pane is at the bottom of the window. The height can be changed by dragging the top edge of the pane up.
![]()
Properties show in:
- Details view
- Details pane
- ScreenTip
![]()
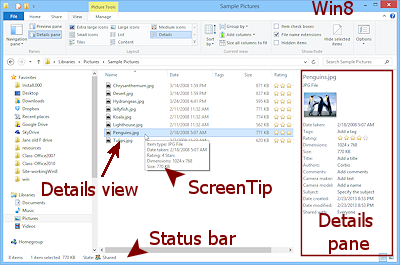
![]() Win8, Win8.1: Details Pane
Win8, Win8.1: Details Pane
The Details pane is at the right of the File Explorer window. It's width can be changed by dragging the left edge of the pane.
Properties show in:
- Details view
- Details pane
- ScreenTip
- Status bar
The Status bar shows how many items are in the Contents pane, how many are selected, and whether they are shared. Hover over the shared icon to see with whom the selection is shared. It might be 'Everyone' or with 'Home group' or with specific users.
| |
Step-by-Step: Manage Details |
|
| What you will learn: | to view properties with ScreenTip to view properties with Status Bar (WinXP, Win8, Win8.1) to show or hide the Details pane to use properties in Details view to sort and group to customize Details view to use the Properties dialog to use the Folder Options dialog |
ScreenTip
Start with ![]() , Computer or File Explorer window open to a pictures folder
, Computer or File Explorer window open to a pictures folder
- If necessary, open a My Computer, Computer, or File Explorer window.
- Navigate back to the folder you used at the end of the last lesson:
 WinXP
WinXP C:\Documents and Settings\All Users\Documents\My Pictures\Sample Pictures 
 Vista, Win7
 C:\Users\Public\Pictures\Sample Pictures 
 Win8, Win8.1
C:\Users\Public\Pictures\Sample Pictures
or C:\Windows\Web\Screen 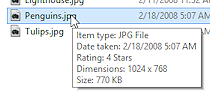 Let your mouse hover over one of the files.
A ScreenTip appears with the image's file type, dimensions, and file size.
It does not matter what folder style view you are in. All show the ScreenTip. Experiment: ScreenTip
- Navigate to other folders and hover over several different files and folders.
-
 What properties show for different kinds of files?
 - Do you get a ScreenTip for a folder? a drive?
What properties show?
WinXP, Win8, Win8.1: Status Bar
Vista and Win7 do not show a Status bar for a Computer window. But WinXP and Win8 show some helpful properties on the Status bar.
What shows on the Status bar?
Properties like File type, File Size, Author, Title, Date created, File Size, Dimensions (for images) |
|
- Experiment: Status Bar
- Select a file in the Contents pane and inspect the Status bar.
- What shows on the Status bar? Are these properties also shown in a ScreenTip or in the Details pane?
- Change to a different type of file.
- Are the properties showing on the Status bar the same?
- Select a drive, a folder, and then multiple files.
- What shows on the Status bar for each of these selections?
Show/Hide Details Pane
The Details pane is shown by default in Vista and Win7 but not in Win8 and Win8.1.
WinXP shows a Details section at the bottom of the Common Tasks pane.
- Hide or show the Details pane:
WinXP: Chevron
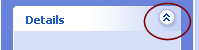
Scroll, if necessary, to see the bottom section of the Common Tasks pane. Click the double chevron on the Details bar.
Vista, Win7: Organize button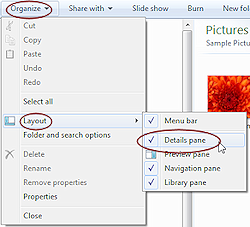
Organize button > Layout > Details pane
Win8, Win8.1: Ribbon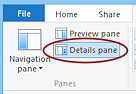
On the View ribbon tab at the left in the Panes tab group, click the Details pane button.
- If necessary, show the Details pane again.
-
Experiment: Details pane or section
- Select various folders and files and observe what the Details pane or section tells you.
- How do these properties compare to what you see in a ScreenTip? on the Status bar?
-
When would you find a Details pane useful enough to have it open?
Dialog: Properties
Every object within Windows has properties. The Properties dialog shows all of the properties.
-
 Right click on a file in the Contents pane.
 -
In the context menu at the bottom,
 click on Properties.
(Your dialog will likely be for a different file than the one used for the illustrations.)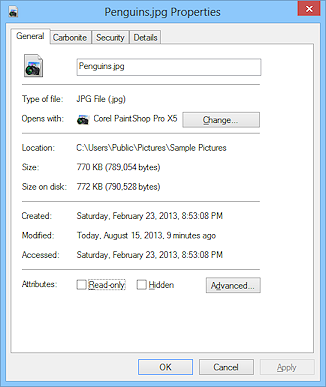
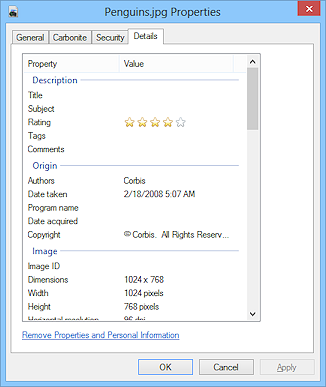
The General tab is open by default and shows properties that all files have, like the file's location and size.
-
Click on the Summary (WinXP) or Details tab.
This tab shows the other properties of the file. Some of these might be blank.
- Click the OK button to close the dialog.
-
Experiment: Properties Dialog
-
Open the Properties dialog for a number of different kinds of files, folders, and drives.
What properties show on the Details tab. -
Find a file where the Details tab includes a section named Descriptions.
This section has properties like Title, Subject, Tags, Categories, Subject. You can edit these right in the dialog. WinXP: On the Summary tab, click the link to Simple View, which has text boxes for the Description properties.
-
Open the Properties dialog for a number of different kinds of files, folders, and drives.
Details View: Sort
To sort means to display items in a particular order, such as alphabetically or numerically.
The Details view is the easiest folder view style to use for sorting the Contents pane. The column headings are actually buttons that can be used to sort the files, in order or in reverse order.
There is no such thing as 'unsorted' or 'remove all sorts'. The default sort is alphabetical on the file's Name property.
There is also a command 'Arrange Icons by' (WinXP) or 'Sort by' on the context menu as well as on the Menu bar or ribbon.
How the default columns sort:
Name: alphabetically by name, with folders first.
Size: numerically by file size, but leaves folders in alphabetical order.
Modified date: calendar order using the date the file or folder was last changed.
Type: alphabetically by file type. However...
Some file extensions are treated as the same file type, so the display is not exactly alphabetical for extensions. For example, the extensions txt and log are grouped together because they are both plain text files.
Only one sort at a time can be applied using the column heading buttons.
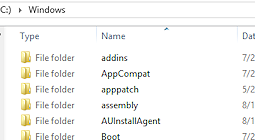
- Navigate to show the Windows folder in the Contents pane.
- Change the folder style to Details view.
The default columns are Name, Date modified, Type, and Size.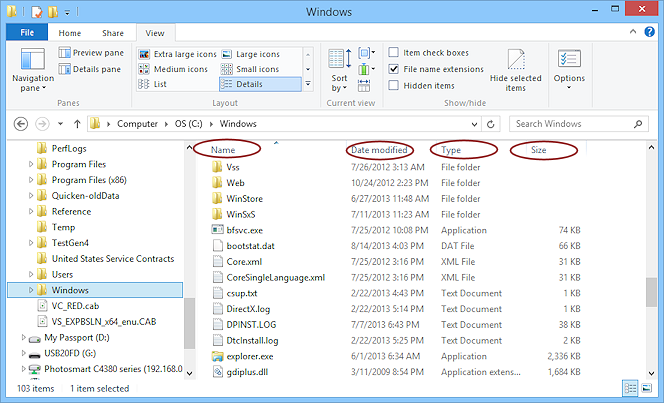
-
Scroll the Contents pane to see the files and their details.
There are a number of different types of files.
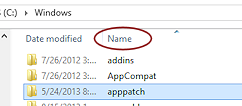
- Click on the property Name at the top of the column.
The Contents pane rearranges the files and folders into reverse alphabetical order, with folders last instead of first. - Click on Name again.
The Contents pane returns to the original order. -
Experiment: Sorting
-
Click on a column heading button to sort the display.
- Scroll the pane to see what changes occurred.
- Click the same button again to reverse the display.
Sort with each of the properties.
- Sort several folders that have different kinds of files.
When you are finished with each folder, return the sort to Name, Ascending. Windows will remember how you left the folder!
-
Details View: Group
To group means to display items in groups based on a particular property, such as names that start with the same letter or by file sizes or by the date modified.
 Examples
of grouping:
Examples
of grouping:
![]() Click the green links below to change the illustration from Win8 at the right.
Click the green links below to change the illustration from Win8 at the right.
- Name -A-H, I-P, Q-Z
- Size - Gigantic, Large, Medium, Small, Tiny, Zero
- Type - Cascading stylesheets, configuration settings, HTML, images, folders, Word documents, Excel documents
- Date Modified - Today, Yesterday, Earlier this week, Last month, Earlier this month, Earlier this year, A long time ago
)
)
)
)
The illustration uses screen shots from Windows 8. Other versions of Windows are quite similar, but there are some differences. For example WinXP groups by name with a group for each letter. You cannot modify the way Windows groups.
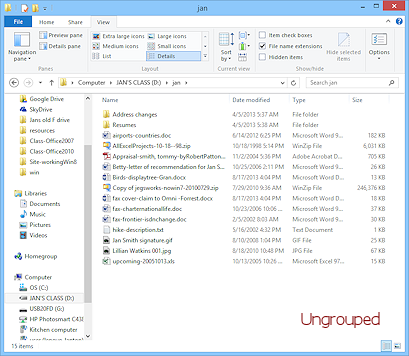
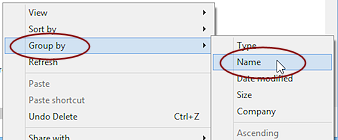 With the Windows folder selected in the folder tree, right click in a blank area of the Contents pane.
A context menu appears.
(WinXP's version is different.)-
Hover over to expand the menu.
WinXP: A list of the properties that have columns in Detail view appears.
-
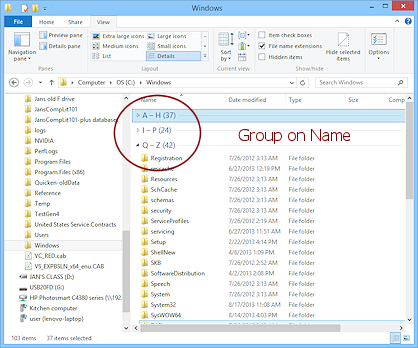 Click on Name.
The window rearranges the files and folders into three alphabetical groups, A - H, I - P, Q - Z. WinXP: With Name checked at the top, click on . The window rearranges with a group for each letter of the alphabet. - Collapse/expand each group by clicking the arrow to the left of the group title.
- Scroll the window.
The groups have the folders first and then files, in alphabetical order within the group.
-
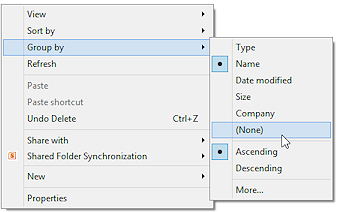 Open the context menu again and click on .
This removes the grouping.
Undo won't work for groups. Unexpected!The item (None) does not appear unless the view is grouped already.
WinXP: Open the context menu and click on Group again to uncheck it. This removes the grouping. - Experiment: Groups
- Try out the other choices for or .
- Scroll to see the effect.
- When you are finished, remove the grouping.
- Try out the other choices for or .
Customize Details View
In Details View, you can resize the column widths, change the order of the columns, and add or remove columns. There is a long list of properties to choose from, but some properties only apply to certain types of files. For example, an image will have a Dimensions property (width X height) and a video has a Length property (how long the video lasts). Those properties would be blank for a document like a letter.
Resize Columns
In Details view, you may need to resize a column to show more of the data in that column.
 With the My Computer, Computer, or File Explorer window showing the Windows folder again, move the mouse pointer to the boundary at the right of the Name column.
The mouse pointer changes to the Resize horizontally shape .
. 
 Drag to the left.
The column gets narrower.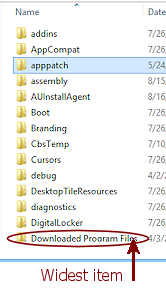 Drag to the right.
The column gets wider. Double-click the boundary between columns.
The column adjusts to Best Fit, which makes it just wide enough for the widest item currently showing in that column.
Rearrange Column Order
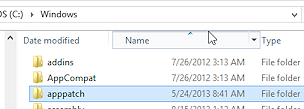 Move the mouse pointer over the middle of the Name button.
- Drag to the right until past the second column.
 Drop.
Drop.
The Name column shifts to the right and is now the second column.
Sorting was not changed!
Choose Which Columns to Show
You can pick any of a long list of properties to show in the Computer or File Explorer window. Of course, some properties only apply to certain file types. Your choices will apply ONLY to the current folder.
-
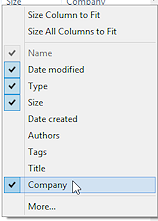
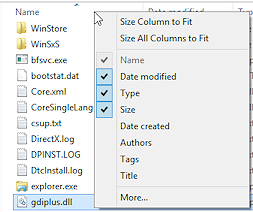 Right click on the heading of one of the columns in Details view.
A context menu appears, with a check mark by the properties that are currently showing as columns in Details view. You can easily have more columns than will fit inside the current window. A horizontal scroll bar will automatically appear in that case.Clicking a property in the context menu toggles the column to show or hide. The list closes immediately. To make several changes at once, you can use the Choose Details dialog.
 Click on the command at the bottom of the context menu.
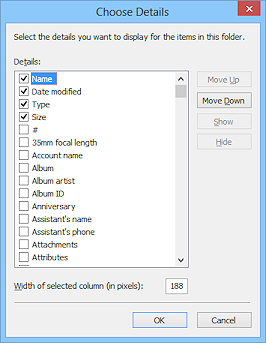
The Choose Details dialog opens with a complete list of all properties that might be available.- Scroll the list of properties.
Can you guess what kind of file these properties would naturally go with? Some are clearly about music or videos or pictures or contact information. Others apply to just about any file.  Click on the box beside Company to put a check mark in it.
This property will show as a new column when you close the dialog.- Click in the list on the property Type to select it, but leave the check mark in its box.
- Click the Move Up button twice.
The order of the properties is now Type, Name, Date modified, Size, and Company, but the listing is still being sorted on Name.
 Click on OK to close the dialog.
The columns are in the new order. The arrow on the Name heading shows that this column is sorted.- If necessary, widen the window enough to show the new column.
-
Scroll the window to look for any items that have an entry in the new Company column.
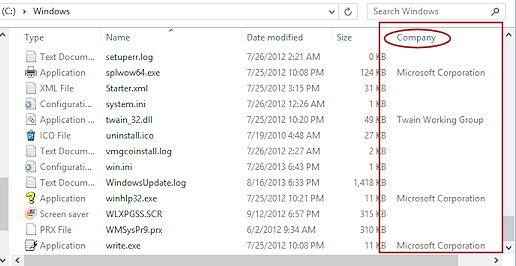
 Right click a blank area to get the context menu again.
- Click on Company to hide that column.
Folder Options: More Ways to Customize
The dialog Folder Options lets you customize the way the folders and files are displayed in a large number of ways. Most of the defaults are good to use, but not quite all. If the display of your folders and files is behaving in an odd manner, check first to see if the folder is sorted or grouped. Then check the Folder Options dialog for changes.
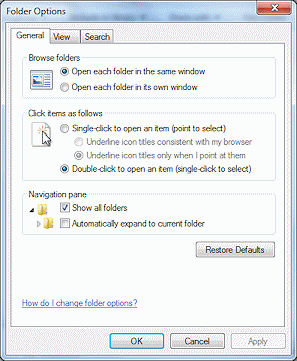 Open the dialog Folder Options:
 WinXP: In a My Computer or Explorer window, open the Tools menu and select Folder Options. Vista, Win7: In an Explorer window, click the Organize button to open a menu, and then click the menu item Folder and Search
Options. Win8, Win8.1: In a File Explorer window on the View ribbon tab, click the Folder Options button.
WinXP: In a My Computer or Explorer window, open the Tools menu and select Folder Options. Vista, Win7: In an Explorer window, click the Organize button to open a menu, and then click the menu item Folder and Search
Options. Win8, Win8.1: In a File Explorer window on the View ribbon tab, click the Folder Options button. 
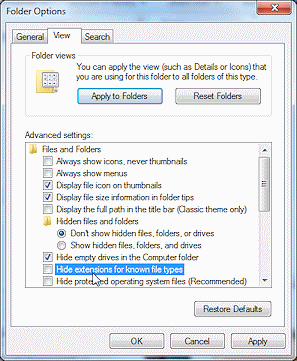 Click on the View tab and read the list of Advanced settings.
The Restore Defaults button returns all of the settings on this list to the originals. Most of these can be left at the default setting.
![]() Windows remembers folder choices: The arrangement that you choose for the icons applies to the open folder only.
Windows can remember your choices for several recently viewed folders. There seems to be no way to make your choices stick permanently.
Once the maximum number of remembered arrangements is reached, making more changes will replace
the oldest choices. The maximum for Vista is supposed to be 5000 and for Win7
it is 20,000. How many can be remembered by other versions of Windows is not documented anywhere that I could find.
Windows remembers folder choices: The arrangement that you choose for the icons applies to the open folder only.
Windows can remember your choices for several recently viewed folders. There seems to be no way to make your choices stick permanently.
Once the maximum number of remembered arrangements is reached, making more changes will replace
the oldest choices. The maximum for Vista is supposed to be 5000 and for Win7
it is 20,000. How many can be remembered by other versions of Windows is not documented anywhere that I could find.
![]() Apply folder choices to other folders: You can apply your choices for the current folder to all folders of the current type (Documents, Music, Pictures, Video) in the Folder
Options dialog with the Apply to Folders button.
Apply folder choices to other folders: You can apply your choices for the current folder to all folders of the current type (Documents, Music, Pictures, Video) in the Folder
Options dialog with the Apply to Folders button.
|
|
| © 1997-2017 Jan Smith All Rights Reserved |
Site Map What's New |
Privacy Policy Terms of Service Copyright Acknowledgements |
~~ 1 Cor. 10:31 ...whatever you do, do it all for the glory of God. ~~
Last updated: March 22, 2017