
Jan's Working with Windows:
Views: Manage Views
To work with files and folders you need to navigate the folder tree, expanding and collapsing parts to show just what you want. You will want to use different panes or folder styles, depending on what you are trying to do.
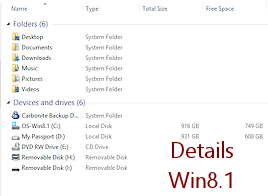
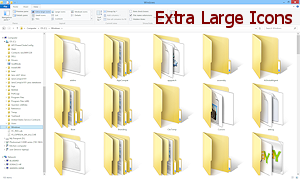
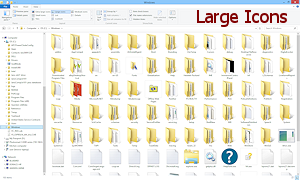
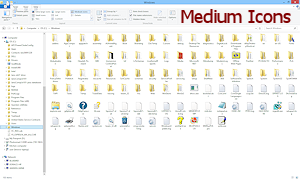
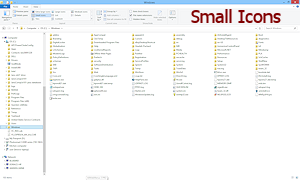
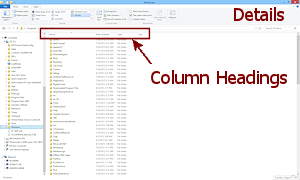
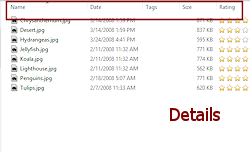
For example, Large Icons or Thumbnails view helps you spot the right image or document. Small Icons view lets you select a large number of files quickly. Details view lets you see various properties like file size or file type or the date created.
In this lesson you will practice with the folder tree and changing the folder view style.
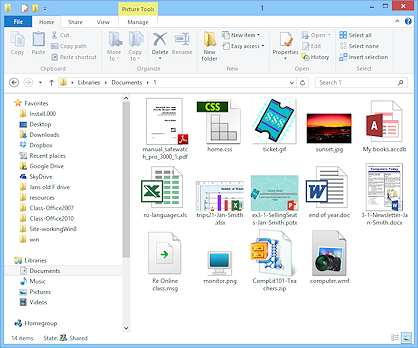
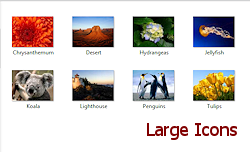
Example: Large Icons style (Win8)
Thumbnails for most images and some documents.
| |
Step-by-Step: Manage Views |
|
| What you will learn: | to open a Computer or File Explorer window to expand and collapse the folder tree to change the folder view style |
Open a Computer or File Explorer Window
Start with-
Open a window that shows your drives and files:
Method 1: Desktop icon
 Double-click the Desktop icon for your computer:
  or
or  or
or 
Method 2: Taskbar icon
Click the folders icon on the Quick Launch bar or Taskbar
 .
.
Then, if necessary, click on Computer or This PC in the folder tree.A default style window opens using the size and display settings it had when it was last closed. It shows the drives on your computer. Of course your window will look different from the illustrations since you likely have different drives and devices and the view settings may be different, too.
- If necessary,
 drag the edges of the window to resize it to a comfortable size.
 -
Inspect the drives that appear and the panes that your window shows.
Your drives may be quite different from any of the illustrations.Can you find these?
- Title bar
- Menu bar - not in Win8, may be hidden in other versions
- Address bar
- Toolbar or (Win8) Ribbon
- Status bar (possibly WinXP)(Win8)
- Navigation pane on the left or (WinXP) Common Tasks
- Contents pane on the right shows the contents of whatever is selected in the Navigation pane
-
Details pane - (WinXP - section at bottom of Common Tasks)
(Vista and Win7- on the bottom) (Win8 and Win8.1- hidden on the right)
Use the Folder Tree
The folder tree shows all of the computer's drives and folders in a nested arrangement, and can also show some special areas like the Control Panel and Recycle Bin.
-
 WinXP: Show folder tree:
  Click the Folders button
  on the Toolbar.
The left pane changes to show the folder tree. - Scroll the left Navigation pane to see what items are available.
 What special areas do you see? Some items like Control Panel and Recycle Bin may be hidden by default. Windows remembers what sections were expanded the last time this kind of window was opened.
-
Double-click on My Computer or Computer or This PC in the folder tree to expand that part of the folder tree and show its contents in the right pane.
-
Click on
 or
or  beside drive C: to expand that branch of the folder tree without changing what shows in the Contents pane.
You may not see the or until your mouse pointer is over the folder tree. or means that the
drive or folder has subfolders in it that are currently hidden.
beside drive C: to expand that branch of the folder tree without changing what shows in the Contents pane.
You may not see the or until your mouse pointer is over the folder tree. or means that the
drive or folder has subfolders in it that are currently hidden.  or
or  means that this drive or folder has
been expanded in the folder tree to display
all its subfolders.
means that this drive or folder has
been expanded in the folder tree to display
all its subfolders. You may or may not see an icon for a drive that is attached but is empty, like a CD or DVD drive. The default is different in different versions of Windows and can be customized, too.
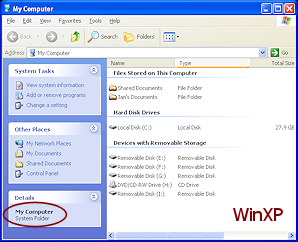
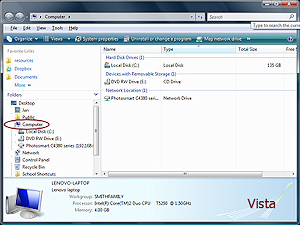
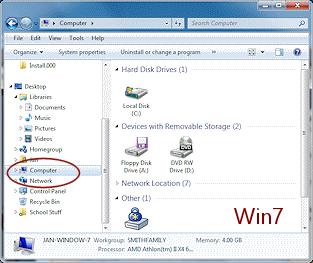
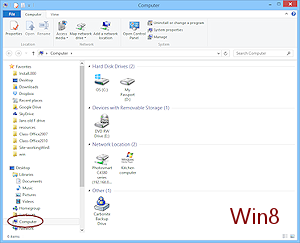
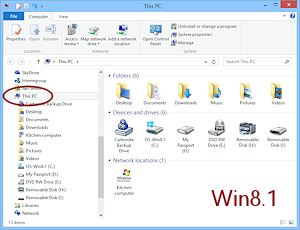
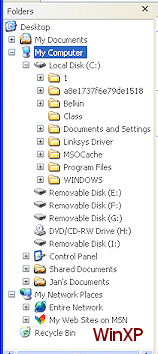
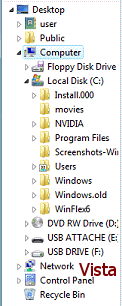
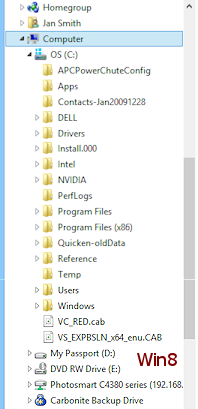
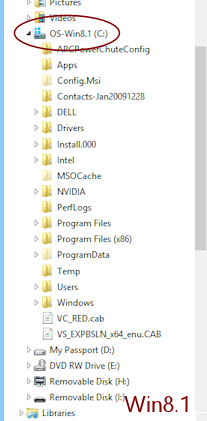
You may see a 'drive' that is actually another kind of device, like the Photosmart printer in the Win8 illustration and the Drive H: icon for Win8.1 that looks like a printer. In both cases the printer has slots for removable media, but the slots were empty. The WinXP illustration includes several drives for removable media which were part of a built-in panel on the computer itself.
-
 Experiment: Expand and collapse folder tree
- Click on or beside various folders and drives to expand the folder tree.
Do not click on any names just yet. - Click on or to collapse the folder tree again.
As you collapse and expand parts of the folder tree, what is displayed in the Contents pane at the right does not change, if you clicked on the symbol to the left of the item's name.
-
- Experiment: Select item in folder tree
-
Click on the name of a drive or folder.
That item is now selected. It's name is highlighted.The Contents pane at the right changes to show what is in the drive or folder that you selected in the Navigation pane at the left. The path to what you selected is in the Address bar.
A folder icon will change to slightly different one
 in WinXP when it is expanded.
In other Windows versions, the folder icon does not change when that branch of the folder tree is expanded.
 - Click on the name for several different items in the folder tree.
The Contents pane changes. -
 Did you find drives in your folder tree that are actually empty or will not expand?
- Built-in slots for removable media: The slots may show as one or several drives for removable media, even when they are empty.
-
CD or DVD drive: The tray will slide open for you to put in a disc when you try to expand it or select it.
- Network drive: Will not expand if you are not logged into that network or if the network device is not connected to the network. You will get an error that says the drive is not accessible.
-
Content Pane: Folder View Styles
You have several choices for how to display the files and folders in the right pane of a Computer or File Explorer window.
In all views, folders are normally listed first, then files.
- Click on My Computer or Computer or This PC in the Navigation pane again.
 Right click in a blank area of the Contents pane.
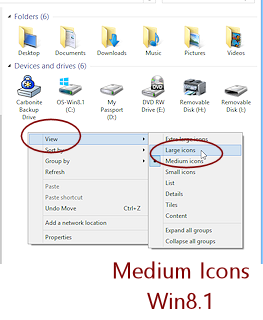
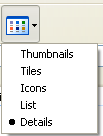
A context menu appears that includes a list of the various folder view styles available in your version of Windows.-
Click on and then on. WinXP: View > Thumbnails
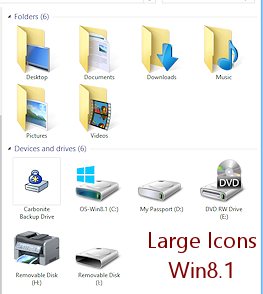
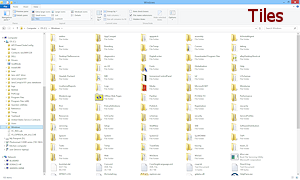
The Contents pane changes to show the drives as much larger icons. These are very useful when the icon is a thumbnail of an image or a document. For drives and folders, the large size does not help.
-
Experiment: Folder View Styles - Context Menu
Use the context menu to try out each of the other styles.
Which do you prefer for showing drives?Examples:
- In the Navigation pane, click on the Windows folder to select it.
This folder has many subfolders and files. Some features will be clearer with a large number of items to work with. - Apply the different folder view styles to it in turn.
-
Scroll the Contents pane to see how each folder view style affects folders and files.
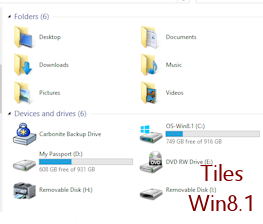
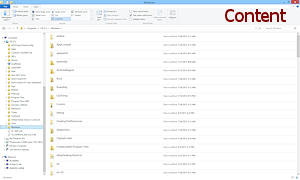
How does each view style alphabetize? Some are alphabetical across columns and other go down the column.Examples from Windows 8:

-
Experiment: Folder View Styles
-
Select various folders and drives and try out other methods for changing the folder view style. Not all versions of Windows can use the same methods.


 Views menu on the Menu bar.
-

 Views button on the toolbar: Click the button itself to rotate through the views.
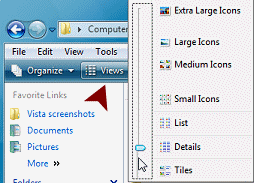
 WinXP, Vista, Win7: Views drop list: Click the arrow at the right
of the Views button to open the drop list of views.
WinXP, Vista, Win7: Views drop list: Click the arrow at the right
of the Views button to open the drop list of views.
In Vista and Win7, drag the slide to a choice or even in between choices for a slightly different size. The icon on the Views button changes to match the current view.


 Win8, Win8.1: Views palette on Home ribbon tab
Hover over the views and Live Preview changes the display temporarily. Click on a view to apply it. If some views are out of sight, click the down arrow with the bar above it to expand the palette. The highlighted item in the palette is the current view.
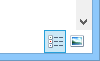 Win8, Win8.1: Views buttons on Status bar
At the bottom right of the window are two button, one for Details view and one for Large Icons view. These are the two views that are used the most.
- What folder view style is used automatically?
Your computer may not apply the default view if a different one was applied previously. Windows tries to remember but cannot remember forever. -
Which view would be best for what kind of action?
Think about finding a specific file by name or a picture when you do not know its name. How about when you want to select several files that are not close together alphabetically? - Which method of applying a folder style do you like best?
Special Folders : Some folders are recognized by Windows as being a special type, like Pictures, Music, or Video. These folders have a special style that is automatically applied.
- Find a folder of pictures.
If you do not have pictures of your own, try:
WinXP C:\Documents and Settings\All Users\Documents\My Pictures\Sample Pictures
Vista, Win7 C:\Users\Public\Pictures\Sample Pictures
Win8, Win8.1 C:\Users\Public\Pictures\Sample Pictures or C:\Windows\Web\Screen
(The folder Screen holds the Lock Screen background that comes with Windows.)
If a folder view style is applied automatically, you will see Thumbnails (WinXP) or Large Icons.
-
Examples of photo folders:
Special folders have a different set of columns in Details View
|
|
| © 1997-2017 Jan Smith All Rights Reserved |
Site Map What's New |
Privacy Policy Terms of Service Copyright Acknowledgements |
~~ 1 Cor. 10:31 ...whatever you do, do it all for the glory of God. ~~
Last updated: March 22, 2017