
Jan's Working with Windows 10:
Dialogs: Personalization
Windows lets the user customize or personalize the look of the screen. The choices are mostly in the new style Personalization dialog. A few things are still done in the classic style Control Panel dialogs. Over time Windows 10 will likely move more and more settings over to the new style Settings dialogs.
While you are learning about customizing Windows, you will also be practicing with different kinds of dialog inputs. Isn't this sneaky? Learning two things at the same time!
[If your computer is on a network, you may not be able to change some or any of the Display properties.]
|
|
Step-by-Step: Personalization |
|
| What you will learn: | to use a Modern style dialog (Personalization dialog) to customize the look of Windows: Background Colors Lock Screen Themes Start to apply a theme to return to the default Personalization settings to use inputs: drop list, palette, command button, slide switch, text box |
Start with: ![]() Desktop and Taskbar showing
Desktop and Taskbar showing
Dialog: Personalization
Changes you make in the new style Settings dialogs, like Personalization, take effect immediately. There are no OK, Apply, or Save buttons in these dialogs. That's a big change!
![]() If your computer has different user accounts, the changes that you make
in the Personalization dialog will apply only to the current user.
If your computer has different user accounts, the changes that you make
in the Personalization dialog will apply only to the current user.
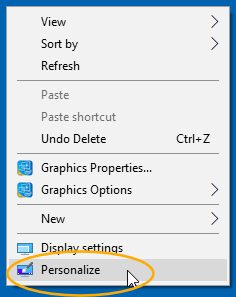
 Right click on a blank area of the desktop to get the
context-sensitive menu.
Right click on a blank area of the desktop to get the
context-sensitive menu.
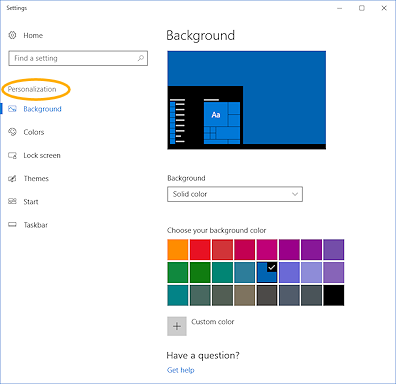
 Click on Personalize.
 The Settings dialog Personalization opens. The Preview at the top will change as you make choices. Your dialog will show the current choice for background.
On the left is a menu for pages in this dialog: Background, Colors, Lock screen, Themes, Start, and Taskbar.
Background
The Background drop box lets you choose a solid color, a picture, or a slide show of pictures from a folder.
![]() Experiment: Background
Experiment: Background
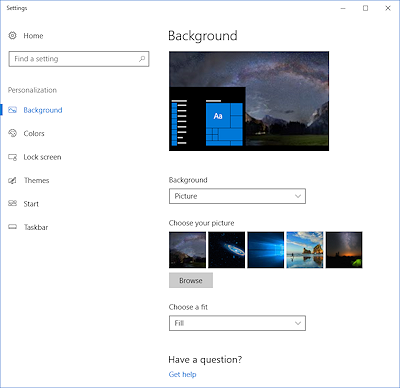 Click the Background box. A drop list of choices appears.
- Picture:
Select Picture.
The dialog shows five recent backgrounds or the default images that come with Windows. - Click on each of the images in the short palette of images.
The Preview at the top of the window changes to show your choice. - Click the Browse button.
A File Explorer window opens. This is how you can pick a picture on your computer... if you know where to look.The five images that you see in the 'Choose your picture' section change as you make new choices, pushing off images that were there before.
The images that come with Windows are stored in the folder
C:\Windows\Web\Wallpaper\Windows 10 - Fit: Try each of the choices in the drop list 'Choose a fit': Fill, Fit, Stretch, Tile, Center, Span with two or three pictures of different proportions.
The fit choices are subtly different with some image sizes. It depends on the original dimensions of the picture and the dimensions of your desktop space. When you have a square picture and a rectangle display, you will see a big difference!
 Solid Color:
Change the Background drop list to Solid color and click on the different choices for the background. The Preview changes to match your choice.
-
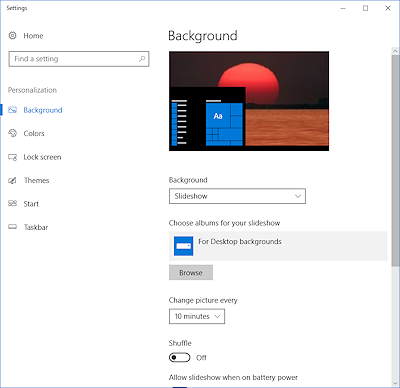 Slide Show:
Change the Background box to Slide Show.
New choices show in the dialog. -
Click the Browse button.
A File Explorer window opens to your Pictures folder. -
Select a folder in Pictures.
The background changes to show different pictures, one at a time, selected from a particular folder that you pick.The box 'Change picture every' lets you pick how quickly you want the background image to change. The default is 10 minutes.
The 'Choose a fit box' is the same as for the Picture background. Unfortunately you cannot pick a fit for each image separately in the slide show. It works best if all of the images and your screen are about the same proportions. That does not mean they have to be the same size!
Colors
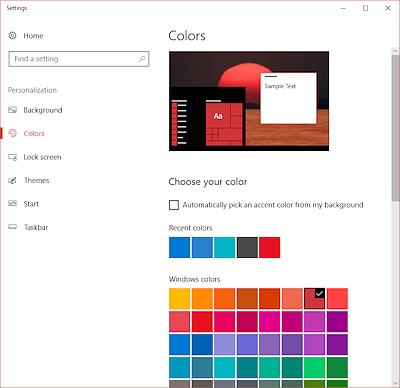 The Colors page lets you pick the accent color for Windows. This color is used for highlighting, as the edge color for windows, as the background color for tiles on the Start menu.
Note what box is selected in the palette for accent color.
![]() Warning: If you let Windows automatically pick a color from the background AND also use a slide show as the background, the accent color will change to match the current background for each slide.
Warning: If you let Windows automatically pick a color from the background AND also use a slide show as the background, the accent color will change to match the current background for each slide.
![]() Experiment: Colors
Experiment: Colors
- Check box: If necessary, click the box to uncheck 'Automatically pick an accent color from my background'.
- Palette: Try each of the colors in the palette as an accent color.
 Which do you like best with your current background?
 - Go back to Background and change the background.
- Select various accent colors again.
Do you like a subtle difference or a strong contrast for the accent color? - Click on the box to check 'Automatically pick an accent color from my background'.
Do you like what Windows chooses? - Go back to Background and pick a picture as a background.
Can you guess what Windows will choose as an accent color? - When you are ready to continue... select the background and colors that you want to keep.
![]() Experiment: More Colors options
Experiment: More Colors options
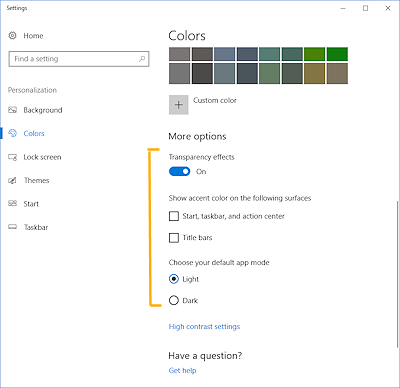 Scroll the Color settings window to see more choices.
- Try each of the choices - slide switch, check box, option buttons. Do your changes make a difference?
- When you are ready to move on, be sure that all of the choices are left where you want them to be.
Lock Screen
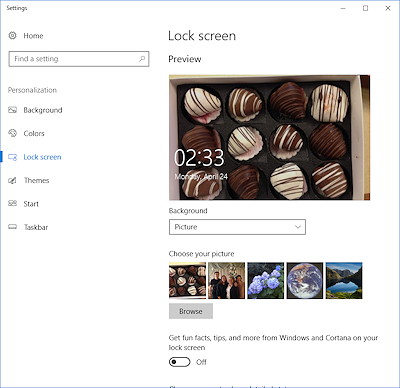 You can customize what shows when you log out or the computer locks the screen.
You can choose a picture, a slide show, or Windows Spotlight.
 If you choose Windows Spotlight, you will see random pictures from Bing while you are connected to the Internet.
You can tell Bing whether or not you like a picture by using a drop list at the top right of the screen. Bing will figure out what kind of pictures you like.
![]() Experiment: Lock Screen
Experiment: Lock Screen
- Drop List: Choose Picture and browse to select a picture.
You could use the same picture as on your Desktop or a different one. - Drop List: Choose Slide Show and pick a folder.
The Preview gets a little arrow icon at the top left to show that it is a slide show. But you won't see a slide show in the Preview. - Drop List: Choose Windows Spotlight.
If you are connected to the Internet, after a brief delay, the Preview shows you a picture that Bing found. The buttons at the top and bottom do not show in the Preview.
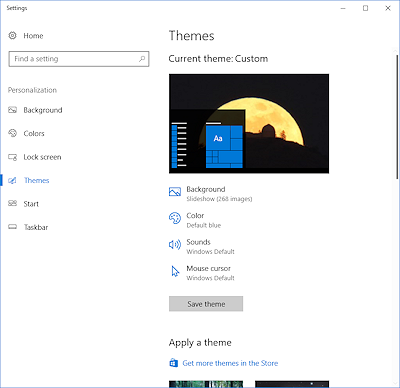
Themes
A theme in Windows 10 is a matched set of desktop background pictures, window colors, and sounds for various events like clicking or an error. Windows comes with three default themes (Windows, Windows 10, Flowers) and four high contrast themes for people with vision issues.
 You can create your own combinations and save them as a theme. You can
also download themes created by others.
You can create your own combinations and save them as a theme. You can
also download themes created by others.
The Themes page shows a preview of the current theme and the choices that make up that theme - background, color, sounds, and mouse cursor.
![]() Experiment: Themes
Experiment: Themes
- Make note of the choices showing below the preview so you can restore them later, if you wish.
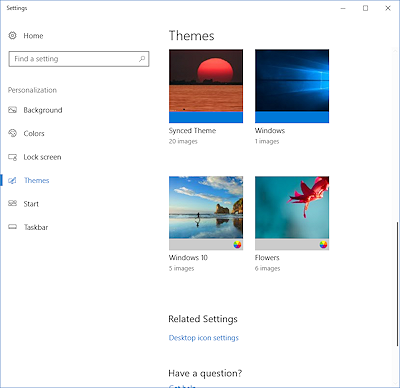
Scroll, if necessary, and inspect the thumbnails under 'Apply a theme'.
- Thumbnails: Click on an existing theme. Check what changes in the preview.
-
Make changes, if you wish, to the Personalization settings until you are happy with your choices.
Return to the Themes page.
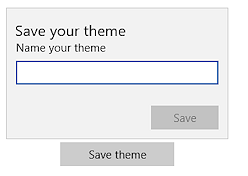
Text Box: If you have changed settings that you want to get back to after this experiment, click the button Save theme
 .
.
A new text box appears above the button.
Type in a name for your theme and click on Save.
Now it is safe to play around a bit!- Minimize all open windows
Check the Desktop and Start menu.
What changed?
Background? Colors?
It is harder to tell if any sounds were changed. In the themes that come with Windows 10, there do not seem to be any sound changes. - Click the Settings icon
 in the Taskbar to return to the Personalization dialog.
 - Change the background or accent color.
Check to make sure that it took effect. - Select a theme and check again.
The theme overrode your previous choices! 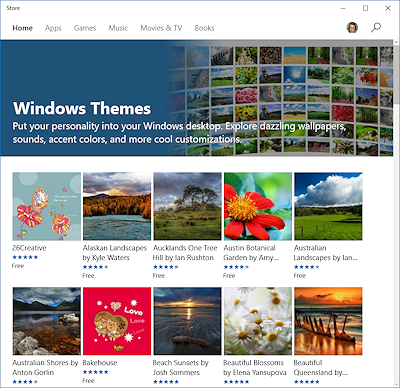
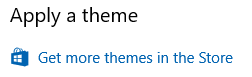
Link: Click the link 'Get more themes in the Store'.
The Windows Store app opens to Windows Themes page. Explore what is available!
If you want to download a theme, click the Download link below the thumbnail. Then open the file that was downloaded. The theme will be automatically installed.
- When you are ready to continue... Reset the theme to the one you saved, the one you downloaded, or to one of the default Windows themes.
![]() Save your theme with a new name: If you customize any of the colors,
background, and sounds while a theme is in place and you save the changes, you will overwrite the original theme. So, be sure to save with a new name.
Save your theme with a new name: If you customize any of the colors,
background, and sounds while a theme is in place and you save the changes, you will overwrite the original theme. So, be sure to save with a new name.
Return to Default
Remember: If you applied changes and want to get back to the original look, apply the Windows theme in the Themes dialog.
Start
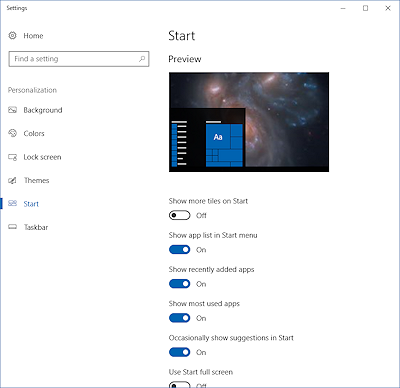 The Start page in the Personalization Settings dialog lets you manage some aspects of the Start menu.
There are On/Off slide switches for several things.
![]() Experiment: Start
Experiment: Start
- Slide Switch: Move the pointer over the left end of a switch that is On.
- Click.
The switch changes to Off. - Open the Start menu to see what changed.
- Click the Settings icon on the Taskbar to see the Start dialog again.
- Slide the switch back to Off.
- Test each of the settings.
Are there any that you want to change?
Note: You may not see a change immediately for some of the options. It will depend on what you have done recently.
|
|
| © 1997-2017 Jan Smith All Rights Reserved |
Site Map What's New |
Privacy Policy Terms of Service Copyright Acknowledgements |
~~ 1 Cor. 10:31 ...whatever you do, do it all for the glory of God. ~~
Last updated: April 24, 2017