
Jan's Working with Windows 10:
Files: Image - Resize & Print
One of life's most perplexing questions is "Why didn't it print the way I wanted?" Usually the answer lies in the Page Setup dialog or in the Print dialog. In other words, you forgot to look at what you really asked the computer to do!
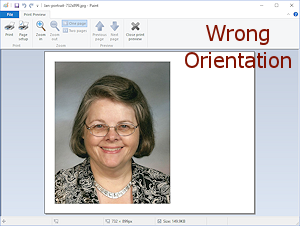
Text can merrily wrap itself to a page's width or flow on to multiple pages. An image is more stubborn. It does not break apart easily. There are several ways you can get an unpleasant surprise from the print process, especially with images. The most common may be to find that your image takes a bit more than one page to print. The chopping can be ugly! You can also be surprised at the size of the picture or its orientation on the page.
Examples of unexpected results:
In this lesson you will print an image from Paint.
| |
Step-by-Step: Image- Resize & Print |
|
Start with: ![]()
![]()
| What you will learn: | to open an existing picture from the Recent Files list in Start to view the file size to resize the canvas to save an existing picture to print a picture |
Open an Existing Picture from File menu
Start with: Paint is closed
-
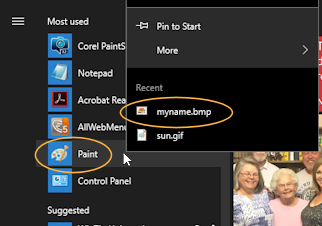 Open the Start menu.
If Paint shows in the Most used list...
 Right click on Paint..
A list of recently viewed files appears.If Paint does NOT show in the Most used list... Scroll the All apps list to Windows Accessories.
 Click on Windows Accessories.
Right click on Paint.
The list of pinned and Recent files appears.
- Click on myname.bmp.
Paint opens and shows the selected picture.
Alternate Method:
Open Paint and click on the File ribbon tab. At the right is a list of recent 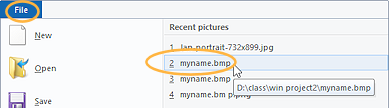 files. Click on the one you want.
![]() Problem: myname.bmp is not in the list of recent items on the Start menu or in the File ribbon tab list.
Problem: myname.bmp is not in the list of recent items on the Start menu or in the File ribbon tab list.
Either you did not save the file in the previous lesson, you didn't save it using this computer, or
too many other files have been opened in Paint since you saved the your file.
Solution 1: If you did save the file and Paint is not open, use File Explorer to locate the file. Use the right click menu and the Open with... command to open it in Paint. (This avoids the problem of some other program being the default program.)
Solution 2: If you did save the file and Paint is open, On the File ribbon tab, select and navigate to the correct folder and select myname.bmp.
Solution 3: If you did not actually save the file, go back to the previous lesson and create the file. Then return to this page to continue.
Check File Size
Ways to reduce file size
- Resize the canvas, without changing anything else about the picture except the amount of empty space.
- Save in a file format, such as PNG or GIF, that compresses the image information.
- Resize the whole picture.
A more advanced graphics program will produce a better result than Paint does when using a compressed file format or when resizing the picture!
- Open the Save As dialog:
Click the File tab on the ribbon and click on
.
The dialog should open to the folder where myname.bmp is saved. 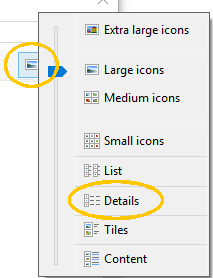 If necessary, change to Details view:
At the right above the Contents pane, click on the Views icon.
The display changes to show columns of info about the files, including a column Size.
-
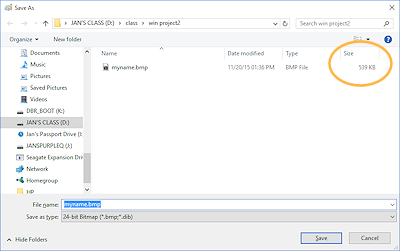 Write down the size of the original file.
The size of the canvas determines the size of the bitmap image. - Click on the Cancel button.
Resize the Canvas
- Move your pointer to the bottom right corner of the canvas and place it over the handle there.
The pointer will change to the Diagonal Resize shape.
A handle is a small square at the corners and side centers. It is tiny!
 Cannot see bottom right corner handle
Solution 1: Maximize the Paint window. The handle is in the bottom right corner, even if you cannot see it.Solution 2: Use the scroll bars to show the bottom right corner of the picture.
The display will not scroll by itself as you drag the handle so you may need to resize in several steps.Solution 3: Use the Zoom command to make the whole canvas show in the window.
Some versions have the Zoom command on the View menu. Later versions have a slider control on the Status bar. 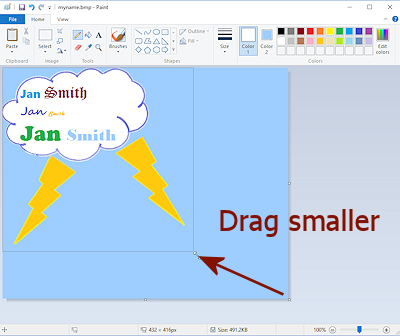
 Drag the bottom right handle of the picture until your picture just fits
in the dotted box and then release the mouse button.
Drag the bottom right handle of the picture until your picture just fits
in the dotted box and then release the mouse button.
The canvas will resize to fit the box. Save this new version:
Click the File tab on the ribbon and click on
.
You will NOT see the Save As dialog box this time because the file has been saved previously. The Save command just replaces the old version with the new one.
 Use Save As: If you want to save a file under a different name or in a different place, you must select .
- To see how the file size has changed, open the Save As dialog one more time.
- Write down the new file size.
-
Compare the size reported to what you wrote down before.
It should be smaller now. How much smaller depends on how much canvas you removed.The actual sizes for your file will almost certainly be different from those shown in the illustrations.
Resizing the canvas will always make a file smaller, but in some formats the difference will not be as large as with BMP files.
Change File Format
Some file formats create smaller files without losing any of the details. It seems like magic! The BMP format used above defines each pixel in the image separately. Other formats group pixels of the same color together and define the set. That takes less programming code to do.
- Change the Save as type box to PNG.
- Save.
-
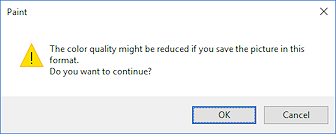 Save As again but use GIF format.
A message warns you that quality might be reduced with this format! - Inspect the image after your save. Do you see a difference? The solid color areas are probably a bit grainy now. This is what the warning was about.
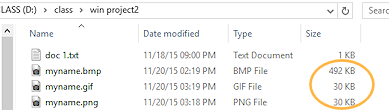 Open a File Explorer window and navigate to your win project2 folder.
The file size in PNG or GIF format is drastically smaller than in BMP format. The PNG image did not lose quality so it is a better choice.
Print a Picture: Page Setup, Print Preview, Print dialog
What will happen when you tell Paint to print your image? There are settings in Page Setup that you must check first!
Print Preview shows how the page(s) will look. The Print dialog lets you pick how many copies, which printer to use, and which pages to print. So many choices!! Happily the dialogs are very similar in these versions of Windows. What a pleasant change!
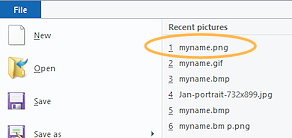 In Paint, click on the File tab.
- In the 'Recent pictures' list, click on myname.png.
Paint now shows the nicer PNG version instead of the GIF version that showed after saving in that format.
-
Open Page Setup:
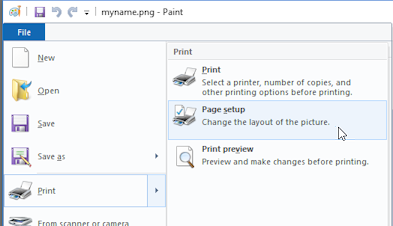
Click on the File tab and then hover over to show its menu at the right. Click on Page setup.
The Page Setup dialog box will appear. Paint remembers the settings you used last.
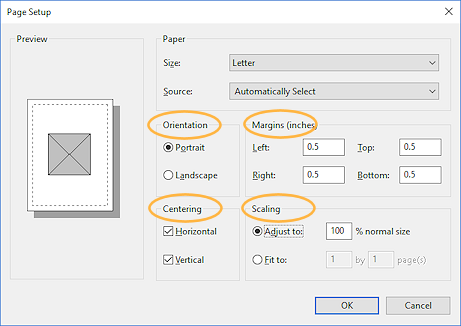 A sample document shows how your picture will appear on the page. There is only a placeholder for your image, rather than the image
itself.
A sample document shows how your picture will appear on the page. There is only a placeholder for your image, rather than the image
itself.
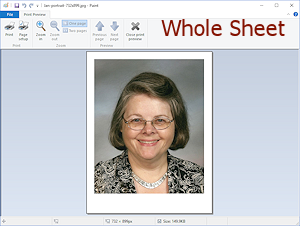
- Match the settings in the illustration:
Orientation = Portrait
Margins = 0.5" all sides
Centering: Horizontal and Vertical
Scaling = Adjust to 100% normal size
- Click the OK button.
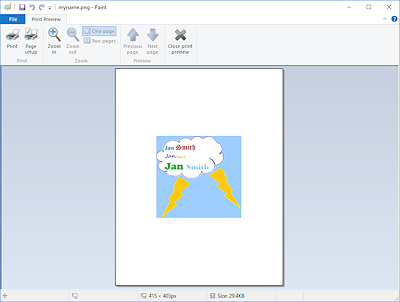 Open Print Preview to see what your
picture will look like when printed:
Open Print Preview to see what your
picture will look like when printed:
Click on the File tab and hover over . Click on .- Click the Zoom In button to enlarge the page you are
viewing.
- Click the Zoom Out button to reduce the size of the page
again.
- Look carefully to see if the Next Page button is available.
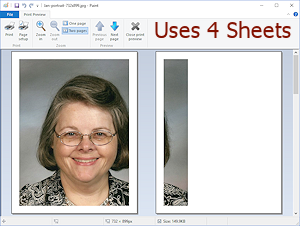
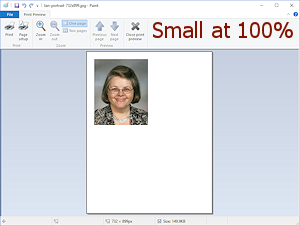
If the button text is black, your print job will take at least one more sheet of paper. This happens when your image is larger than the space between the margins as set in Page Setup. Unfortunately Paint does not tell you how many pages there will be all together.
 Problem: The
picture is too wide or too tall to fit on one page
Problem: The
picture is too wide or too tall to fit on one page
Solutions:-
Change the margins or orientation in Page Setup to keep your image on one page.
-
Edit the picture to reduce its dimensions.
- Change the scaling in Page Setup to fit 1 x 1 pages.
-
Accept a divided picture and in the Print dialog box, choose to print just the page that has the part you want.
-
- If you do need to change Page Setup choices, click on the button Page Setup.
If you need to edit the image itself, click the Close button.
Once all is fixed, return to Print Preview.  Click the Print button on the Print Preview ribbon, after making sure that your image fits on one
page.
Click the Print button on the Print Preview ribbon, after making sure that your image fits on one
page.
The Print dialog box appears.Here is where you can choose to print only certain pages. Be sure your picture fits on one page.
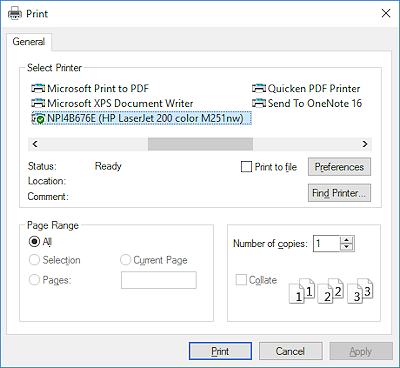
Inspect the other choices on the Print dialog -
- which printer
- what pages to print or just what was selected.
- the number of copies
- preferences for how the printer behaves, including color or gray scale or black-and-white, orientation of the paper, quality of the paper (especially important if you are printing photos)
- If you have a color printer, select it and then click on Preferences button.
The dialog that opens will be different for different printers.
Check to see if the page will print in color or in gray scale or in black-and-white.
Change, if necessary, to the mode you want.
Once you are satisfied, close that dialog to get back to the Print dialog. - Click the OK button to print your picture.
- Close Paint.
Your instructor (if you have one) may want you to submit the image file to a course management site. You still need experience in printing on paper!
|
|
| © 1997-2017 Jan Smith All Rights Reserved |
Site Map What's New |
Privacy Policy Terms of Service Copyright Acknowledgements |
~~ 1 Cor. 10:31 ...whatever you do, do it all for the glory of God. ~~
Last updated: April 27, 2017