
Jan's Working with Words
Templates: Text Boxes
A text box is simply a shape that can hold text.
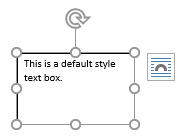
 The default text box is a rectangle with a white background and black text. This is what you get when you select the Text Box shape
 ![]() .
.
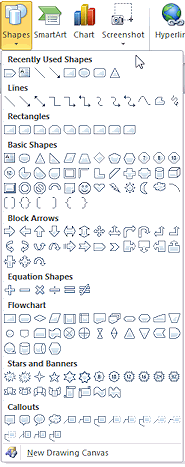
But you can add text to any AutoShape in the Shapes gallery. In the Normal template the default style for a shape is Colored Fill Blue, Accent 1 with white text and a dark blue border.
To create a text box:
On the Insert tab, pick a shape from
the Shapes gallery and drag in your document to create the size shape that
you want.
Start typing while the shape is still selected and your shape becomes a text box. It's that easy. Next you can get creative with your formatting of the text and of the text
box.
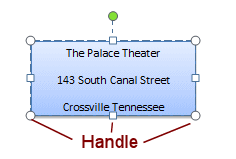 These shapes are completely
resizable. Just drag the handles. Text does not resize with the shape.
These shapes are completely
resizable. Just drag the handles. Text does not resize with the shape.
![]() How
to resize and keep shape proportions:
How
to resize and keep shape proportions:
Hold down the
SHIFT key while you drag a corner handle to keep a shape's proportions. Dragging a corner
handle alone will not keep the shape's proportions, unless you are really good at dragging at a 45 degree angle.
Features of Shapes/Text Boxes
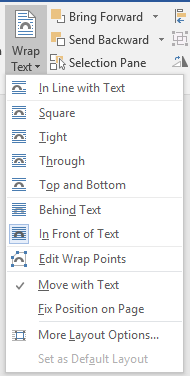 Wrap: Text
can wrap around the outside of a shape in many different ways. The Wrap Text gallery and the
dialog Layout > Text Wrapping tab let you control text wrapping.
Wrap: Text
can wrap around the outside of a shape in many different ways. The Wrap Text gallery and the
dialog Layout > Text Wrapping tab let you control text wrapping.
Grouping: Once you have two or more shapes that are neatly arranged, you can group them together. That lets you drag the whole group around or resize it as a whole, without messing up your careful arrangement.
Link: One major advantage of putting text into text boxes is that you can link text boxes together to flow text from one part of a document to another. This what a newspaper or magazine article does when its text flows into a new column or finishes several pages away from where it started.
Spell Check: Spell Check
normally will see the text in a text box. When the text box is grouped with other drawing objects, Word may get
confused. Check your spelling and grammar early. Spell check does NOT see WordArt.
Format: Tools on the Drawing Tools ribbon tab let you format a shape, including those with text. You can change the background and outline and add effects like Shadow, Glow, Rotation, Transform. You can also apply effects to the text inside the text box like you did with WordArt.

| |
Step-by-Step: Text Boxes |
|
| What you will learn: | to create a text box to add text to a text box to format a text box to change the shape of a text box to change the stacking order to edit a text box to group a text box with an image |
Start
with: ![]() , Word 2007: letter3-Lastname-Firstname.docx
, Word 2007: letter3-Lastname-Firstname.docx
Word 2010, 2013, 2016: letter5-Lastname-Firstname.docx
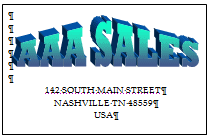
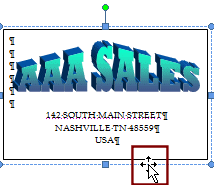
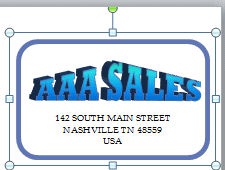
The AAA Sales logo looks a bit lonely. It needs an address to keep it company. You will take the address that is the heading of the letter and move it into a text box underneath the AAA Sales logo.
- If necessary, open the letter from the previous lesson:
 Word 2007: letter3-Lastname-Firstname.docx


 Word 2010, 2013, 2016: letter5-Lastname-Firstname.docx
-
 Save
As letter6-Lastname-Firstname.docx in the folder word project2
Save
As letter6-Lastname-Firstname.docx in the folder word project2
(Word 2007 users - Your last version was letter3 so you are skipping some numbers.)
Word 2010, 2013, 2016: Add Text to WordArt Text Box
[Word 2007 will not let you paste normal text into the container for the WordArt.]
-
 Select the 3 address lines at the top right of the letter, lines 5, 6, and
7.
Select the 3 address lines at the top right of the letter, lines 5, 6, and
7. -
Copy.
-
Click at the right end of the WordArt, AAA SALES.
The shape of the WordArt shifts to temporarily remove the advanced effects.
-
 Press ENTER.
A new line is created in the text box holding the WordArt.
-
 Paste.
The three address lines appear inside the text box.
Word 2010:
USA
is unexpectedly centered.
Word 2016: Tall blank line below the address
-
 Click outside of the text box.
The WordArt re-applies all of the advanced effects, but things look different now! The bottom edge of the WordArt is not flat anymore. Plus, the address lines are using the Triangle Up transformation, too. What a change, and not in a good way! -
Undo twice and then click in the document to deselect the WordArt.
The WordArt should be back to the original with the gradient and effects.
Clearly we cannot put the address into the same text box as the WordArt.
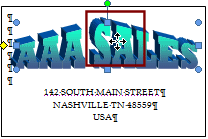
Create Text Box
To keep the address as normal text, you will have to get a little sneaky. You will create and format a new text box for the address and line it up with the WordArt. You can then group the two together for a logo that you can use in other documents.
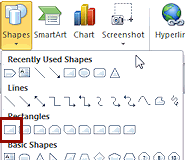 On
the Insert tab click on
the Shapes button and then on the Rectangle shape.
On
the Insert tab click on
the Shapes button and then on the Rectangle shape.
Your pointer changes to the Precision Select shape.
-
 Drag to create a text box around the WordArt logo that is
large enough to hold the logo and leave room for the address below it.
Drag to create a text box around the WordArt logo that is
large enough to hold the logo and leave room for the address below it.The default style for Word 2007 has a white background but for Word 2010, 2013, and 2016 the background is blue.
-
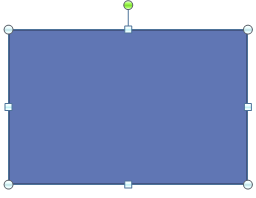 Release the mouse.
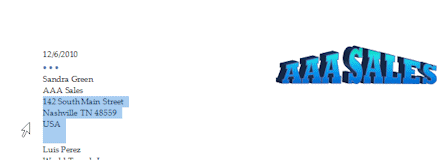
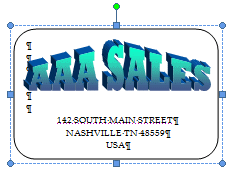
Your logo vanishes!! Not to worry. It is hidden by the opaque text box you just created. You will fix this shortly. -
Save.
[letter6-Lastname-Firstname.docx]
Add Text
-
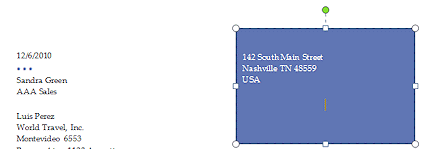 Select the
three return address lines at the left top of the page and cut them.
Select the
three return address lines at the left top of the page and cut them.
- Prepare to paste:
Word 2007: Right click the rectangle and select Add Text.
A paragraph mark appears in the shape.
Word 2010, 2013, 2016: Click on the rectangle to select it. -
Paste the text you cut into the text box you created.
This location will put the text overlapping the logo so you must move the text down.
-
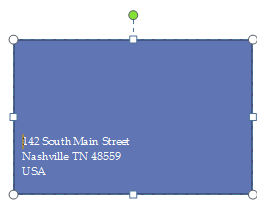 Click in front of the first line of the address and press the ENTER key repeatedly to move the address down to the bottom of the text box.
(How many times depends on the size of your text box.)
Click in front of the first line of the address and press the ENTER key repeatedly to move the address down to the bottom of the text box.
(How many times depends on the size of your text box.)
- Save.
[letter6-Lastname-Firstname.docx]
Change Stacking Order
You need to put the text box behind the WordArt logo by changing the stacking order of these drawing objects.
-
 If necessary,
select the text box.
If necessary,
select the text box.
- If necessary, switch to
Word 2007: Text Box Tools: Format tab
Word 2010, 2013, 2016: Drawing
Tools: Format tab
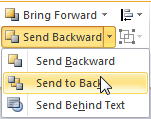
- Click on the Send Backward button to
open its list.
-
Click on Send to Back.
 This moves the
text box to the bottom of
the stack of objects underneath it.
This moves the
text box to the bottom of
the stack of objects underneath it. The command Send Backward moves the selection down one layer in the stack. In this case the WordArt is the only other object so Send Backward would work just as well as Send to Back.
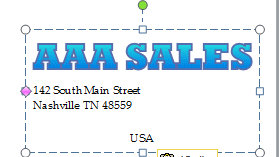
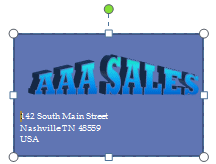
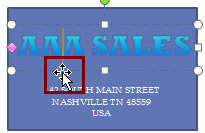
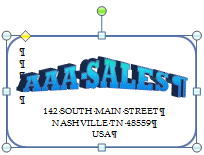
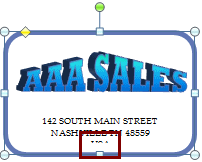
If you sized and positioned your text box well, you can now see both the address and the WordArt.
 Problem: Part of address is under the WordArt
Your text is still too high in the text box. You need to add more blank lines.
Solution: Undo the Send to Back. Add one or more blank lines above the address lines. Send to Back again. (You may need to use the arrow keys to move the cursor up and to the left of 142 South Main Street.) Problem: Part of address is cut off at the bottom
Your text box is not tall enough.
Solution: Drag the bottom center handle down to make the text box tall enough to show all 3 lines of the address. - Save.
[letter6-Lastname-Firstname.docx]
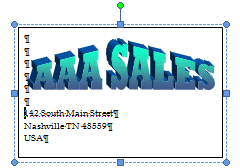
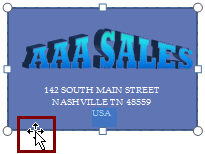
Format Text
You can format the text and the text box to be more readable and to just look better. Then you can adjust the positions of the two text boxes, WordArt and address, until they line up nicely.
-
Select the address lines in the text box.
- Format address as all uppercase letters:
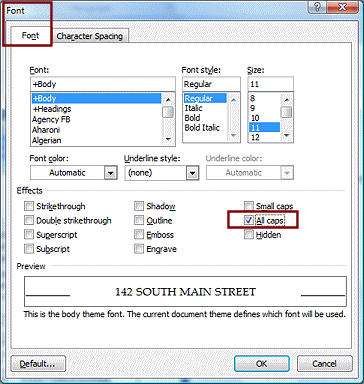 Word 2007: On the Home tab in the Font tab
group, open the Font dialog with the Dialog Box Launcher.
Check the box for All Caps. Word 2010, 2013, 2016: Use the Change Case button
Word 2007: On the Home tab in the Font tab
group, open the Font dialog with the Dialog Box Launcher.
Check the box for All Caps. Word 2010, 2013, 2016: Use the Change Case button  on the Home ribbon tab to change the
address to UPPERCASE.
on the Home ribbon tab to change the
address to UPPERCASE. -

 Center the address lines with the Center button on the Home ribbon tab.
 -
Click outside the box to deselect it.
-
Make adjustments if the address and logo don't seem in quite the right positions. Move the WordArt or the address text box until you are satisfied.
 Tips on arranging objects:
 - If your WordArt shows a paragraph mark, turn off display of marks temporarily.
The paragraph mark in the WordArt takes up space in the text box. The shape and width of the WordArt is different once the mark is hidden! - Be sure the pointer has changed to
the
 Move shape or you will be resizing
instead of moving!
Move shape or you will be resizing
instead of moving! - To resize the text box, click on its border to get handles and resize the box.
- To move WordArt inside its own text box:
-
 Word 2007: Click on the Word Art.
The pointer changes to the Move shape, 4 arrows.
Drag.
-
 Word 2010, 2013, 2016: Click on one of the letters.
The shape changes temporarily and a cursor appears in the WordArt text.
Move the pointer over the border around the WordArt until the pointer shape changes to the 4 arrows.
Drag.
-
-
 Move the WordArt box on the page:
Click in the text box away from the WordArt to select the text box.
Move the mouse pointer over the text box's border. The pointer shape changes to 4 arrows.
Drag - To move something a small distance, use the arrow keys on your keyboard.
- If your WordArt shows a paragraph mark, turn off display of marks temporarily.
-
Save.
[letter6-Lastname-Firstname.docx]
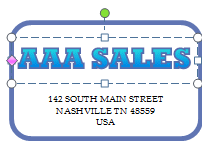
Format Text Box
The dark background in Word 2010, 2013, and 2016 and the boring rectangle box can be improved on. You just need to format the text box.
- If necessary, click in the address text box, not on the logo.
The text box with the address is selected.
-
Change the shape of the text box:
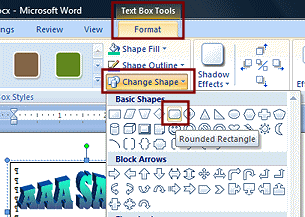 Word 2007: On the Text Box Tools:
Format tab, click the button Change Shape.
Word 2007: On the Text Box Tools:
Format tab, click the button Change Shape.
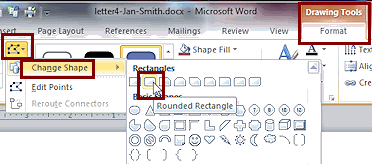 Word 2010, 2013, 2016: On the Drawing Tools: Format tab, click the button Edit Shape and hover
over Change Shape.
Word 2010, 2013, 2016: On the Drawing Tools: Format tab, click the button Edit Shape and hover
over Change Shape.
A gallery of shapes appears.
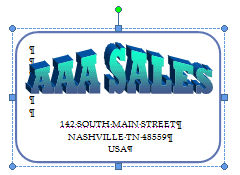
-
 Click on the Rounded Rectangle shape.
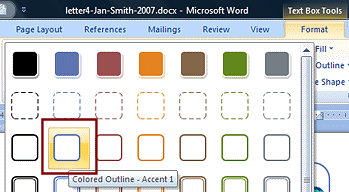
- On the same ribbon tab, select a shape style:
Word 2007: click the Styles dialog box launcher
to open the gallery of pre-set styles. Click on style = Colored
Outline, Accent 1 (Row 3, Column 2)
 Word 2010, 2013, 2016: In the gallery of shape styles, click on Colored
Outline, Indigo, Accent 1 (Row 1, Column 2)
Word 2010, 2013, 2016: In the gallery of shape styles, click on Colored
Outline, Indigo, Accent 1 (Row 1, Column 2)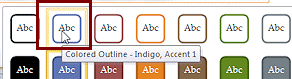
 Experiment: Shape Styles
Hover over various other shape styles and let Live Preview show the effect.
Do you see any that look better with this WordArt?-
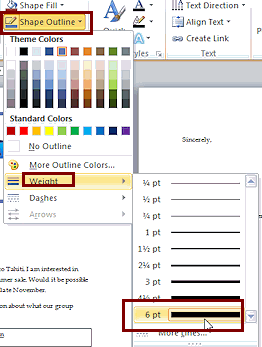 Click the Shape
Outline button and then hover
over Weight.
Click the Shape
Outline button and then hover
over Weight.
A gallery of widths for the lines appears.
-
Click on 6pt.

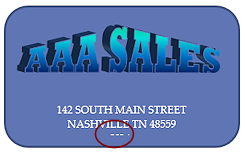
 Problem: Last line of the address is now hidden or partially hidden
If your text box was just big enough before you made the outline wider, then the last line will be hidden or partly hidden.Solution 1: If you have extra white space above the address as the illustration shows, you should remove some of the blank lines that are above the address. This can be tiny bit trickier than it looks at first. Your mouse cannot get to the lines that are underneath the logo so that you can delete one or two. You can change the stacking order, or, you can get the cursor into the address lines and use the Up arrow key to move the cursor up underneath the WordArt so you can delete a blank line.
Solution 2: If you do not have extra white space above the address, make the text box taller.
-
Save.
[letter6-Lastname-Firstname.docx]
Group Objects
As a safety precaution, it is wise to group objects that you want stay to together. That way you won't accidentally mess up the arrangement you worked so hard to get just right.
-
 Select the WordArt by clicking on one of its letters.
 Handles appear around the logo and the letters temporarily shift in Word 2010, 2013, and 2016.
-
 Hold down the SHIFT key and click on the border of the
text box. Both the logo and
the text box are now selected. Handles show for both objects.
Hold down the SHIFT key and click on the border of the
text box. Both the logo and
the text box are now selected. Handles show for both objects.
-
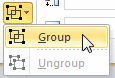 From the Text Box Tools tab or the Drawing
Tools tab, click on the Group button
to open the list and then on Group.
From the Text Box Tools tab or the Drawing
Tools tab, click on the Group button
to open the list and then on Group.This fastens the two objects together. Now they are treated as one object and can be moved together without changing their relationship to each other.
Handles appear only for the combined object.
Later you can ungroup a group by clicking the Group button again and selecting Ungroup.
-
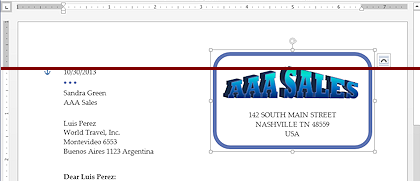 Drag the combined group up so that the top of the WordArt is about even with the top of the date line at the left.
The right edge of the group should be at about 6.75 on the horizontal ruler. The group logo extends into the letter's margin.
- Save.
[letter6-Lastname-Firstname.docx]
Header vs. Drawing object
- Open the header by double-clicking in the header.
This only works after a header has been created, but the template did that for you unless you erased it.
- Type your name, 2 spaces, insert the date, tab twice, and Word Project 2 .
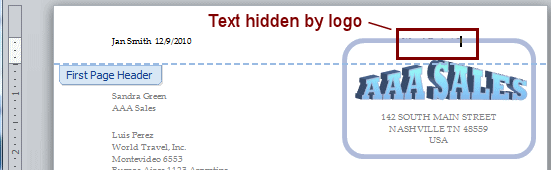
Whoops - at least in some instances. The AAA Sales logo may block part of the text you typed on the right. Word 2010's template blocks more than Word 2013's. Of course it also depends on exactly where you positioned the logo.
The colors of the WordArt are paler and grayer. The logo is part of the body of the document. When the header is open, the rest of the document is grayed out a bit.
-
 If necessary, enlarge
the header by dragging the
boundary between the white and gray
parts of the vertical ruler down just a little. The letter text and the logo move down as you enlarge the margin. Keep dragging until the header text is entirely visible.
If necessary, enlarge
the header by dragging the
boundary between the white and gray
parts of the vertical ruler down just a little. The letter text and the logo move down as you enlarge the margin. Keep dragging until the header text is entirely visible. - Click the button Close Header/Footer to go back to the
document.
Colors pop back to normal.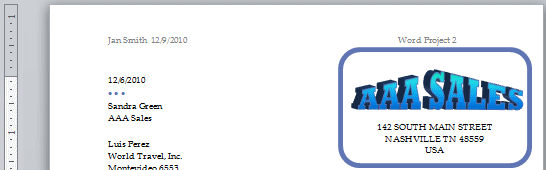
- Save.
[letter6-Lastname-Firstname.docx]
Preview and Print
How much of your letter is on the second page? It depends on several things, so your letter may not quite match the illustration below.
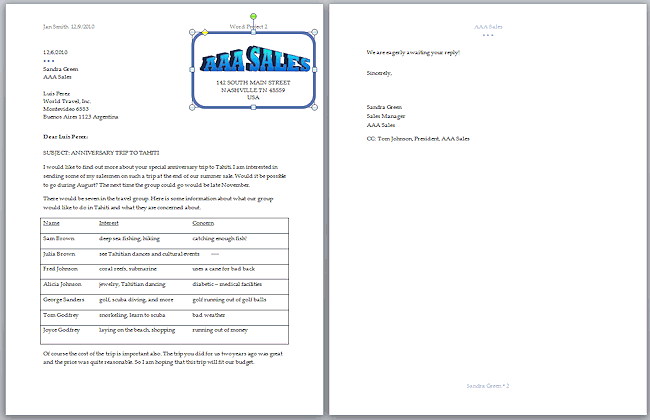
Now that the logo is completed, you can remove a couple of lines that aren't needed anymore. Then you can adjust the white space in several different spots to reduce the letter to one page.
- Change the Zoom to show 2 pages.
- Delete lines 3 and 4, the sender's name and company
name at
the top left of the page.
You don't need these since you have the company info in the logo and the sender's name in the signature block.
- Select the lines that make up the tabbed columns table, lines 14 - 22.
- Open the Paragraph dialog and change:
- Line Spacing = Single
- Space After = 0 pt.
- Remove the line break in the last table row.
Do you still have a lonely line left on page two? Probably.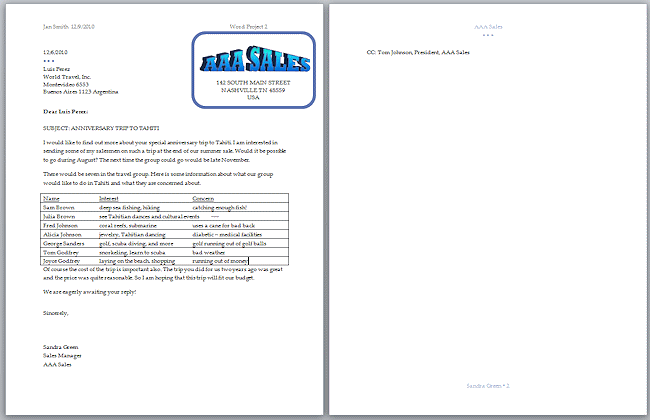
You will make some more adjustments, even if your document does not actually need them to get to just one page. - Select line 25, Sincerely.
-
 In
the Paragraph dialog, change the Space Before to 12
pt.
In
the Paragraph dialog, change the Space Before to 12
pt.
- Select the greeting, Dear Luis Perez:
-
In the Paragraph dialog change the Space After to 6 pt.
You letter should now fit onto a single page. Hurrah!
- Save.
[letter6-Lastname-Firstname.docx]
-
 If all is correct, print.
Revise
The current letter is not particularly wonderful in its layout and appearance. Perhaps you can improve it.
-
Experiment: Themes
On Page Layout or Design ribbon tab, find the Themes button and open the gallery of themes.
Hover over each one and check to see what changes.Is there a theme you like better than the current one? How does the theme change the letter? Does the letter still fit on one page? Does the theme change the WordArt? None of the colors for the WordArt were theme colors except the Depth.
- Apply your choice of theme to the letter.
- Inspect your document.
How can you improve the look and readability of this letter? What could you change? Font? Font size? Spacing? WordArt colors or font? Text box shape or colors? - Make changes that improve the letter and save your letter as
letter6-revised-Lastname-Firstname.docx to your word project2 folder. Your letter should not be quite like any other student's. - Print.
- When your print out is done and you have verified that it is correct, close the document window.
Congratulations on using a template to create a document and
making
a logo!
|
|
| © 1997-2017 Jan Smith All Rights Reserved |
Site Map What's New |
Privacy Policy Terms of Service Copyright Acknowledgements |
~~ 1 Cor. 10:31 ...whatever you do, do it all for the glory of God. ~~
Last updated: March 22, 2017