
Jan's Working with Words
Interface: Ribbon
Starting with Office 2007, the window for Word and other Office programs uses a ribbon with tabs to hold the buttons, commands, and galleries that earlier versions put on the menu and various toolbars. The new design is intended to let you see more choices at once without having to open and reopen menus. Very helpful!
Also, you are supposed to be able to get to the other features with fewer clicks and less digging down through layers of menus. Of course, what you need to do may be different from what the average user needs!
The active tab is has a border and a lighter color than the background. In these lessons, the names of tabs will be formatted like: Home
Inactive tabs don't have a tab shape around the tab's name. The name just sits there on the background of the ribbon.
Examples:
The default tabs show their names across the top of the ribbon.
![]() Word 2007: Ribbon with View tab selected
Word 2007: Ribbon with View tab selected

![]() Word 2010: Ribbon with Home tab selected
Word 2010: Ribbon with Home tab selected

![]() Word 2013: Ribbon with Insert tab selected
Word 2013: Ribbon with Insert tab selected

For some reason Office 2013 uses all caps for the ribbon tab labels.
![]() Word 2016: Ribbon with Design tab selected.
Word 2016: Ribbon with Design tab selected.

Context-sensitive tabs:
 There are more tabs than
the ones that show when Word starts. Other tabs appear
when they are needed.
There are more tabs than
the ones that show when Word starts. Other tabs appear
when they are needed.
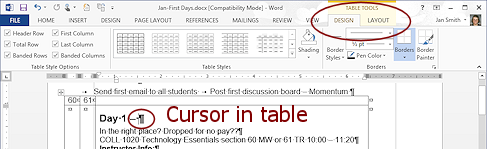
Example: The Table Tools tab group with its two tabs, Design and Layout, only appears when the cursor is in a table. That makes sense!
Customizing the Ribbon
If you can write programming code, you can change a lot about the ribbon. That's no help for most of us!
In particular, for the ribbon that comes with Word:
- You cannot add commands or groups of commands to the existing tabs.
- You cannot rearrange icons or change the image for an icon on the existing tabs.
- You cannot move the ribbon from the top of the window.
- You cannot switch back to the old toolbars-with-menus interface.
 Minimized Ribbon
Hide ribbon: Right click on a tab and select or . Only the tab titles will show.
Show ribbon temporarily: Click on a tab.
Show ribbon all the time again: Right click a tab again and click on or again to uncheck that command and keep the ribbon in view. Or, double-click a tab.
![]()
![]()
![]() Word 2010/13/16: More control of the ribbon
Word 2010/13/16: More control of the ribbon
- Custom tab or tab group: You can add a custom tab to the ribbon or a custom group to one of the default tabs. You still cannot change the default ribbon layout.
- Import/export ribbon: You can transport your custom tab or group to a different computer that has Word 2010, 2013, or 2016 installed.
Ribbon vs. Window Width
If the window is too narrow to show all of the ribbon items, groups on the ribbon will collapse.
 This
illustration shows all of the groups on the Home tab as collapsed for a very
narrow Word window. Clicking the arrow at the bottom of the group opens a
palette that shows what was hidden.
This
illustration shows all of the groups on the Home tab as collapsed for a very
narrow Word window. Clicking the arrow at the bottom of the group opens a
palette that shows what was hidden.
The Font group is opened in the illustration.
I don't think you really want to work with a window this narrow anyway!
Just don't be surprised when you don't see what you are looking for on the
ribbon in a window that is slightly too narrow to show everything. You've been
warned!
Quick Access Toolbar
At the top left of the Title bar is the Quick Access Toolbar. By default it holds just three icons: ![]()
![]() Save,
Save,

![]()
![]() Undo,
and
Undo,
and 

![]() Redo.
Redo.
Office 2007/10/13/16 remembers the last 100 actions! So the Undo button will back you up when you get carried away. If you back up too far, the Redo button will walk back through the actions.
Some actions can be repeated. The Redo button ![]() will change to
the Repeat button
will change to
the Repeat button 

![]() in that case.
in that case.
![]() The More arrow
The More arrow ![]()
![]()
![]() at the
right end of the bar opens a drop list of commands that you might want to add to the Quick
Access Toolbar. A check
mark in the list shows that the item is already on the bar. Just click on one of these popular
commands to add it.
at the
right end of the bar opens a drop list of commands that you might want to add to the Quick
Access Toolbar. A check
mark in the list shows that the item is already on the bar. Just click on one of these popular
commands to add it.
You can add icons for other commands that exist in Word, using at the bottom of the list. Choose buttons for things that you do often, but which are not on the tab that is usually open when you need that command. This dialog is also where you can change the order of the icons on the bar.
Example: What I added to the Quick Access bar and Why
Word 2007: 
Word 2013: ![]()
Word 2016: ![]()
When I create a document for a math class, I often need to use superscripts for writing formulas like
a2 + b2 = c2. There is a button for superscript on the Home tab in the Font group. But, I found that I often
wanted to superscript soon after I inserted a symbol. The button to open the
Symbols dialog is on the Insert tab. Awkward!
So, I put a button ![]()
![]()
![]() for superscript
formatting on my Quick Access bar. Exactly the situation for which the Quick
Access Toolbar was designed. Even better, I put a button for Symbols
for superscript
formatting on my Quick Access bar. Exactly the situation for which the Quick
Access Toolbar was designed. Even better, I put a button for Symbols ![]()
![]()
![]() on the
Quick Access Toolbar, too! Now I can do symbols and superscripts easily, no matter
which tab is active.
on the
Quick Access Toolbar, too! Now I can do symbols and superscripts easily, no matter
which tab is active.
I also added a button for Print Preview ![]()
![]()
![]() .
In Word 2007 this replaces 3 actions: Office button >
Print > Print Preview. In Word 2010, 2013, and 2016 this replaces 2 actions: File > Print. In your own work you might find other buttons useful.
.
In Word 2007 this replaces 3 actions: Office button >
Print > Print Preview. In Word 2010, 2013, and 2016 this replaces 2 actions: File > Print. In your own work you might find other buttons useful.
![]() Which print command is it?
Which print command is it?
- Print Preview and Print opens the File > Print view where you can make choices about what to print and where to print it.
- Quick Print immediately prints your document without allowing you to make any changes from the last time you printed. Do you know what the choices were?
You will be adding a few buttons to the Quick Access Toolbar as you go through the lessons. Feel free to add any other items that you find helpful with your other work.
|
|
| © 1997-2017 Jan Smith All Rights Reserved |
Site Map What's New |
Privacy Policy Terms of Service Copyright Acknowledgements |
~~ 1 Cor. 10:31 ...whatever you do, do it all for the glory of God. ~~
Last updated: March 27, 2017