
Jan's Working with Words
Report: Finish: Properties
Any object under Windows has Properties, which can be seen by right clicking on the object and choosing from the context menu.
File Explorer shows selected file properties, like the file size, file type, date created, last date modified, and read-only. These characteristics are more about the file as a whole, not what is inside it.
Word documents have even more document properties like author, title, subject, and keywords. These additional characteristics are about what is inside the document. They may be visible only from within an Office application, depending on which versions of Word and Windows you are using and which properties your File Explorer windows are set to show. Since Windows and Office are both by Microsoft, some of the document properties for Office documents will show in the Details pane in File Explorer.
| |
Step-by-Step: Properties |
|
| What you will learn: | to access a document's properties
from inside Word to see file properties in a File Explorer window to reduce a document's file size |
Start with: ![]() , report-WorldTravelInc8-Lastname-Firstname.docx
, report-WorldTravelInc8-Lastname-Firstname.docx
Different versions of Word show you various file properties in very different ways.
Your own windows and properties may be different from the illustrations, especially File Size, Date Created, Last Date Modified, and the path to the document. Don't let that bother you!
Info Pane
- If necessary, open the file report-WorldTravelInc8-Lastname-Firstname.docx from the word project4 folder on your Class disk.
- Write down the FileSize numbers that show in all of the
headers.
Since the fields were inserted at different times, it is possible that they are different from each other, depending on whether or not you edited the document in between. -
Open the Properties for this document:
 Word 2007:
-
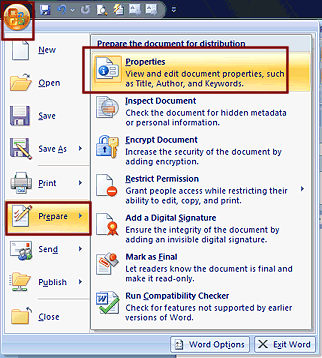
Click the Office button > Prepare > Properties
The Document Properties pane appears between the ribbon and the document. Only a few properties display here.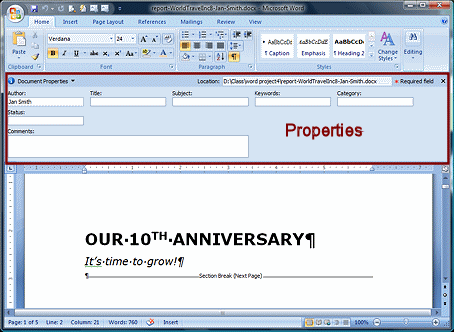
You could enter values here for the blank text boxes, but we will wait and do that with the Properties dialog which shows even more properties. The Properties dialog looks the same in Word 2007, 2010, and 2013.
- Click the arrow beside Document Properties at the upper
left of the new pane.
- Click on Advanced Properties.
The Properties dialog opens.


 Word
2010, 2013, 2016:
Word
2010, 2013, 2016:-
From the ribbon select File .
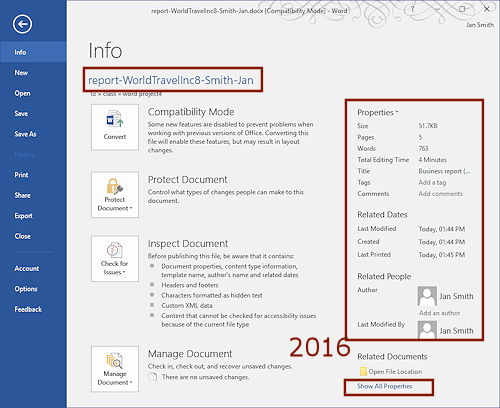
The default panel is Info. At the far right is a list of some of the properties for this document. The path to the file is at the center top. Word 2010 includes a thumbnail of the first page of the document but Word 2013 and 2016 do not.
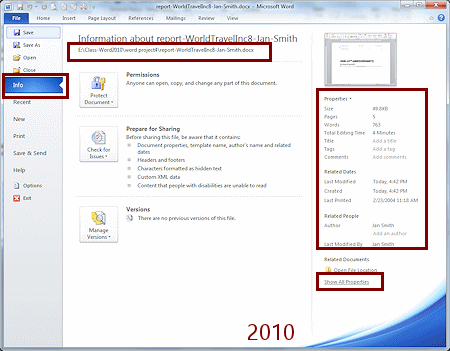

-
At the bottom of the pane, click on Show All Properties. A longer list of properties appears in the pane. You may want to make the window taller to see all of the properties at once.
You can edit some properties directly on the panel, like the Title and Author.
-
Click on various properties to see which ones show a text box for typing.
We will wait to make changes in the Properties dialog, which shows even more properties. That dialog looks the same in all recent versions.
- At
the top of the Properties list, click on Properties to open its menu.
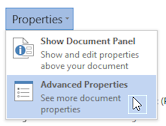 Word 2010 and 2013 have two choices. The first choice, Show Document Panel, opens the Document pane that
you see in Word 2007, between the document and the ribbon. Word 2016 does not offer this choice.
Word 2010 and 2013 have two choices. The first choice, Show Document Panel, opens the Document pane that
you see in Word 2007, between the document and the ribbon. Word 2016 does not offer this choice.
- Click on Advanced
Properties.
The Properties dialog appears.
-
Dialog: Document Properties
-
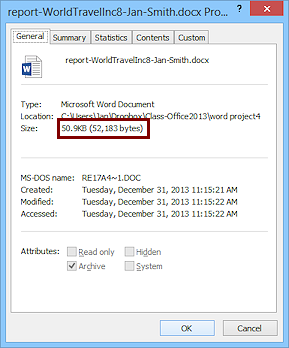 If necessary, click the General
tab.
If necessary, click the General
tab.
This tab shows lots of information about the file. You already included the file size in the report header.Write down the file size (the number of bytes). It is probably different from the number in the illustration.
This tab shows the basic file properties. These properties are about the file, not what is in the document. The values of these properties for your file are probably different from the illustration.
- file path
- file size
- MS-DOS name
- date created
- date modified
- date last accessed
- file attributes
Do not close the dialog yet.
-
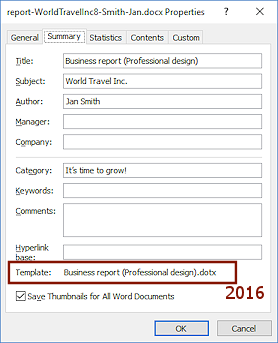 Click the Summary tab.
This tab shows the name of the template that was used to create this document.Some of this information will show in File Explorer in the Details pane. It can help in a search.
-
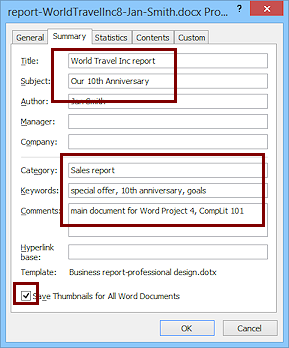 Enter the info as shown at right.
 Title: World Travel Inc. report
Subject: Our 10th Anniversary
Author: Use your own name
Category: Sales report
Keywords: : special offer, 10th anniversary, goals
Comments: main document for Word Project 4, CompLit 101
Check box is checked for Save Thumbnails for All Word Documents.
Note: The Template name has numbers after it if you have downloaded and used the 'same' template multiple times.
Do not close the dialog yet.
-
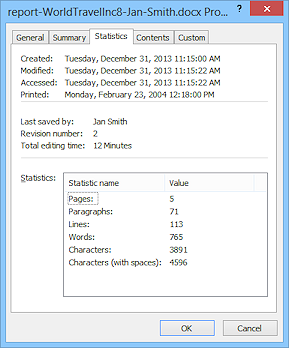 Statistics tab: Shows
dates for when you created, modified, accessed or printed the document plus the number of pages, words,
paragraphs, etc.
Statistics tab: Shows
dates for when you created, modified, accessed or printed the document plus the number of pages, words,
paragraphs, etc. Your values will vary from the illustration of course on the dates and may vary some for the other numbers, too. Blank paragraphs and spaces count!
This is one place to look to see if you've gotten enough words yet for that school paper that has to have 500 words.
-
 Contents
tab: Shows an outline created from your Heading
styles. Those heading styles are just SO useful.
Contents
tab: Shows an outline created from your Heading
styles. Those heading styles are just SO useful. The next time you open File Properties, the Title here will be the one you typed on the Summary page.
Do not close the dialog yet.
-
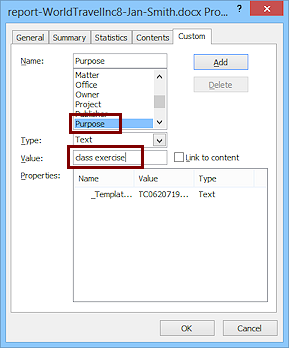 Custom tab: You
can set values for some standard properties or create your own
properties.
Custom tab: You
can set values for some standard properties or create your own
properties.Select the property Purpose in the upper list.
In the Value box type class exercise .
-
 Click the Add button.
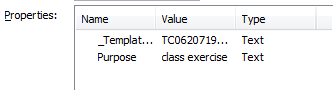
Your new property is listed in the bottom list.
- Click on OK to close the File Properties dialog.
 Save and close.
[report-WorldTravelInc8-Lastname-Firstname.docx]
Properties in File Explorer
Let's take a look at other spots that you can see some of the properties for the document. What you see depends on your version of Windows and whether or not the document is still open. Changes to properties may not show until the document is closed.
- Open a File Explorer window and navigate to where you saved the report.
-
Details view:
If necessary, change the view to Details.
The default columns for Details view are Name, Date modified, Type, and Size.In a folder that has special types of files like Videos, Music, or Pictures, the properties shown will be different. For the Pictures folder, for example, if you use the Details view instead of a thumbnail, there are additional columns for Tags and Rating. There are many other properties that you could choose to show.
- Popup Tip:
 Hover over the file name, report-WorldTravelInc8-Lastname-Firstname.docx.
A popup tip shows a number of properties, exactly which ones depends on your version of Windows and how recently Windows has looked for changed properties. You may see just the file type, file size and date modified.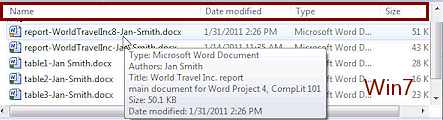
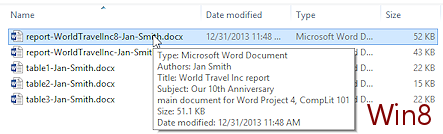

 Problem:
Recent changes to properties did not show in the popup tip
Problem:
Recent changes to properties did not show in the popup tip
Solution: Save and close the document so File Explorer can see the changes. -
Details Pane:
Click on the file's name, report-WorldTravelInc8-Lastname-Firstname.docx
In Windows 7 and Vista, the Details pane appears at the bottom of the window and shows several properties. You can even edit some of them here, like Title and Authors, Tags, and Categories.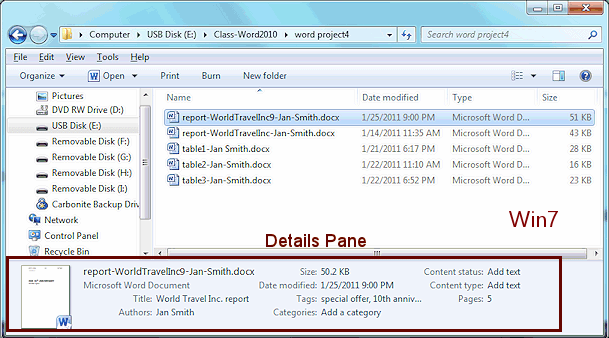
In Windows 8 and 10 the Details Pane is at the right.
If the pane does not show, on the View ribbon tab, click on Details pane.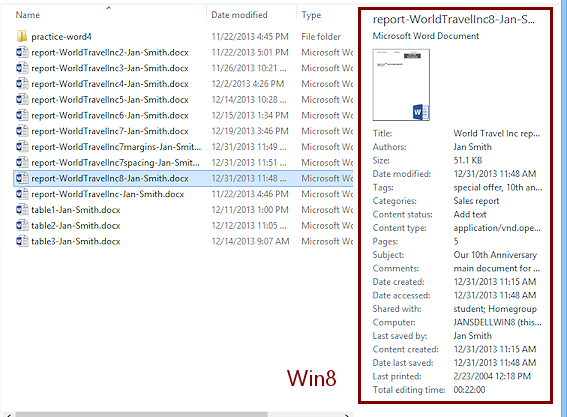
If you checked the Save Thumbnail ... box in the Properties dialog, an image of the first page of the document shows in the Details Pane.
Problem: Details Pane in Win7 or Vista does not show much
If the pane is too short, only a few properties will show.
Solution: Drag the top edge of the Details pane upward until more properties show.
- Make room to show all properties by dragging an edge to enlarge the pane width or height.
Which properties show varies with the version of Windows.

 Vista, Win7: Alternate method: Right click in the list of
properties, but not on a place you can type. From the context menu
you can choose Size and then Small, Medium, or Large. Even the Large size does not
show all of the properties. To see all properties, drag the top edge.
Vista, Win7: Alternate method: Right click in the list of
properties, but not on a place you can type. From the context menu
you can choose Size and then Small, Medium, or Large. Even the Large size does not
show all of the properties. To see all properties, drag the top edge. The
properties do not update while the document is open for editing.
Even after closing the document, you
may need to select something else and then select the file again in
the Explorer list to get the current values.
The
properties do not update while the document is open for editing.
Even after closing the document, you
may need to select something else and then select the file again in
the Explorer list to get the current values.
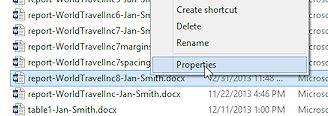 Right click the filename in the Explorer window and then click on Properties in the context menu.
The Properties dialog appears, but it is not quite the same as you saw from inside Word.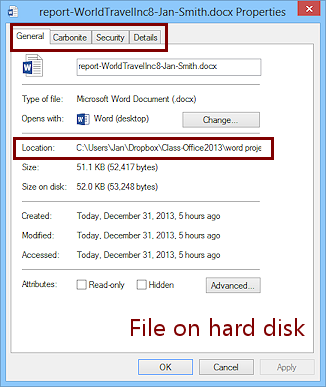
The Properties dialog appears, but it does not have the same tabs as the one you saw earlier! Word apparently made some changes to that dialog.
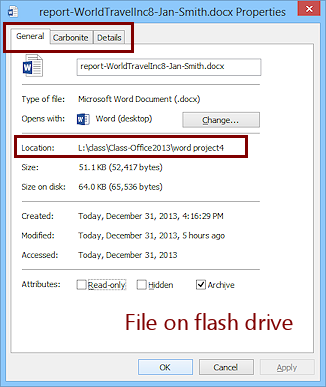
Exactly which tabs you see depends on:
- version of Windows
- hard disk or removable disk
-
what other software you have installed on the computer.
Some security and backup programs may add their own tab to this dialog, like the Carbonite tab in the illustration. Carbonite is an online backup service.
-
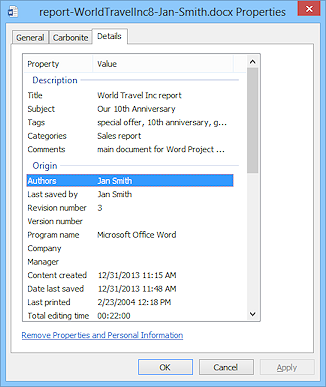 Click the Details tab.
The properties dialog from Word did not have a tab with this name. This tab includes properties from the Word properties tabs Summary and Statistics.'Tags' in this dialog are the same as 'Keywords' in the Word properties dialog.
- Scroll the list in the Details tab to see all the
properties that show here.
- Click on OK to close the dialog.
Update Fields
The three different headers contain a FileSize field. As you added headers, you changed the file size, but the fields do not update automatically! You can update each field separately or all fields in the document at once. All at once is an attractive thought, if you can remember how to do it! The downside of updating all fields at once is that you will lose your custom formatting of those fields. Updating the Works Cited and Table of Contents fields can easily make you redo a lot of work!
- Open report-WorldTravelInc8-Lastname-Firstname.docx again in Word.
- Compare the FileSize shown on each page of your
report. Are they all the same?
Possibly not! You created them at different times.
- Compare the
FileSize field showing in the header of the Cover Page to the file size
you wrote down from the File Properties dialog. Are they exactly the
same? Possibly not! The difference may be small for this file.
The header number has not been updated yet. Even a little bit of editing, such as changing the file properties, makes a difference in the file size.
- Click in the FileSize field in the
header of the first page.
The background of the number may or may not turn gray to show that it is a field.
- Press the F9 key. The field is updated.
- Repeat for the other headers.
- Scroll through the document and check that all headers now show the same number. Is this the number you saw in File Properties?
![]() Updating
all fields at once loses manual formatting: When your cursor is in the body of a document, you can select the
whole document with the Select button or CTRL + A. When
you press the F9 key, all the fields in the selection are updated.
BUT... you will lose
any manual formatting you applied. For example in this document you
increased the font sizes for the Works Cited page and centered the title. Those will go back to the paragraph styles.
Updating
all fields at once loses manual formatting: When your cursor is in the body of a document, you can select the
whole document with the Select button or CTRL + A. When
you press the F9 key, all the fields in the selection are updated.
BUT... you will lose
any manual formatting you applied. For example in this document you
increased the font sizes for the Works Cited page and centered the title. Those will go back to the paragraph styles.
The biggest
issue in this case, however, is that the headers are not part of the 'whole document' when you
select. Each section's header is a separate 'document' to Word.
Save to Reduce Size
As you work with a document, the file size has a tendency to grow. It can become several times larger than necessary! You can often reduce the size substantially by saving the document under a different name. You have been saving your report with a different name at the various stages of work to avoid this very thing.
When working with an old print version of a set of lessons, I had files which started with a file size of about 2 MB but which grew to over 20 MB each! I had not added that much material!!! Saving under a different name from time to time kept the file size under control.
- Look at the properties to see the current file size, with the method of your choice.
- Save this document on your Class disk with a new name: report-WorldTravelInc9-Lastname-Firstname.docx
- Look at the properties again. Are they the same??
Your may be larger than before! That happens when you make changes. - Update the FileSize field on page 1.
-
 Print page 1 only of report-worldtravel9-Lastname-Firstname.docx Save disk space: To save space on your disk, once you
have printed your documents and see that all is well, you could delete the
larger, original file and then rename the smaller file to the original
name. This technique seems to help with documents that have been worked
with a lot. Keep it in mind if your disk gets
full. The documents for these lessons do not get very big.
Print page 1 only of report-worldtravel9-Lastname-Firstname.docx Save disk space: To save space on your disk, once you
have printed your documents and see that all is well, you could delete the
larger, original file and then rename the smaller file to the original
name. This technique seems to help with documents that have been worked
with a lot. Keep it in mind if your disk gets
full. The documents for these lessons do not get very big.
- Close the document.
|
|
| © 1997-2017 Jan Smith All Rights Reserved |
Site Map What's New |
Privacy Policy Terms of Service Copyright Acknowledgements |
~~ 1 Cor. 10:31 ...whatever you do, do it all for the glory of God. ~~
Last updated: March 22, 2017