
Jan's Working with Words
Report: References
In the body of a report or other document you may see a superscript symbol like * or number like 4. These tell you to look at another part of the report for more information. Some report styles put this extra information at the bottom of the page as a footnote. Other styles put it in a list of endnotes, which comes after the main body of the document. Numbers are generally used for the superscripts if there are lot of references.
There are two kinds of extra information that might be in such a reference:
- Explanation or comment about what is in the document
- Source of what is in the document
In MLA style, superscripts mark explanations that appear in footnotes. The source information is written as part of the body text by placing the author's name and the page number between parentheses like (Smith 10). The complete source information is listed in the Works Cited page at the end of the document.
| |
Step-by-Step: References |
|
| What you will learn: | to
insert a parenthetical reference to insert a explanatory reference as a footnote to change Note Options |
Start with: ![]()
![]() , report-WorldTravelInc3-Lastname-Firstname.docx from the previous lesson
, report-WorldTravelInc3-Lastname-Firstname.docx from the previous lesson
Parenthetical References
Next you are going to add to the report the citations for statements that came from the sources listed in your Works Cited page. You need to cite any quotations and facts that came from these sources. In some instances you may need to cite ideas or general concepts, especially if they are unusual or are original to that source.
If your Works Cited page lists more than one work by the same author, you must include a title with the parenthetical reference. If the work has only one page, you don't need a page number.
 Save as report-WorldTravelInc4-Lastname-Firstname.docx in the word project4 folder on your Class disk.
- Insert Citation:
 Click to the right of 'business.' on the second line of the paragraph
after the heading 'Our Motivation: A Changing World'.
Click to the right of 'business.' on the second line of the paragraph
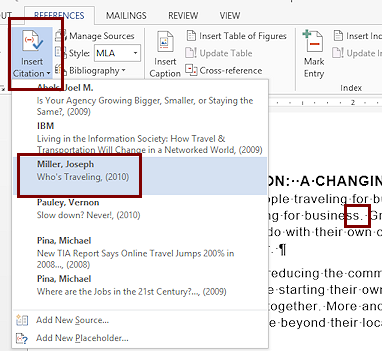
after the heading 'Our Motivation: A Changing World'.- Click the Insert Citation button on the Reference tab.
- Click the source Miller in the list of
sources.
(Miller) appears in the text. 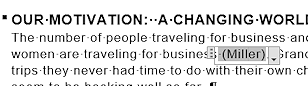 Click on the word 'Miller'.
A field box appears around it.
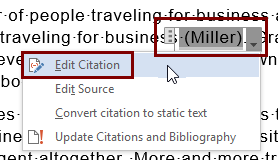 Click the arrow to open the menu of
options.
Click the arrow to open the menu of
options.- Click Edit Citation.
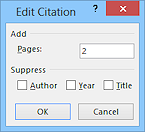 Type 2 in the Pages box.
- Click on OK.
(Miller 2) now shows in the text with a space on each side. - Repeat similarly for the remaining citations.
(References are highlighted in the illustration below but won't be in your document.)

Why use the Insert Citation button instead of just typing it in?
By using the button, you can update the citations if you have to update the source information. If you create citations as you write, you get the citation in the text automatically when you create the new source or when you pick a source from the list from the Insert Citation button. This is as painless as it can get for creating reference lists and citations!
- Save.
[report-WorldTravelInc4-Lastname-Firstname.docx]
Explanatory Reference as a Footnote
Word makes it easy to include a footnote or a page of endnotes. You won't really appreciate this unless you ever had to create a document with footnotes using a typewriter! It's quite a blessing.
Some word processors make it even easier by having a footnote wizard which has a dialog similar to the Create Source dialog for all the source information. The wizard automatically formats the footnote using the manual of style that you choose. No more worries about punctuation and the order of the parts! Of course, the word processor must include the style manual that your teacher or publisher wants to use for this to do any good!
-
 Place the cursor at the end of the sentence Major airlines are reducing
... arranging airline tickets. .
Place the cursor at the end of the sentence Major airlines are reducing
... arranging airline tickets. .
-
From the References tab in the Footnotes tab group, click on the big button Insert Footnote.
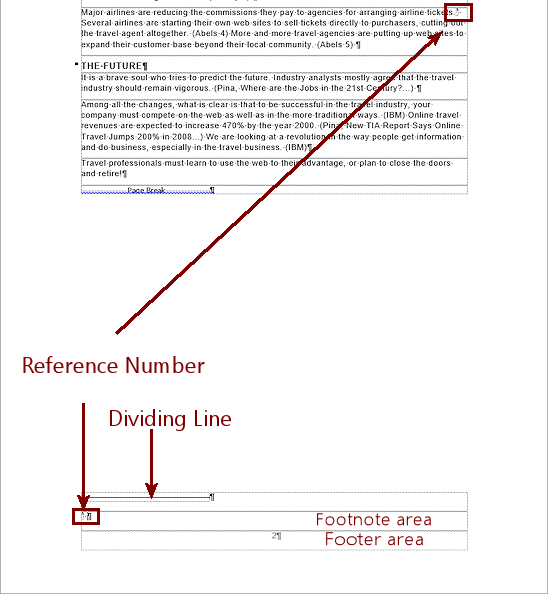
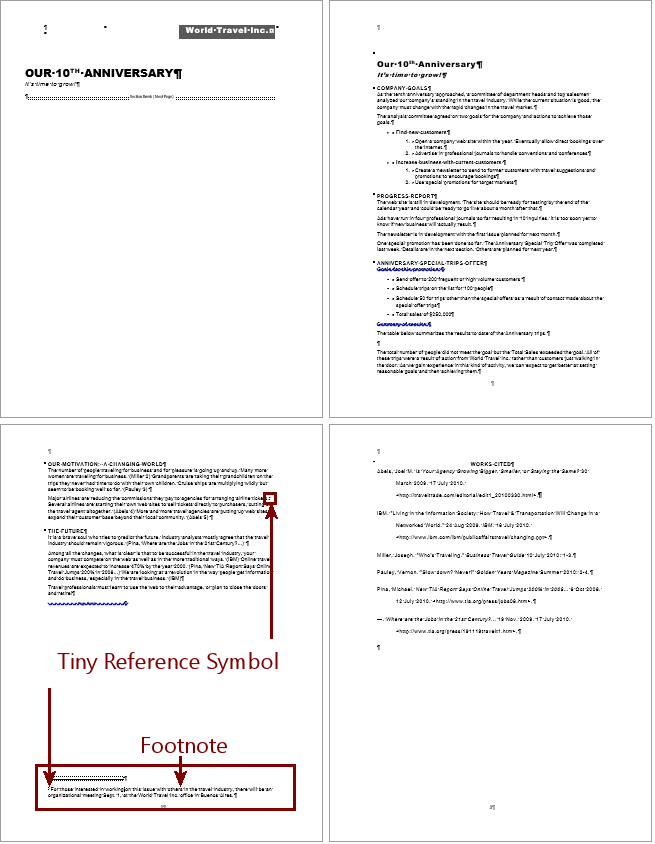
Word creates a footnote area at the bottom of the page, above the page's footer, and automatically numbers it. The cursor jumps to the bottom of the page for you to start typing your footnote.The illustration has the dotted lines for text areas to make it clearer where the footnote and footer are. These dotted lines make the document hard to read!
Note: Word 2010 puts a blank paragraph between the dividing line and the footnote text. Word 2007, 2013, and 2016 do not. This makes the flow of text from page to page different by one line.
These names 'footnote' and 'footer' are a bit confusing. Just remember that every page has a footer, even if it is blank. But NOT every page has a footnote.Three new things appear, in Print Layout view:
- Reference number where the cursor was
- Dividing line above footnote area
- Reference number in footnote area at the bottom of the page
The style Footnote Reference is automatically applied to the tiny superscript number and the style Footnote Text is automatically applied to the text of the footnote. Using these styles ensures that all your footnotes will look the same. Unhappily, the styles do not usually show in the Styles Gallery and Styles pane.
In Normal view, Word opens a footnote window at the bottom of the Word window. You will have to close it yourself after you finish creating the footnote.
 Footnotes follow the text: If you edit your document so that the
sentence with the footnote reference changes pages, the footnote will move, too. Super!!
Footnotes follow the text: If you edit your document so that the
sentence with the footnote reference changes pages, the footnote will move, too. Super!!
- Type the text below as the footnote text:
For those interested in working on this issue with others in the travel industry, there will be an organizational meeting Sept. 1, at the World Travel Inc. office in Buenos Aires.

Notice what font and font size are used here - Arial 9 pt. The headings and Body Text style use Arial also.
-
Save.
[report-WorldTravelInc4-Lastname-Firstname.docx]
Dialog: Note Options
The command Note Options... in the context menu opens the dialog Footnote and Endnote. You can pick a location for your references - Bottom of page or Below text. You can also select the symbols to use from several standard sets of symbols or create a custom set of symbols.
-
 Right
click in the footnote area.
Right
click in the footnote area.
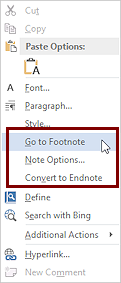
The context menu includes 3 items special to footnotes:
Go to Footnote - Takes the cursor to the text with the same reference number.
Note Options... - Opens a dialog about footnotes and endnotes.
Convert to Endnote - Changes the footnote into an endnote.
-
Click on Note Options...
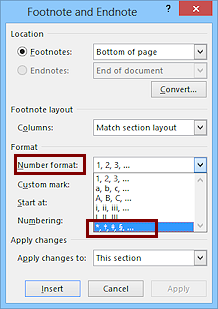
The Footnote and Endnote Options dialog appears.Look at what your options are - whether to use footnotes or endnotes, where to put them, the type of numbering, the start number...
- Click the arrow at the right of the Number format text box.
A list of standard numbering formats appears.
- Click on the last one, which has symbols instead of letters or numbers.
The first symbol is a tiny asterisk so the first footnote you put into this document will use that symbol as its reference "number". The second footnote will use the second symbol, a dagger and so forth.
- Click on the button Apply to close the Footnote and Endnote dialog
and apply the change.
If you click on Insert, you will get a second reference number at the left of the footnote. Not at all
what you want!
- Save.
[report-WorldTravelInc4-Lastname-Firstname.docx]
- Close the report. You will add more material to this report after taking a break to practice with tables.
|
|
| © 1997-2017 Jan Smith All Rights Reserved |
Site Map What's New |
Privacy Policy Terms of Service Copyright Acknowledgements |
~~ 1 Cor. 10:31 ...whatever you do, do it all for the glory of God. ~~
Last updated: March 22, 2017