
Jan's Working with Words
Report: Tables
A table is a set of rows and columns. The intersection of a row and a column is a cell. By default in Word, a table has a ½ pt black, single, solid-line border that will print. Word will show a faint non-printing border for table cells that do not have printable borders but only when the cursor is in the table.
Create a Table: Button on Insert Tab
 You
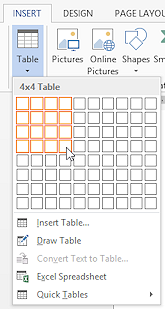
can create a simple table most easily in Word by clicking
the Table button on the Insert tab. A menu and selection palette appears. Just drag
on the palette to select the number of rows and columns.
When you release the mouse, a default style table appears in your
document. The
illustration shows what the palette looks like for a table with 4 rows and
4 columns.
You
can create a simple table most easily in Word by clicking
the Table button on the Insert tab. A menu and selection palette appears. Just drag
on the palette to select the number of rows and columns.
When you release the mouse, a default style table appears in your
document. The
illustration shows what the palette looks like for a table with 4 rows and
4 columns.
When you create a table with the palette, the table will stretch across the width of the page with columns of equal size. You can adjust the width and height of the whole table and of each column and row but, to start with, all the cells are the same size.

Notice that each column and each row has its own section on the horizontal and vertical rulers.
Create a Table: Draw Table
 Another
way to create a table is to click the Table button and then click the Draw Table command
Another
way to create a table is to click the Table button and then click the Draw Table command ![]() on the menu.
on the menu.
Your mouse pointer changes to a pencil shape ![]() to let you draw the outside border of a table yourself. Then you can draw
in dividing lines to make rows and columns that do not have to be all the
same. The ribbon changes to the Table Tools: Design tab where you
can click the Draw Table button to turn off drawing and get the regular
pointer back.
to let you draw the outside border of a table yourself. Then you can draw
in dividing lines to make rows and columns that do not have to be all the
same. The ribbon changes to the Table Tools: Design tab where you
can click the Draw Table button to turn off drawing and get the regular
pointer back.
This method is very cool when you know just what you want and you want cells of different sizes.
Table Task Methods
There are several ways to do most tasks that affect a table:
- Drag or click with the mouse
-
 Key combo
 - Ribbon button
- Command on a button's menu
- Right click menu command
As you work, you will probably find that you prefer one type of action, but please try out others as you run across them. The more experienced you become, the more likely you are to use key combos. They are fast... when you remember which keys to use.
Parts of a Table
Word is a bit inconsistent about how it refers to columns in a table. In a spreadsheet, columns are labeled with letters, but in some places in Word, columns are referred to with numbers.
 Columns: Named with letters starting at the left
Pointer shape to select: ![]()
Rows: Named with numbers starting at the top
Pointer shape to select: ![]()
 Cells: Named in the form ColumnRow. So, cell B2 is in column B
and row 2.
Cells: Named in the form ColumnRow. So, cell B2 is in column B
and row 2.
Pointer shape to select: ![]()
Grid lines: Lines that divide the space into cells. Even lines that don't print will show in Word as light gray. But, of
course, you might choose to have gray lines in print, too. Look at the
Print Preview to be sure if the lines will print the way you want.
 End-of-cell and End-of-row
marks: Word uses a special
symbol
End-of-cell and End-of-row
marks: Word uses a special
symbol ![]() (a circle with 4 lines sticking out) to show
where the contents of a cell stops and also where a table row stops. This
symbol is one of the characters in a normal font, but it is not on
the keyboard. The symbol uses the same font and font size as the default cell
text. Some fonts give the symbol quite a different look,
like
(a circle with 4 lines sticking out) to show
where the contents of a cell stops and also where a table row stops. This
symbol is one of the characters in a normal font, but it is not on
the keyboard. The symbol uses the same font and font size as the default cell
text. Some fonts give the symbol quite a different look,
like ![]()
![]()
![]()
![]() . Sometimes you will want to select the symbol along with the text, just like
you sometimes want to include the paragraph symbol in a selection. And sometimes
not! You cannot drag inside a cell to select the end of cell symbol. You must select the
whole cell using the
. Sometimes you will want to select the symbol along with the text, just like
you sometimes want to include the paragraph symbol in a selection. And sometimes
not! You cannot drag inside a cell to select the end of cell symbol. You must select the
whole cell using the ![]() pointer shape or use the Select Cell command from the list on the Select button or
in the right click menu for the cell.
pointer shape or use the Select Cell command from the list on the Select button or
in the right click menu for the cell.
Check your understanding: What value shows in cell B2 in the illustration
above of end of cell marks?
Answer 5
 Handles: There are two handles for a table
-
 Table
Select/Move handle: Appears at the top left of the table when your mouse
hovers over the table or when the cursor is in the table. Click
the handle to select the whole table. Drag this handle to move the table on the page
Table
Select/Move handle: Appears at the top left of the table when your mouse
hovers over the table or when the cursor is in the table. Click
the handle to select the whole table. Drag this handle to move the table on the page -
 Table Select/Resize handle:
Appears at the bottom right of the table when your mouse hovers over the
table or the cursor is in the table. Drag this handle to resize the whole table.
The rows and columns will resize along with the table as a whole. The text
in the cells does not resize.
Table Select/Resize handle:
Appears at the bottom right of the table when your mouse hovers over the
table or the cursor is in the table. Drag this handle to resize the whole table.
The rows and columns will resize along with the table as a whole. The text
in the cells does not resize.
Table Tools Tab
The Table Tools tab appears whenever your cursor is in a table or you selected a whole table or part of a table. Unlike most other context tabs on the ribbon, Table Tools has two subtabs: Design and Layout.
Table Tools: Design


The Design tab has tools that let you apply a table style to the table as a whole. You can select which special types of rows and columns you want, like a header row or a Totals row. Of course you can change the shading or borders afterwards as you wish.
Table Tools: Layout


The Layout tab has tools for editing parts of an existing table. The Select button gives options for selecting the whole table or just a cell or row or column. The Rows & Columns tab groups has buttons that make it easy to add or delete rows or columns. Other buttons let you merge or split cells, set the height or width of cells exactly, align text inside the cell, and more.
Special Buttons:
Draw Table and Eraser:
![]()
![]() Word 2007, 2010: Design tab
Word 2007, 2010: Design tab
![]()
![]() Word 2013, 2016: Layout tab
Word 2013, 2016: Layout tab
Once
you have a table, you can use
the Draw Table button to add lines to your table with the
pencil shape ![]() to create more rows and/or
columns. The Eraser button changes your mouse to the eraser
shape
to create more rows and/or
columns. The Eraser button changes your mouse to the eraser
shape ![]() . Click or drag on table lines to erase them.
. Click or drag on table lines to erase them.
Select: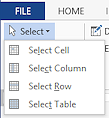
The Select button on the Table Tools: Layout tab lets you select the whole table or just a row, column, or cell.
![]() Word 2010: The Select command and submenu are also on the table's context menu.
Word 2010: The Select command and submenu are also on the table's context menu.
Context Menu
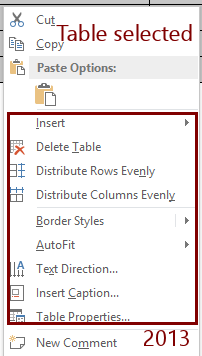 When you right click on a table, the context menu will include several commands that apply to tables. The list of commands depends on what is selected.
For example, when the whole table is selected, you see the command Delete Table. But if a row is selected, you see Delete Row and Merge Cells. If a cell is selected, you see commands Delete Cells and Split Cells.
Table Properties Dialog
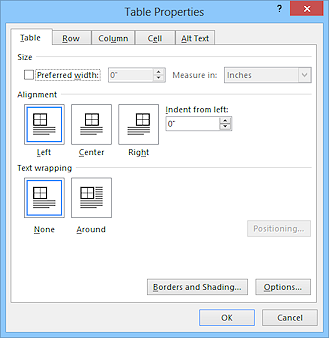 You can open the Table Properties dialog with the
Properties button on the Table Tools: Layout tab or from the context menu for the table.
You can open the Table Properties dialog with the
Properties button on the Table Tools: Layout tab or from the context menu for the table.
The Table Properties dialog has several tabs that have detailed choices for how your table looks.
|
|
| © 1997-2017 Jan Smith All Rights Reserved |
Site Map What's New |
Privacy Policy Terms of Service Copyright Acknowledgements |
~~ 1 Cor. 10:31 ...whatever you do, do it all for the glory of God. ~~
Last updated: March 22, 2017