 |
Step-by-Step: Help Topics |
 |
What you will learn: |
to use Word Help contents
to turn off Office Assistant
what AutoCorrect can correct
what AutoFormat can change
|
Start with:

 (Word is open with a blank document.)
If you worked through the lessons in Working with
Windows, you already have formatted a floppy disk and put several folders
and files on it. While the files you saved will not be used again, you do
need the folder my docs and its subfolders word project1,
and word project2. You will make more
folders as you go along.
 Eventually your floppy disk will be full, so keep a spare
blank disk handy or plan to delete files (after your work has been
graded!).
Check it out! |
 |
Your Class disk should currently contain:
-
 my docs my docs
-
 win project2 win project2
-
 doc 1.txt doc 1.txt
-
 myname.bmp myname.bmp
-
 word project1 word project1
-
 word project2 word project2
|
Turn off Office Assistant
If you are using Word 97 or later, to get to the Help dialog you must turn off the Office
Assistant. If you do not see the Office Assistant, it may be just hiding instead
of turned off. You will learn to use Office Assistant in the next lesson.
- If the Office Assistant is not
showing
, from the
menu select | .
- Click on the Office Assistant cartoon to open its dialog.
- Click on the Options button.
- On the Options tab of the dialog that
opens, uncheck the
box Use the Office Assistant.
- Click on OK
to close the dialog.
Watch the Assistant do its disappearing
act.
Read Help Topics
Word has the ability to automatically fix some of the
most common typing mistakes and to automatically insert symbols for some
character combinations. It can be quite a surprise if Word "corrects"
something and you weren't expecting it. You can turn off some of this
automation if it "corrects" things that you don't want corrected.
- From the menu, choose:
 |
|  | | |
| | |
 || |
|
 |(the Help Task Pane opens) |
|| |
- Read all the topics displayed under AutoFormat. Be sure to read the linked topics inside them. Some are also listed in the Contents pane, but not all are. Close Help after you have finished reading.
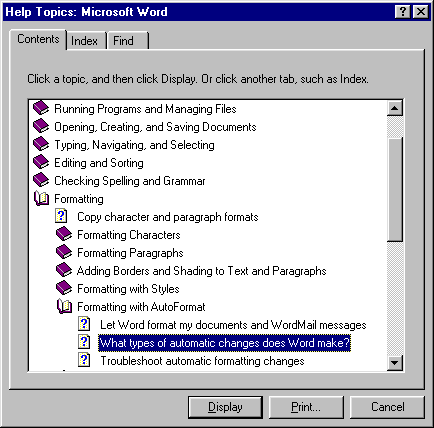
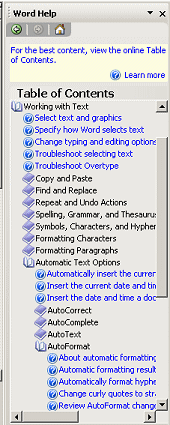
 In Word 2000 in the topic
Format a document automatically, read the link Learn about automatic formatting options. and the link in that topic Learn about the results of formatting a document automatically. This last page has a list
of the autocorrections Word comes with. It's is a lot harder to find
than it was in Word 97.

 In Word 2002/2003
the topic Automatic formatting results has a list of what kind of
formatting Word will do automatically by default. It's an important list that is
buried rather deeply in the topic structure.
Dialog: AutoCorrect
- Open the AutoCorrect dialog box, using the menu | .
 | .
| .
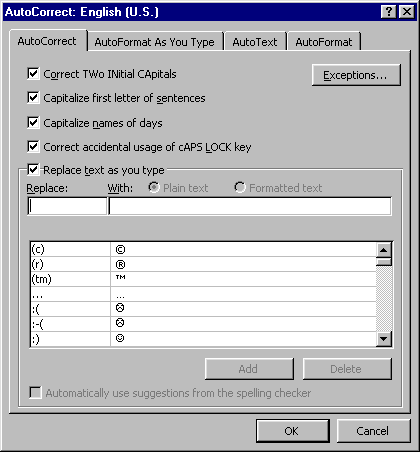
- Select the tab AutoCorrect. There should be a check mark
in each box. Be especially careful that Replace text
as you type is checked.
- Select the tab AutoFormat as you type. (Be careful
you are on the correct tab and not the AutoFormat tab. Confusing again!!)

-
For this exercise, be sure that the box for Ordinals (1st) with
superscript is NOT checked. Usually you will want
this one checked, but we are going to experiment shortly.

 The box for Define styles based on your formatting should NOT be checked. When this one
is checked, Word looks at what formatting you apply to text that already
has a paragraph style. Then Word changes the style definition to match!
Useful, but it could be disastrous if you forget about it.
- Place a checkmark in the other boxes as shown in
the illustration
by clicking them.
- Click on OK
to close the dialog.
AutoCorrect
To print a copy of what you will be typing, click here to open an
image in your browser. Use the browser's Print command (File | Print).
Then use the Back button to return to this page.
-
 On line 1 of your
blank document type the words Word Project 1 and
press
the ENTER key to move to a new line.
- On line 2 type your name and press the ENTER key.
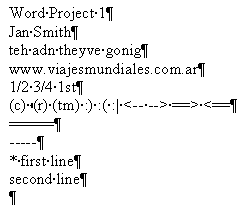
- Starting on line 3, type the characters at the right
EXACTLY as shown. Press the ENTER key at the end of
each line. Watch carefully to see how Word changes what you type.
Note: After the (tm) those faint double dots are colons. The dots in between words show that there is a blank space there.
The AutoCorrect and AutoFormat features change your typing except for the one feature that we turned off earlier - the ordinal number.
- With your cursor in the last line,
press BACKSPACE once. This stops the bulleting of the
lines.
- Start typing the
name of the current month. Word's AutoText suggests a completion to what you type in a popup tip
 ,
in this case the date. (You may need to type a space after the
month to see the popup.) Of course the date you get will be today's
date!

 Word 2003 suggests just the month, not the full date.
- Press ENTER to accept what Word suggests.
AutoFormat
- Select the characters 1st in line 4 by dragging over them.
- From the menu select | | |. Put a checkmark in the box beside Ordinals (1st) with Superscript. Now when Word autoformats as you type, it will apply this
rule, too.
- Click on OK to return to the AutoFormat dialog.
Now Word is ready to AutoCorrect your
superscript. But you must do something to make Word actually look at the
text again.
-
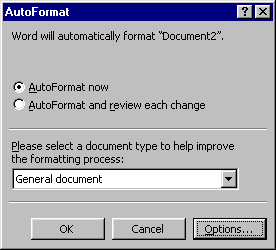 Click on AutoFormat now, if it
is not already selected.
- Click on the OK button. The characters should look like 1st
now. Amazing!!
[You can also use
 the
AutoFormat button, but it is not on the toolbar by default in all
versions of Word.]
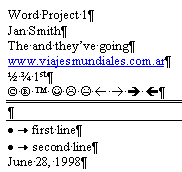
Completed document - AutoCorrect & AutoFormat done
- Go back to |

 |
.
|
.
Uncheck again Ordinals (1st) with Superscript. You'll get another chance to use this
technique later.
You might be asking yourself- why not leave these AutoFormat choices on all the time? Sometimes it's more trouble than it is worth if Word keeps trying to AutoFormat something that you don't want changed. If you really want a set of 6 dashes instead of a border, you have to uncheck the AutoFormat Borders which turns those dashes into a straight line across the page, for example.
 Save this document by clicking
 the Save button. Since this is a new document, you
will see the Save As dialog box. Name the document mysymbols.doc and save it in the word project1 folder on your Class
disk.
 Print by clicking
 the Print button on the toolbar.
- Close the document with
 the Close button for the document window, but do not close Word.

