 |
To be sure that your copy of Word will look and react as the Step-by-Step directions describe, you may need to change some settings. There are many things about Word that you can change or customize. You will probably be comfortable with the default settings for most of Word's behaviors.
When Word is not looking or behaving as you wish, there
are several places that you can go to make changes.
-
Toolbars and menu: contain commands
that change the way the document displays in the window.
-
Page Setup
dialog: sets the size,
orientation, and margins for your paper.
-
Right-click menu
on a toolbar: lists toolbars that you can hide or
display.
-
Options dialog:
contains many settings for how Word behaves and
reacts, including spell checking and automatically saving. If something is
happening automatically that
you don't like, this dialog probably contains the setting you
need to change.
|
|
Where you are:
JegsWorks > Lessons > Word97-2003
Before you start...
Project 1: Word Basics
Interface
Getting Started 
 Open Word Open Word
Word Settings
Help- Topics
Help-
Assistant
Format
Images
Pre-Print
Manage Printing
Summary
Quiz
Exercises
Project 2: Auto Tools
Project 3: Brochure
Project 4: Report
Search
Glossary
|
|
 |
Step-by-Step: Word Settings |
|
What you will learn: |
to change the way a document displays
to change the page characteristics
to change the window display
to change the way Word behaves
|
Start with:
 (Word is open with a blank document.) (Word is open with a blank document.)
Document Display
- Click on
 the Show/Hide Marks button to show the marks, if
it's not already depressed. the Show/Hide Marks button to show the marks, if
it's not already depressed.
- At the bottom left of the document
window, click on
 the Page Layout View button. the Page Layout View button.
- Set
 the Zoom Control to 100%. the Zoom Control to 100%.
Page Setup
- From the menu select | | .
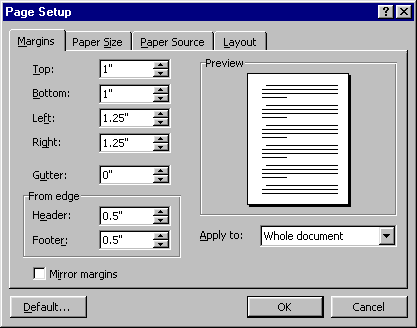
- Margins =
1" top and bottom and 1.25"
left and right.
Quick fix: Click on the Default... button to reset all at
once.
You cannot change the unit of measurement in this dialog. The choice of
inches, centimeters, etc. is on the Options | General tab, which you will
see shortly.
- Click on the Paper Size tab.
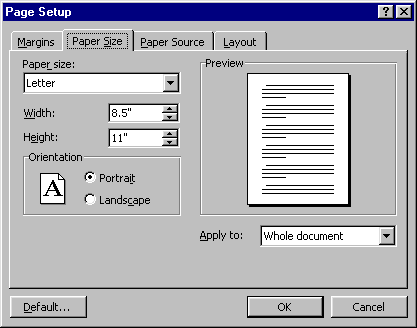
- Set Paper Size = Letter with Width = 8.5" and Height = 11".
- Set Orientation =
Portrait
- Apply to: Whole document
- Click on OK to close the dialog.
Window Display
- Maximize your document window, if necessary, using
 the
maximize button on the document's title bar. the
maximize button on the document's title bar.
-
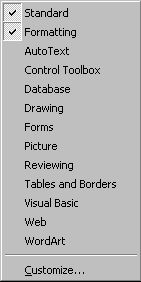 Right click on a toolbar. A list of available
bars appears. Right click on a toolbar. A list of available
bars appears.
Be sure the boxes for the Standard and Formatting toolbars are checked and uncheck any
other toolbars. (You will have to reopen the list by right clicking a
toolbar for each change you make.)
[In Word 95 you choose | to see a dialog to make these changes.]
Word's Behavior
- From the menu select | .
The Options dialog
opens. Most of the settings are probably still at the original defaults. The steps below make sure that certain key choices are checked.
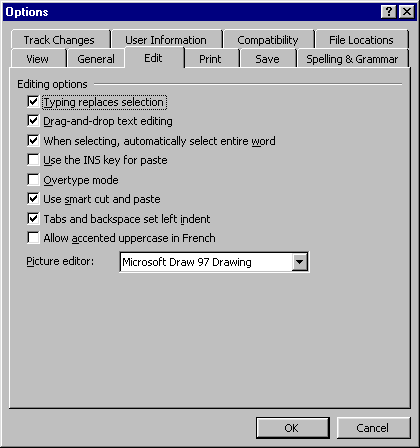
- On the Edit tab - match the illustration above, except for the Picture editor which we will not be using. Click on
 the dialog's Help button and
then on a choice to see an explanation of the choice. the dialog's Help button and
then on a choice to see an explanation of the choice.
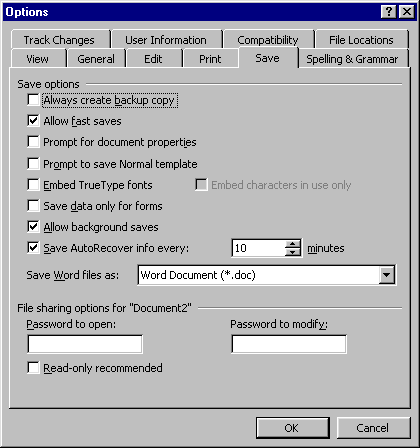
- On the Save tab - Save AutoRecover info is checked. Set the number of minutes to 10 or
less.
 When Word is
doing an automatic save, you won't be able to work. So don't set the number of minutes too small. It gets annoying!! When Word is
doing an automatic save, you won't be able to work. So don't set the number of minutes too small. It gets annoying!!
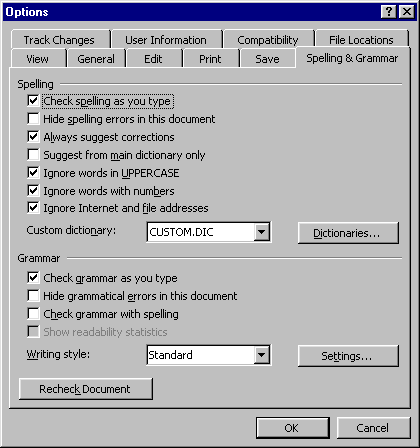
- Select the Spelling & Grammar tab.
Check the following:
Check spelling as you type
Always suggest corrections
Check grammar as you type.
|
