Database in
Excel = List
 Point of Confusion: Excel's choice of the word list for
the cells that it treats as a database makes for confusion. There are other
"lists" in the Excel interface. It will take careful wording to keep things
clear! Point of Confusion: Excel's choice of the word list for
the cells that it treats as a database makes for confusion. There are other
"lists" in the Excel interface. It will take careful wording to keep things
clear!
Creating a list (i.e. a database) in Excel
- Select the cells that are to be your database.
- Verify that the selected rows are each a single record.
- From Excel's menu, select Data | List | Create List
OR
Right click in your selection and choose Create List from the popup
menu.
What
will change when Excel turns your data into a list?
An Excel list has some handy features and a new toolbar. If you have some
experience with Excel, you will appreciate the changes.
1. Column headings get a drop-list for sorting and filtering:
Sort:
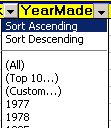 You can sort the column in alphabetical or
numerical order (Sort Ascending), or in reverse order (Sort Descending). You can sort the column in alphabetical or
numerical order (Sort Ascending), or in reverse order (Sort Descending).
All of the fields in a record move together. We don't want to move some
fields and leave behind others in that same record!
Only the rows you put into the database move.
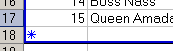
Example: Choosing Sort Ascending from the drop-list for the column
YearMade will reorder the rows in the database so that the values in
this column are in numerical order.
 Sorting on
multiple columns: You can sort on up to three columns by using the
Sort... command on the Data menu. If you use the drop-lists for columns
in a database, you can only sort on one column at a time. Sorting on
multiple columns: You can sort on up to three columns by using the
Sort... command on the Data menu. If you use the drop-lists for columns
in a database, you can only sort on one column at a time.
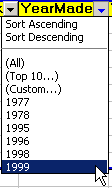 Filter: Filter:
You can filter the records, which means to
show just certain records, by choosing a value from the drop-list.
For example, if you click on 1999 in the options for
the column YearMade, only the records that have 1999 in this column will
show. They are not really gone!
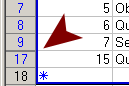 The
row numbers at the left show you that some rows are temporarily hidden. The
row numbers at the left show you that some rows are temporarily hidden.
 Filters
add together: After you have filtered once, choosing
a value from another column's list of values does not remove the
previous filter. It filters the current, previously filtered records. You are filtering
what has already been filtered. Filters
add together: After you have filtered once, choosing
a value from another column's list of values does not remove the
previous filter. It filters the current, previously filtered records. You are filtering
what has already been filtered.
2. Border and new record row
 Excel puts a blue border around your list and adds a New
Record row below the last record, marked with a blue asterisk, Excel puts a blue border around your list and adds a New
Record row below the last record, marked with a blue asterisk,
 . .
The border is helpful since you will often have cells and rows on your
sheet that are not part of the list.
3. List Toolbar:
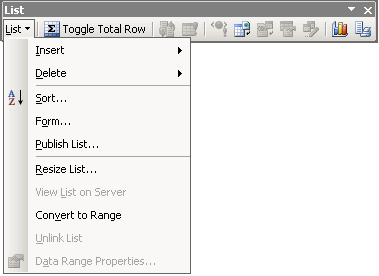 The
List toolbar appears when the list is active.
Selecting a cell inside the list makes the list active. The
List toolbar appears when the list is active.
Selecting a cell inside the list makes the list active.
List Button:

Opens a menu of common tasks about lists.
The
command Convert to Range changes your list back
to normal cells. This command
will be gray and not available to you unless you have selected a cell
inside the list.
 The
Toggle Total Row button: The
Toggle Total Row button:

Adds/hides a row for column Totals.
You can do more than just add numbers in the Totals row. There is a drop-list
of functions that you can select.
These are the only ones that you can use in a Totals row.
Average
Count
Count Nums
Max
Min
Sum
StdDev
Var
Do It!
Would you like to see a spreadsheet database at work?
If you have installed software that will open an Excel spreadsheet, click
the image below to open an actual spreadsheet. Depending on your software
and its settings, you will either get an spreadsheet program
window or the spreadsheet will open in a new browser window, which will
have new toolbars and menu commands.

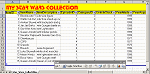
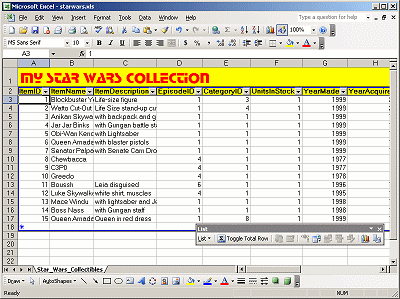
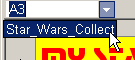
Star Wars Collection spreadsheet
 Experiment! Play around with it. We will not explore Excel
in depth here but it is good to see what can be done with a plain spreadsheet.
Experiment! Play around with it. We will not explore Excel
in depth here but it is good to see what can be done with a plain spreadsheet.
Try the following activities in the spreadsheet:
(The directions below are also on the sheet named Experiment in the spreadsheet.)
- Sort using various columns.
- Return to original order: Sort Ascending
on first column, ItemID.
- Filter to show only items made in 1999: Open drop-list for
column YearMade and click on 1999. [The Status bar should now show 8 records
out of 15.]
- Add a filter to the previous results to show items that were a
Gift, using the column HowAcquired.
[There are now 6 records.]
- Add a Totals row.
- In the Totals row, COUNT the number of items in the column
Condition Details. (You must scroll horizontally to see the column
Condition Details.)
[There are 5 records that have an entry in this field.]
- In the Totals row, use the SUM function to add up the Price
Paid.
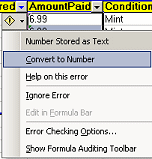 [The sum
will be zero! The prices are being treated as text instead of numbers.
Select the numbers in this column and click the button that appears [The sum
will be zero! The prices are being treated as text instead of numbers.
Select the numbers in this column and click the button that appears
 , Error Checking.
Select Convert to Number from the menu.) Now the sum is 49.9] , Error Checking.
Select Convert to Number from the menu.) Now the sum is 49.9]
- Remove all the filters: Data | Filter | Show All.
[The sum of Price Paid column changes to 63.88]
-
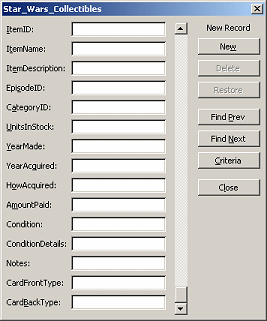 Add
new record with form: From the menu select Data | Form... and click the
New button. Enter some data for a new record. You cannot modify the
appearance or layout of this form. Add
new record with form: From the menu select Data | Form... and click the
New button. Enter some data for a new record. You cannot modify the
appearance or layout of this form.
- Find records with form: In the data form, click the Criteria
button. Find the items that were made in 1977 by typing the year in the
field YearMade and then clicking on the Find Next or Find Prev button.
[There are two records for 1977.]
Close the form.
-
 Select
all the database cells from the list of named cells at the upper left
of the worksheet. (This is the easy way to select the original rows. The
name is added automatically to the drop list!) Select
all the database cells from the list of named cells at the upper left
of the worksheet. (This is the easy way to select the original rows. The
name is added automatically to the drop list!)
 Print:
File | Page Setup - select Landscape orientation on the Page tab.
Close Page Setup. From the List toolbar, click the Print List button. Print:
File | Page Setup - select Landscape orientation on the Page tab.
Close Page Setup. From the List toolbar, click the Print List button.
- Back to normal cells: Select a single cell in the database.
From the List button on the List toolbar, choose Convert to Range or right
click and choose Convert to Range from the popup list.
If you want to know more about spreadsheets, there is a complete set of
lessons in Jan's
Illustrated Computer Literacy =
Working with Numbers. |