
Jan's Computer Basics:
Hands On: Directories/Folders
 Once you've named a file, you still have to put it some where. Files are organized by grouping them in directories or folders. (Which name you use depends on what operating system you are using, but the results are the same.)
The directories/folders are nested within each other, forming a hierarchy called the Directory Tree or Folder Tree. Below is an expanded folder tree in Windows 7's Explorer. (Other versions of Windows have a different look, but they work very much the same.)
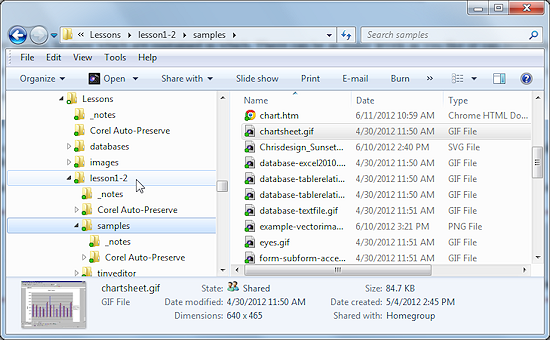
There are several features to notice.
The nesting of the folders is shown by indenting the folder names, to show which are contained in which. There can be as many levels as you like or can remember.
The selected folder has its contents displayed in the right window pane. When the mouse is over a folder name, it is highlighted also but the right pane does not change to match until you click.
An expanded folder is highlighted and shows its subfolders and files in the folder tree on the left. No files ever show on the left in the folder tree. It's for folders!
The highlighted file on the right is the currently selected file.
A symbol, like an arrow or plus sign usually, indicates a folder which is collapsed. It has subfolders which are not displayed in the tree. Clicking on the symbol would expand the tree to show these folders. In Vista and Windows 7 this symbol is not displayed unless the mouse pointer is over the folder tree.
Another symbol, a down arrow or a minus sign usually, marks a folder which is expanded. It has subfolders which are being shown in the tree. Clicking on the icon would collapse this branch of the tree so that the subfolders are not shown any more.
Path
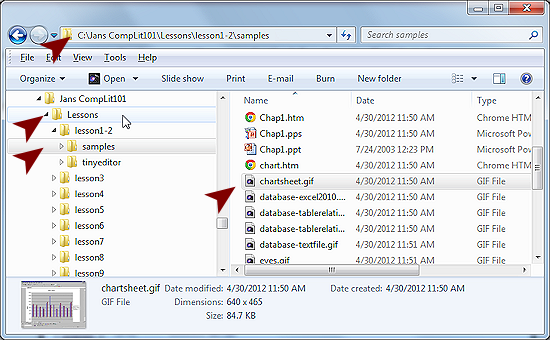
The full path name for a file lists the whole route down the tree from the root to the document. For example, the full path to the file selected is:
C:\Jans CompLit
101\Lessons\lesson1-2\samples\chartsheet.gif
which tells us that on drive C in folder Jans CompLit 101 in subfolder Lessons in subfolder Lesson1-2 in
subfolder samples is the file chartsheet.gif
You can see that nesting your documents deeply in such a tree could add a lot of typing to your day!
![]() Where
did you save it? When saving your file, be careful not only about the name it's saved with but WHERE it is being saved, that is, in what folder or directory. Some programs have a default folder/directory that they use all the time unless you select a different one at the time you save the file. Others will automatically use the folder that was used the last time a file was saved. The more sophisticated programs allow you to choose which behavior you want or even change the default folder to one of your own. There are benefits to both schemes, but you need to be very much aware of what each program is doing.
Where
did you save it? When saving your file, be careful not only about the name it's saved with but WHERE it is being saved, that is, in what folder or directory. Some programs have a default folder/directory that they use all the time unless you select a different one at the time you save the file. Others will automatically use the folder that was used the last time a file was saved. The more sophisticated programs allow you to choose which behavior you want or even change the default folder to one of your own. There are benefits to both schemes, but you need to be very much aware of what each program is doing.
![]() Save
buttons: Clicking on a Save button can be risky. What exactly will
happen? Will you get a dialog box to pick a name and location? Will the file be
saved to a default location with a default name? You may need to use the File
> Save or File > Save As menu command to get to a dialog box so you can modify the standard behavior for that program. If you don't know what your program is doing, using the
button can result in "lost" files: "I know I saved it but I just can't find it!" Know your software!
Save
buttons: Clicking on a Save button can be risky. What exactly will
happen? Will you get a dialog box to pick a name and location? Will the file be
saved to a default location with a default name? You may need to use the File
> Save or File > Save As menu command to get to a dialog box so you can modify the standard behavior for that program. If you don't know what your program is doing, using the
button can result in "lost" files: "I know I saved it but I just can't find it!" Know your software!
Directories
If you don't want to use your program's default folders for storing documents created by that program, you can create folders of your own, with your own names, organized to suit the way you work. After all, they are YOUR documents! Let's look at how to do this under:
 Directory in DOS
Sometimes we get in trouble and our lovely graphical interfaces won't work. To handle some of these emergencies you need to work in DOS. So, to create a directory from the DOS command line you first need to know the full path that you want. Then to create a directory, named mydrctry for example (my 8 character version of "my directory"), use the command for making a directory, which is md (It's nice to be obvious from time to time!)
C:\>md e:\mydrctry
The first line in the example creates the subdirectory mydrctry in the directory currently shown on the command line. In this case that is the root directory of a removable drive, E:. This is where you would want to save a file when the computer is not your own or you want to work on the file elsewhere.
The second command in the example creates a directory somewhere besides the directory on the command line, which shows drive C in this case. You must give the full path to the new directory.
Remember the restrictions on legal names discussed in the previous lesson on Files. And, only 8 characters are allowed in DOS for the directory name.
There are a number of other DOS commands that are useful, even under Windows.
 Folder
in Windows
Folder
in Windows
To create a folder in Windows you need to open a window for the drive you want your new folder to be on. The illustration is for an Explorer window for Drive C.
The name for this window varies a bit from version to version. Windows 7 uses Windows Explorer but Windows 8, 8.1, and 10 call it File Explorer (which does describe what the window does better).

WinXP, Vista: Menu to create new folder > New Folder, ready for renaming

Win7, 8, 8.1, 10: Home tab > New folder, ready for renaming
Win7, 8, 8.1, 10: The ribbon is hidden by default for File Explorer windows. Click a tab to show the ribbon, until you click on a button. To show the ribbon all of the time, right click on a tab or the blank area to the right of the tabs. Click on Minimize Ribbon to toggle it off.
Steps to Create Folder
- Open the drive or folder for which you want your new folder to be a subfolder by double-clicking it. The right-hand pane will show that folder's contents.
-
WinXP, Vista: From the File menu select New and then Folder.
Win7, Win8, Win8.1, 10: On the Home ribbon tab click the button New Folder.
OR
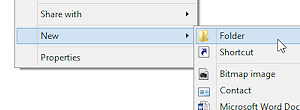 All versions: Right click in a blank area where the folder's contents is displayed. From the context menu choose New and then Folder.
While you're here, check out the other file management commands that are available from the File menu or the ribbon and the right-click context menu. You can rename, move, copy, and delete files and folders. You can drag and drop files and folders also.
 Right
drag: If you use the right mouse button to drag, you'll see a popup menu of choices when you drop. This method lets you choose whether to move, copy, or create a shortcut after you get there!
Right
drag: If you use the right mouse button to drag, you'll see a popup menu of choices when you drop. This method lets you choose whether to move, copy, or create a shortcut after you get there!  Make
changes most carefully: While you are looking around, don't start deleting and renaming stuff that you didn't create yourself! You can destroy your programs if you aren't careful! Avoid
Format command: Also be VERY CAREFUL with the Format command, which is
in the context menu for drives. Remember that you can erase your hard disk with this one!!! Choose your drive very, very carefully.
Make
changes most carefully: While you are looking around, don't start deleting and renaming stuff that you didn't create yourself! You can destroy your programs if you aren't careful! Avoid
Format command: Also be VERY CAREFUL with the Format command, which is
in the context menu for drives. Remember that you can erase your hard disk with this one!!! Choose your drive very, very carefully. - Name the folder.
When the icon for the new folder appears, it's name will be "New Folder" and it will be highlighted. You can just start typing the name you want - something more helpful! Your typing replaces the highlighted text.
|
|
| © 1997-2017 Jan Smith All Rights Reserved |
Site Map What's New |
Privacy Policy Terms of Service Copyright Acknowledgements |
~~ 1 Cor. 10:31 ...whatever you do, do it all for the glory of God. ~~
Last updated: March 24, 2017