Jan's Computer Basics:
Hands On: Printing
 After saving files, probably the most common task is to print out what you've done. Assuming you have created or edited some document, how do you to get it to print?
Simple answer:
Click on a ![]()
![]() Print button on the toolbar or use the File
> Print command from the menu. But wait! You may have an unhappy surprise.
Print button on the toolbar or use the File
> Print command from the menu. But wait! You may have an unhappy surprise.
![]() Quick Print: The Print button in some programs starts printing right away, using the last settings you used. Is that what you want?
Quick Print: The Print button in some programs starts printing right away, using the last settings you used. Is that what you want?
Design for your printer
We looked earlier at Printer Features and Printer Types. In those lessons we saw that not all features are available on all printers. So the first thing you must know is what kind of printer you have and which features it has. If you want to print a colorful drawing you did in Paint or a beautiful sunset photo, but your printer won't do color, you will be disappointed in the printout!
Features include the ability to handle various typefaces, styles, fonts, font sizes, color, and graphics plus various sizes of paper and types of paper - slick, card stock, index cards, envelopes. Old dot matrix printers don't do color at all and are very limited in other features! (Dot matrix printers are still being used in businesses every day!) Be familiar with what your printer will do and what it won't do. Design your documents with the printer in mind.
Some programs do not adjust what you see on the screen to the capabilities of your default printer. So what you see onscreen would not be quite how it will print. Margins are a particular problem. Even some WYSIWYG (What You See Is What You Get) programs can be misleading, as we will discuss below.
Print Preview
 Most programs these days have a WYSIWYG view
while editing or offer a Print Preview command on the File menu or a
 ![]() Print Preview button on the toolbar/ribbon.
Print Preview button on the toolbar/ribbon.
![]() Preview
Before Printing: Look before you print... EVERY time!! You will waste a lot of paper if you fail to look at what the printer thinks it is supposed to do. Especially check for the number of pages. If some part of the document is too wide, like a table or picture, the excess
may print on a separate page or it may not print at all. If you have blank
lines at the end, you might get an extra blank sheet of paper... or two! You can either change which pages to print or edit the document to fix the problem.
Preview
Before Printing: Look before you print... EVERY time!! You will waste a lot of paper if you fail to look at what the printer thinks it is supposed to do. Especially check for the number of pages. If some part of the document is too wide, like a table or picture, the excess
may print on a separate page or it may not print at all. If you have blank
lines at the end, you might get an extra blank sheet of paper... or two! You can either change which pages to print or edit the document to fix the problem.
![]() Special
Warning about Spreadsheets:
Special
Warning about Spreadsheets:
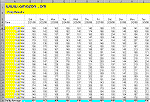
It is VERY easy to accidentally format ALL of the thousands of cells available in a single spreadsheet, for example by putting a border around ALL instead of just the cells you actually have data in. This creates a document of dozens or hundreds of paper pages. If you print this whole document (which is usually the default for the Print button on the toolbar), it will take a very long time, waste a lot of paper, and really irritate everyone else who needs to use the printer! Check the number of pages in the document and be SURE it is right before you start a print job.
Print Dialog Box
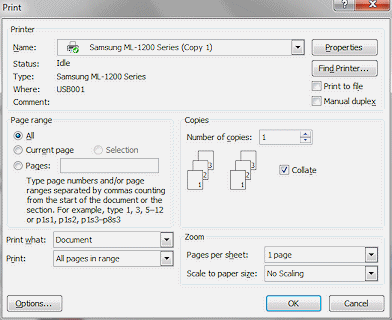 The Print dialog box offers a number of choices,
depending on your particular printer. The illustration shows some common
choices:
- which printer (drop list of printers)
- what part of the document to print
- the total number of copies.
Multiple printers: On a network there may be many printers in different locations that are shared. You must be careful to pick a printer you can get to!
Even a stand-alone computer might have more than one printer (a fast black-and-white laser plus a color ink jet) or several virtual printers that create PDF files or fax documents.
Number of pages: Often the Print dialog does not show the total number of pages in the document. For example, you must look on the status bar in MS Word to see how many pages there are. The illustration below shows your cursor is on page 1 out of total of 30 pages. In some programs the Print Preview shows the total number of pages. These variations between different programs can get quite confusing! You certainly need to know how many sheets of paper the printer will need!
![]()
Page Settings
 Your program may have a toolbar/ribbon button
or a menu command called Page Setup that lets you set the Page Settings.
Office 2007, 2010, and 2013 have these choices on the ribbon (new version of a
toolbar).
The choices will include:
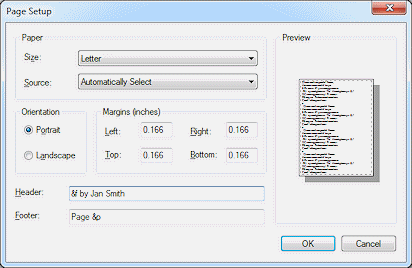
- Orientation - portrait or landscape
- Margin widths - top, bottom, left, right
- Header/Footer - text and margins
(Sometimes handled from a different menu command.)
The result of using the wrong page settings can be quite startling - half your picture is on another page or your header doesn't print.
In the illustration of a dialog from Notepad, notice the various choices. The default margins for another program or printer may be quite different! This dialog box includes a text box for you to enter the text for the header and footer.
Common Header and Footer Codes:
 The
ampersand symbol, &, is combined with certain letters as a code for things that are commonly wanted in the header or footer.
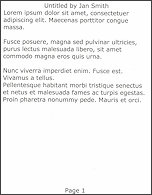
The Notepad page on the right shows how the header and footer set above would look with the settings in the dialog above. Since there was no code for alignment entered,
the header and footer are centered by default.
The
ampersand symbol, &, is combined with certain letters as a code for things that are commonly wanted in the header or footer.
The Notepad page on the right shows how the header and footer set above would look with the settings in the dialog above. Since there was no code for alignment entered,
the header and footer are centered by default.
Here is a reference chart for commonly used codes:
| &f | Inserts the name of file, or "Untitled" if the file is not named yet |
| &d | Current date, according to your computer |
| &t | Current time, according to your computer |
| &p | Page number |
| && | Inserts an ampersand in your text |
| &l | Aligns the header/footer on the left |
| &c | Aligns the header/footer in the center |
| &r | Aligns the header/footer on the right |
 No Print Area:
Your printer has an area where it can't print for physical reasons. This no-print area varies from printer to printer. Commonly, printers can print within .25" of the left and right edges and .50" of the top and bottom of the paper. But this is not universally true. My old HP500C could print from .33" of the top but only from .67" of the bottom of the page.
Your Print Preview or WYSIWYG view of your document might not take the no-print area into account, especially if you wind up using a printer besides the default printer. Thus, part of the document might not print even though you see it onscreen.
Test your software to see how it handles margins that overlap the no-print area. And don't forget to LOOK for the header and footer! It's easy to miss that they are missing.
![]() Problem: Header or footer doesn't print or is only partially there
Problem: Header or footer doesn't print or is only partially there
Solution 1: You have run into the no-print area. Enlarge the margins.
Solution 2: You have set the header/footer margin too close to the size of the page margin, leaving no room for the header/footer itself! Reduce the header/footer margin or enlarge the page margin.
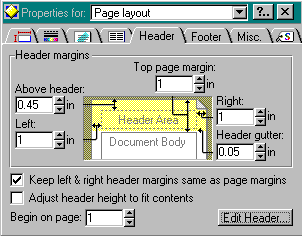 Some programs give you total control of the margins, header,
and footer. The dialog box to the right (from an old version of Lotus Word Pro) allows you to adjust absolutely everything about the margin and the header, all in one spot!
Other programs handle this situation differently. They might not let you set all of the distances in the figure. Headers and footers are really useful and are often required for school papers. But they can be tricky to manage and one reason is the differences between programs!
