
Jan's Working with Databases
Forms & Reports: Special Types:
Multiple Columns
 By packing the Detail data into
two or more columns on the page, you can save a lot of paper.
By packing the Detail data into
two or more columns on the page, you can save a lot of paper.
To create columns of records in a report you must use:
- Page Setup dialog:
- Margins tab
- Columns tab
- Width property for the report
- Width property for Detail section
You will likely need to tweak the settings more than once to get everything looking good on the page. Frustrating, for sure!
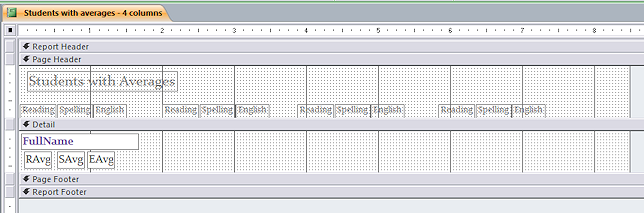
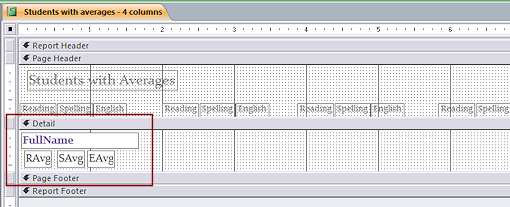
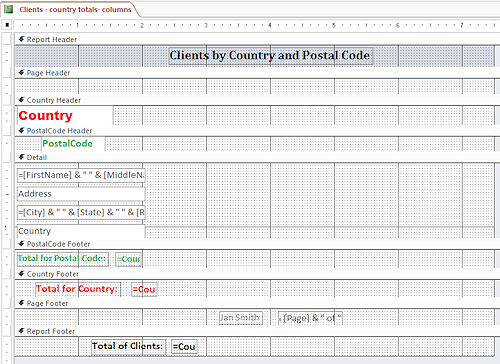
Report Design View for Multiple Columns
Multiple columns do not show in Report Design view. What you see there is not quite what you get!
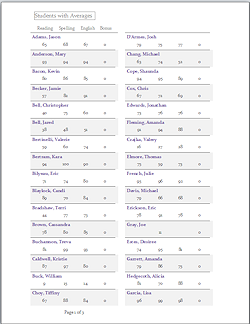
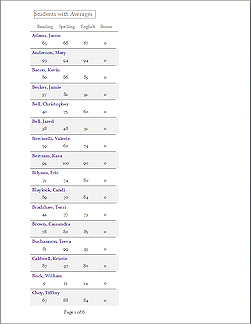
The same layout in Report Design View, below, can produce the one-column report or the two-column report! The difference is in the choices in Page Setup.

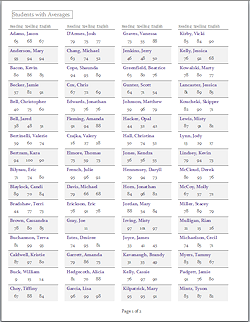
In a four-column version of the same report, below, in Design View the Detail section appears to have a LOT of wasted space. Why are the controls are so tightly packed at the left with repeating labels in the Page Header? The Print Preview shows why! All that empty space got filled up with columns. Again, the choices in the Page Setup dialog make a big difference.
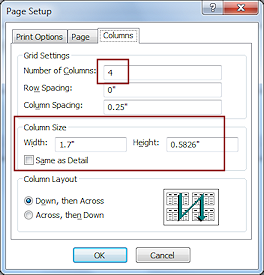
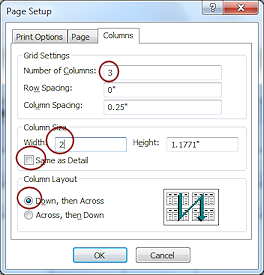
Page Setup Dialog: Creating Multiple Columns
 Strangely,
you configure columns in the Page Setup dialog on the Columns tab, NOT in Report
Design View.
Strangely,
you configure columns in the Page Setup dialog on the Columns tab, NOT in Report
Design View.
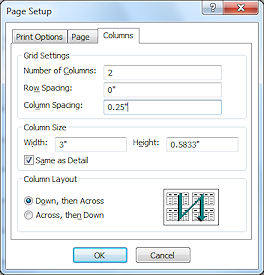
Under Grid Settings:
- Number of Columns: Enter the number your want. (Duh!)
- Row Spacing: Adds white space between records going down the column. If you already allowed some extra space in the layout of the Detail section, this value can be zero.
- Column Spacing: Adds space between columns. If the Detail
section has enough empty space at the right and left already, this value
also can be zero.
Under Column Size you have two ways to set the size of a record in a column:
-
 Same
as Detail checked;
Same
as Detail checked;
Width and Height automatically entered from Detail values.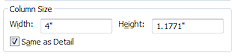
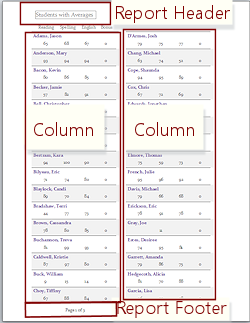
With the option Same as Detail, the Report Header/Footer and the Page Header/Footer MUST fit in the first column's width because all sections must have the same width.
In the example at the right the Page Footer looks odd because it is centered under the first column instead of on the whole page. The report's title fits nicely in a column and looks OK in this report, but it can't be centered on the page when the box Same as Detail is checked.
-
 Same
as Detail unchecked;
Same
as Detail unchecked;
Enter your own choices for Width & Height values.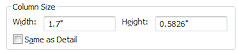
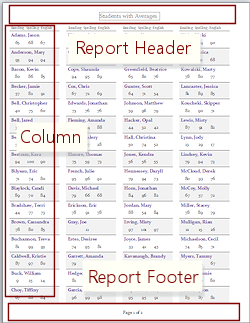
With this choice, in Report Design View the Detail section must have all its controls within the width and height you entered. The Report Header/Footer and the Page Header/Footer can be aligned compared to the whole page instead of the column width.
The Report and Page Headers/Footers will show just as the Design View shows. They can be centered on the page, for example, or extend across the whole width of the page.
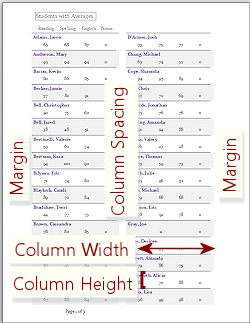
Measure the Spaces:
 Tweaking
the measurements is really important to creating a successful multiple
column report. The following measurements must work together to fit all
the data in columns on the page.
Tweaking
the measurements is really important to creating a successful multiple
column report. The following measurements must work together to fit all
the data in columns on the page.
- Report Design View:
- Width/Height of Detail section or area containing controls
- Page Setup Dialog:
- Margins tab: Left & Right margins especially. Default is 0.25" for all margins.
- Columns tab: Column Spacing. Default is 0.25".
- Columns tab: Column Size - Set your own Width and Height (which are for one record) or choose Same as
Detail.
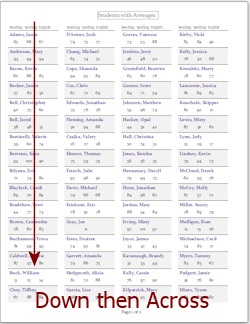
 Warning: Add distances carefully. Otherwise, some of your data may be cut off down the right
margin. In this example the report's width was too wide for two columns to
fit on the paper. Inspect the right edge carefully to be sure ALL characters of the widest record are showing.
Warning: Add distances carefully. Otherwise, some of your data may be cut off down the right
margin. In this example the report's width was too wide for two columns to
fit on the paper. Inspect the right edge carefully to be sure ALL characters of the widest record are showing.
Column Layout:
You have two choices for how records flow through the columns - across the columns first and then drop down or go down the column first and then back to the top of the next column. It may be hard to see the difference in Print Preview at first glance. Check the sorting. Most reports should probably should use Down and then Across, like newspaper columns.
- Page Setup Dialog:
- Columns tab:
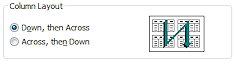 Down and then Across
 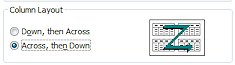 Across and then Down
- Columns tab:

 Across and then Down is not often the best choice. You must be sure that the heights going across will always be the same.
If any control has Can Grow or Can Shrink set to Yes, the height might change. That destroys the 'row' alignment.
Headers and Footers:
Remember - Headers and Footers must fit in the column width if you choose Same as Detail in the Page Setup dialog. The only way to let them extend past the column's width is to not check the box Same as Detail and to enter column Width and Height yourself. That's a small price to pay to get more flexibility.
Step-by-Step: Create Multiple Columns |
|
| What you will learn: | to copy and paste existing single-column report to edit report to fit in narrow column to use Page Setup to create multiple columns with full-width report header |
Start with: ![]() , resource files, worldtravel-Lastname-Firstname.accdb from folder databases project4 as updated in the previous lesson
, resource files, worldtravel-Lastname-Firstname.accdb from folder databases project4 as updated in the previous lesson
For this exercise you will take an existing report and change it to use multiple columns. Then you will make some adjustments to the formatting and layout so that it looks good in the new arrangement.
Copy and Paste Existing Single-Column Report
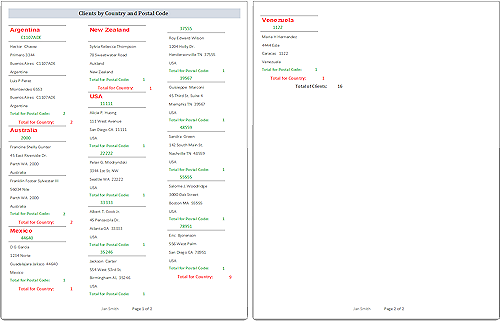
 In the Navigation Pane select the report Clients - country totals.
- Copy and Paste to the Navigation Pane, naming the new report Clients - country totals-columns.
-
 Open the report Clients -
country totals-columns in Print Preview.
Open the report Clients -
country totals-columns in Print Preview.
You created the original report in the first part of a previous lesson. The clients of World Travel Inc. are grouped and counted by country and postal code. -
Inspect the pages.
Clearly there is a lot of wasted space in this layout. What changes would you make to get this report ready to print in three columns?
Certainly, you will have to reduce the width of the Detail section.
The report's title is about the same width as the current width of the Detail section but you are about to reduce that width. You have two choices about that. You could revise and shorten the title but for this lesson you will make the proper choices in Page Setup so that the title can extend across multiple columns.
The Page Footer controls are aligned to fit within the column width. You will edit the section so that the controls are aligned on the page instead.
Report Design View: Format Column
You need to rearrange the controls in the Detail and group footers to get them into a smaller space.
-
Open the Page Setup and check the values for the margins.
Currently the report's margins should be 0.25".
If they are not, change the margins.
Calculating: The paper is 8½" x 11". You need 0.25" for each of the two side margins. Three data columns need two Column Spacing areas of 0.25" each. That's a total of 1" for margins and column spacing. That leaves 7.5" for the data columns. Divide by 3. Each column could be 2.5" wide. Let's move some controls around and see if we can make that work. -
 Switch to Design View.
Currently your report width is 3.5" to 4" wide. The exact width was not important for a one-column report.
-
 Drag the right edge of the report to make it 7½" wide or use the Property Sheet.
Remember, the page margins are not shown in this view.
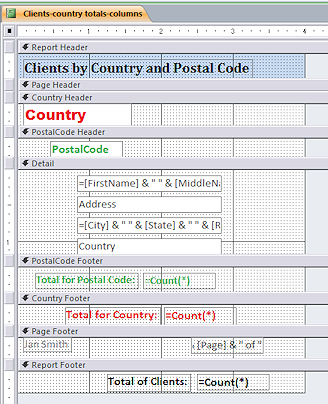
- in the Report Header, move the title to the
center of the width.
- In the Page Footer, move the controls for your name and the
page number to the center of the width.
- Move the Detail controls to the left,
nearly to the edge of the report.
-
Move the Total controls in the group footers left, slightly staggered.
-
Select all 3 text boxes with the expression =Count(*) and set the Width in the Property Sheet to 0.4" wide.
The numbers for these won't be very large since they are a count of clients.
-
Position the control for the Country total to fall across the 2" line, as in the illustration.
(There is a reason!)
-
Select the two divider lines by dragging across where they should be.
One divider line is above the label Country in the group header. The other is at the top edge of the Detail section. You really cannot see either one in Design View.
-
In the Property Sheet change the width of each line to 2".
Page Setup Dialog: Create Columns with Full-Width Report Header
Assuming that your rearranging of the controls on the report is going well, you still have to make changes to the Page Setup setting.
-
 Open the Page Setup dialog to the Columns tab.
-
On the Columns tab, set the following:
Number of Columns = 3
Width = 2" (Yes, this is not quite wide enough)
Height - Leave at the current height.
(Your height may be different from the illustration)
Same as Detail = unchecked (Important!)
Down, then Across
-
Click on OK to close Page Setup.
-
Switch to Print Preview.
This is close to want we want.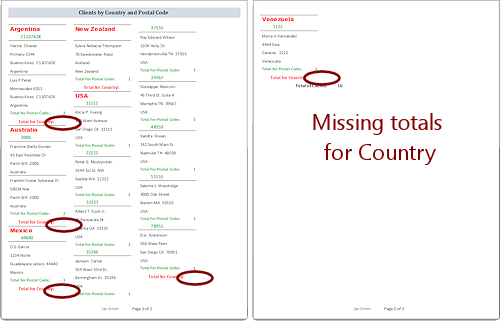
-
Inspect the pages carefully.
Whoops! You should see at least one problem, depending on exactly how you positioned the controls: The Total for Country sum is not showing.Since you set the Width of the column to 2" and deliberately positioned the control across the 2" line and number are aligned to the right, of course it got cut off!
(Good lessons show you how to handle mistakes and problems, so we sometimes have to create them on purpose!)It looks like there is some extra space at the right on the page. Our calculations earlier showed that the columns could be as much as 2.5" wide.
-
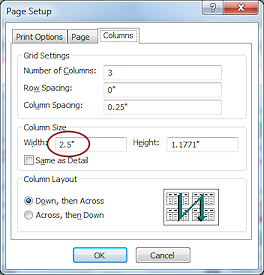 Open Page Setup again,
while still in Print Preview, to the Columns tab.
Open Page Setup again,
while still in Print Preview, to the Columns tab. -
Change the Width to 2.5".
-
Click on OK.
The preview changes to use the new settings. Looks better!The Country Totals now show and the white space is better balanced.
-
 Save the report as Clients -
country totals-3col
Save the report as Clients -
country totals-3col
-
 Print the report. (two pages)
|
|
| © 1997-2017 Jan Smith All Rights Reserved |
Site Map What's New |
Privacy Policy Terms of Service Copyright Acknowledgements |
~~ 1 Cor. 10:31 ...whatever you do, do it all for the glory of God. ~~
Last updated: March 22, 2017