|
Getting your spreadsheet onto paper is more complex than printing letters and reports. A single
worksheet can be of any size from 1 cell to over 16 million cells. You must decide how you want it broken up into pages. There are quite a number of
options.
The Appendix contains a general Pre-print
checklist
 . Not all items in this list will be important for every sheet you
print, of course. The bigger the sheet, the more complex the printing. . Not all items in this list will be important for every sheet you
print, of course. The bigger the sheet, the more complex the printing.
|
|
Where you are:
JegsWorks >
Lessons >
Numbers
Before
you start...
Project 1: Excel Intro Project 2: Excel Basics
Getting Started
Arrange
AutoFill
Finish

 Chart Chart
Print-Defaults
Print-Options
Summary
Quiz
Exercises
Project 3: Format & Arrange
Project 4: Groups & Formulas
Project 5: Design
Search
Glossary
Appendix
|
|
 |
Step-by-Step: Print |
|
What you will learn: |
to check sheet for printing
to print with defaults
to print chart
|
Start with:
 ,
trips8.xls (saved in
previous lesson) ,
trips8.xls (saved in
previous lesson)
Print: Defaults
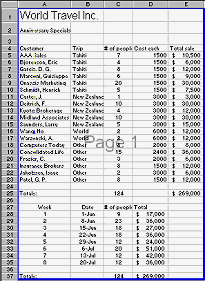
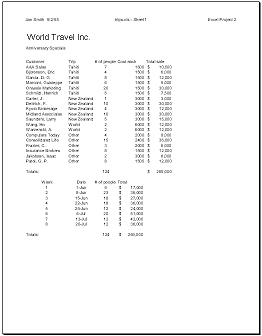
- Click on the tab for Sheet1 to make it the active sheet.
If cells are selected, click on a cell to remove the selection.
- Spell Check. ( | ) Many of the names in the Customer column will be unknown to Excel's dictionary. Look carefully to see if you've typed the name in correctly. Do not add these names to the dictionary.
- Select | . Verify the settings on all the tabs.
Page - Portrait, 100%, Letter size
Margins - top and bottom 1 inch, left and right .75 inch, header and footer .5
inch
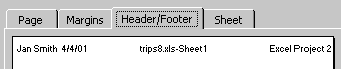
Header - name & date, file name - sheet name, Excel Project 2
Sheet - all blank except Page order: Down then over.
- Click OK to close Page Setup.
-
 On the menu select | On the menu select |
The whole sheet fits neatly on one page.
-
 Click
on Click
on
 Print Preview and check that all looks right. Close Print Preview.
-
 Print by clicking Print by clicking
 the Print button.
Only the active sheet prints. the Print button.
Only the active sheet prints.
Print: Chart sheet
-
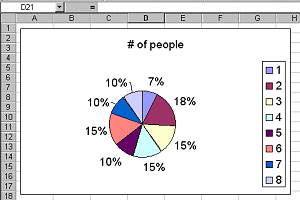
 Click on the tab Pie Chart to make it the active sheet. Click on the tab Pie Chart to make it the active sheet.
- If necessary, click on the chart to select it. There are resizing
handles on the chart and the Name Box shows "Chart Area".
-
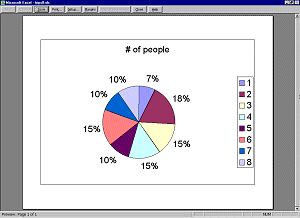 Click on
Print Preview. The chart takes up the whole piece of paper. How
unexpected! Click on
Print Preview. The chart takes up the whole piece of paper. How
unexpected!
- Close Print Preview.
-
 Deselect
the chart by clicking on a cell. No handles should be showing around the
chart. The Name Box shows the cell reference where you clicked. Deselect
the chart by clicking on a cell. No handles should be showing around the
chart. The Name Box shows the cell reference where you clicked.
-
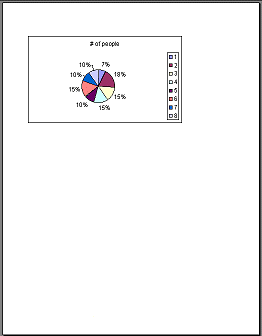 Click on
Print Preview. Now the chart is in the upper left of the page. Much
smaller. But, there is no header showing! You must set the header separately for each sheet in a
workbook or else group the sheets and then set the header. Click on
Print Preview. Now the chart is in the upper left of the page. Much
smaller. But, there is no header showing! You must set the header separately for each sheet in a
workbook or else group the sheets and then set the header.
 If your chart takes up the whole sheet, it was selected when you went to Print Preview. Return to Normal view and click off the chart. Try again. If your chart takes up the whole sheet, it was selected when you went to Print Preview. Return to Normal view and click off the chart. Try again.
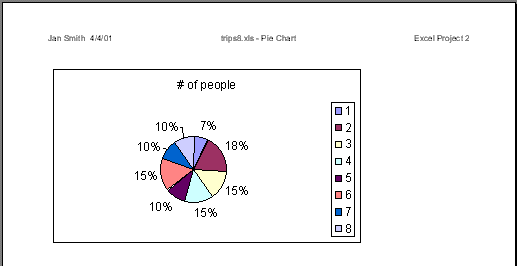
- Click on the Setup… button in Print Preview. The Page Setup dialog opens. Click on the Header/Footer tab and create a custom header with your name, two spaces, the date in the Left section, File name - Sheet name in the Center section, and Excel Project
2 in the Right section. Click on OK to close Page Setup.
- Click the Print button in the Print Preview window. The Print dialog opens. Use the default settings to print the active window. Click OK to print the chart sheet.
- Save
As trips9.xls
 How to handle a full disk How to handle a full disk
|