|
 When you print your
worksheet, do you want to see the comments or not? Printing choices
for comments are on Page Setup's Sheet
tab. When you print your
worksheet, do you want to see the comments or not? Printing choices
for comments are on Page Setup's Sheet
tab.
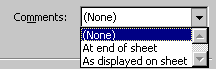
Your
choices for printing:
(None) = no comments printed, which is the default.
All comments printed at the end of sheet on a separate page
As displayed on the sheet (only the ones that are visible)
Three comments printed
at end of sheet in order by row, then column
|
|
Where you are:
JegsWorks >
Lessons >
Numbers
Before
you start...
Project 1: Excel Intro
Project 2: Excel Basics
Project 3: Format & Arrange
Project 4: Groups & Formulas
Project 5: Design
Analysis

 Analyze Analyze
Documentation
Comments
Print
Comments
Planning
What If...
Logical Tests
Sharing Data
Summary
Quiz
Exercises
Search
Glossary
Appendix |
|
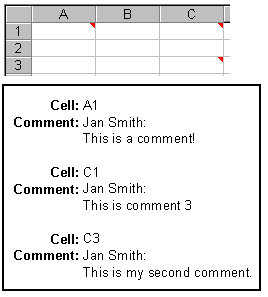
Comment Order
Comments are named in order, as you create them, with boring default names:
Comment 1, Comment 2, etc. You can rename a comment just like you can name a
cell. Select the comment and type the name in the Name Box. The names won't
print, so usually there is not much point in changing the default names.
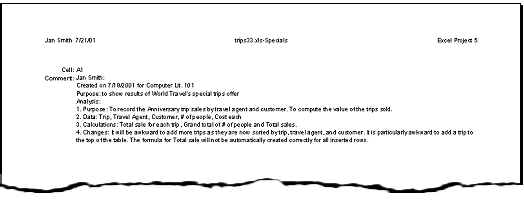
If you choose to print comments "at end of sheet", they appear in cell order
(by row, then column) rather than the order in which you created (and thus
numbered) them. The comments attached to the three cells in the illustration
above were created in the order A1, C3, and C1 but are not printed that way.
 Cell A1 is normally where
hidden comments about the
sheet as a whole belong. Reserve comments in other cells for explanations of that cell's importance or its behavior or its data source. For
visible comments choose a cell that will let the comment display nicely
without hiding your data. Cell A1 is normally where
hidden comments about the
sheet as a whole belong. Reserve comments in other cells for explanations of that cell's importance or its behavior or its data source. For
visible comments choose a cell that will let the comment display nicely
without hiding your data.

|
Step-by-Step: Print Comments
|
|
|
What you will learn:
|
to make a comment visible
to hide a comment
to print comments
|
Start with:
 trips32.xls - sheet Specials (saved
in previous lesson)
trips32.xls - sheet Specials (saved
in previous lesson)
Comment: Visible
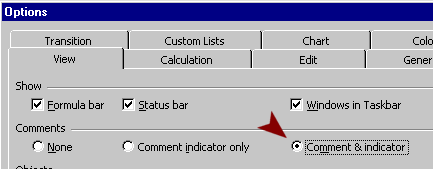
- From the menu select | |
and check the box
for Comments & indicator. Now your comments will be visible all the time.
Comment: Paste text
You can include your Analysis in a comment. You don't even have to type
it over again! You can copy and paste it to your comment.
- Double-click cell A50 to edit it. Drag to select all of the text in cell A50
(your analysis) and then Copy.
If you try to copy the cell instead of the cell contents,
nothing will happen when you paste to the comment box.
- Click in a cell to unselect A50.
- Right click on cell G1 and select .
- Paste what you copied to the end of the existing
text in the comment.
- Resize the comment's text box to show all the new
text. (Hint: Drag the bottom of the box down)
- Format your pasted text by making Analysis:
bold. Add other
formatting, if you wish, to make your text easier to read.
-
Save as trips33.xls in the excel project5 folder of your Class
disk.
Comment: Move alone
A comment will move when you move a whole cell, but how do you move a comment by itself?
You will move your comment in cell G1 to cell A1 without overwriting the
cell's contents.
- Select cell G1. Copy.
- Right click on cell A1. Select from the popup
menu | . Click
OK. Your comment is copied, but only the comment - not the cell's contents or formatting.
- Right click on G1 and from the popup menu select .
- Save.
[trips33.xls]
Unexpectedly, you cannot select a comment and copy or cut and
paste. Who knew??
Comment: Print as displayed
You control how comments print from the Page Setup dialog. The control
is not very noticeable for some reason.
- Open Page Setup.
- On the Sheet tab, for Comments select As displayed on sheet.
- If necessary, set Rows to repeat at the top to $1:$2 to get the
title cells on all the pages.
- On the Page tab select Portrait orientation. Close the
dialog.
-
 Open
the Page Break Preview. Open
the Page Break Preview.
If necessary, insert page breaks
between the two tables and above the analysis in cell A50.
If necessary, drag the right border wide enough to include the
whole comment.
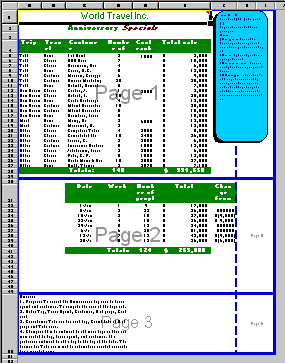
You may have more than 3 pages, depending on the width of your comment
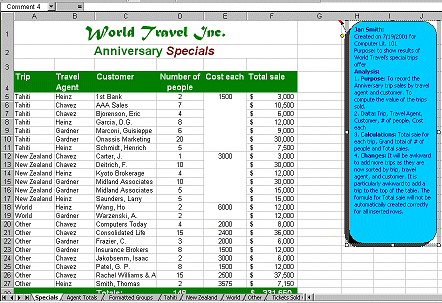
box. The illustration shows that 6 pages will print when you print the sheet.
-
 Click on the
Print Preview button and check all pages. Click on the
Print Preview button and check all pages.
This is not what you want! Problem 1: Only half of the comment box is showing on
the first page! The rest of the comment box is on another page (page 4
in the illustration). Possible Solution: Make the page wider. You
could make the margins narrower, or change to Landscape orientation.
Sometimes you can make columns or the comment box itself narrower.
Problem 2: Other pages include part of the comment box, too.
Pages 2, 3, 5, and 6 are repeating rows 1 and 2 the way you told them to
in the Page Setup. The comment box overlaps those rows. Possible Solution:
Move the comment box so that it does not overlap the repeated rows.
Or make the whole sheet fit on 1 page.
- Click on the Setup… button to see Page Setup again. Change to
Landscape orientation.
-
Click on the Print Preview button.
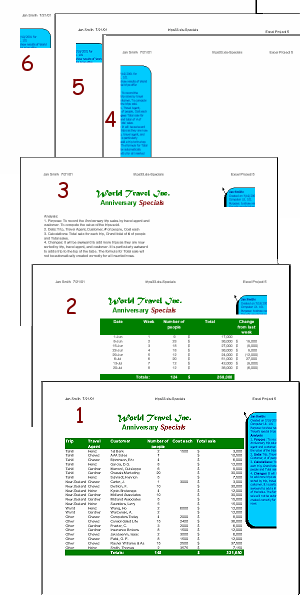
Only three pages to print now and the comment is fully shown on page 1. But...
part of the Comment box is on pages 2 and 3 because
it overlaps rows 1 and 2, which print on all pages of this sheet. This
is not want you want to see!
-
 Click on the Setup… button again to see Page Setup. Select Portrait and
Fit to one page
wide by one page tall. Click on the Setup… button again to see Page Setup. Select Portrait and
Fit to one page
wide by one page tall.
- Click on the Print Preview button.
Now the two tables, the comment, and the analysis fit on a single page.
Of course you would not normally have the analysis in two places!
 Print the
single page. Print the
single page.
Comment: Print at end
Printing comments at the end has the advantage of putting all your
comments together. It may also simplify your formatting since the
comments, whether hidden or visible, will not print on the pages with
data.
- Open Page Setup again to the Sheet tab.
- For Comments select At the end of sheet
- Open Print Preview and click on the Next button to see the
sheet with the Comment. [You should still be set for 1 page wide by 1
page tall.]
- Open the Print dialog and set it to Pages From 2, To 2 to print the one
page with the comment.
- Print. The formatting you
applied to the comment box did not show up in print!
Comment: Hide
- Select | |
and select under Comments None. Now the comment
indicator is hidden and so is your comment. You can view
the comment by right clicking cell A1 and choosing Edit Comment. When a
user looks at this sheet, there is no clue that there is a hidden
comment. Sometimes that is a good thing and sometimes it's not.
- While you are cleaning up, select cell A50 with the Analysis and press
DELETE. Use AutoFit to resize Row 50 to the default height. Split
the merged cells with |
- Save.
[trips33.xls]
|