 |
One way to include your
documentation without cluttering up the worksheet is to use comments.
Excel lets you insert into any cell a comment that acts like a hidden Post-It note.
By default, a cell that has a comment displays a small red
triangle in the upper right of the cell.
 Move your mouse
over cell A1 in the illustration. Move your mouse
over cell A1 in the illustration.
The comment pops into view. When you
move the mouse out of the cell, the comment vanishes again.
(If this did not work for you, your browser does not recognize MouseOver and
MouseOut commands.)
|
 |

Where you are:
JegsWorks >
Lessons >
Numbers
Before
you start...
Project 1: Excel Intro
Project 2: Excel Basics
Project 3: Format & Arrange
Project 4: Groups & Formulas
Project 5: Design
Analysis

 Analyze Analyze
Documentation
 Comments Comments
 Print
Comments Print
Comments
 Planning Planning
What If...
Logical Tests
Sharing Data
Summary
Quiz
Exercises
Search
Glossary
Appendix |
|
Working with Comments
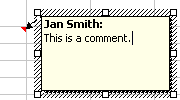 The
Default Comment The
Default Comment
The background color is the color set for ToolTips. A ToolTip is the
little popup tip you see when your mouse hovers over a button or other
feature. This color is set in the Appearance tab of the Display dialog for
Windows, starting with Win95.
 If your name
is not showing as the comment's author, you can delete the name and retype.
If you expect to do a number of comments, change the Author in the document
properties: | | . Then you won't have to retype
each one! If your name
is not showing as the comment's author, you can delete the name and retype.
If you expect to do a number of comments, change the Author in the document
properties: | | . Then you won't have to retype
each one!
Add & Format Text
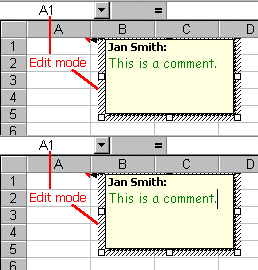 You can format the text inside your comment box with all the normal tools as
you create it. You can format the text inside your comment box with all the normal tools as
you create it.
Once you have created a comment, you can make changes when you are in Edit mode.
To edit an existing comment:
When you are in Edit mode:
 If you need to
see underneath a comment while you are editing, just
drag the comment by its border. The next time the comment pops up, it will be back in the default location - to the right of the cell with the comment's top edge slightly above the cell.
When you edit the comment later, however, it will move to where you left it the last time you
edited. A bit confusing... but handy! If you need to
see underneath a comment while you are editing, just
drag the comment by its border. The next time the comment pops up, it will be back in the default location - to the right of the cell with the comment's top edge slightly above the cell.
When you edit the comment later, however, it will move to where you left it the last time you
edited. A bit confusing... but handy!
Format Text Box
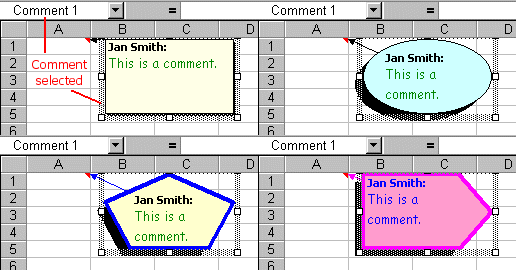 You
can format your comment text box only when the box is selected. The
comment box is actually an AutoShape.
Click on the border of the comment text box to select it. If you miss, the
comment will close. You
can format your comment text box only when the box is selected. The
comment box is actually an AutoShape.
Click on the border of the comment text box to select it. If you miss, the
comment will close.
When the comment is selected:
You can use buttons on either the Formatting bar or on the Drawing bar
to change the background color and text color. To change the shape of the text
box, use |. You cannot just pick a new shape from
the normal AutoShapes list.

|
Step-by-Step: Comments
|
 |
|
What you will learn:
|
to create a comment
to format a comment
to edit an existing comment
|
Start with:
 trips31.xls - sheet Specials (saved
in previous lesson)
Comment: Create
- Open trips31.xls, if necessary.
- Select cell G1. You will attach a comment that will be
visible all the time. Comments about the sheet as a whole are usually put in
cell A1. However, for some sheets, such a comment could not be visible all the time
without blocking part of the sheet.
-
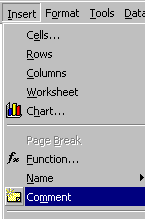 From the menu select | . The default comment box
appears with handles for resizing and a cursor ready for your typing. From the menu select | . The default comment box
appears with handles for resizing and a cursor ready for your typing.
-
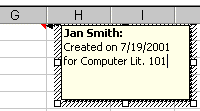 If necessary, change the user name to your own
name. If necessary, change the user name to your own
name.
- Type Created on and type the date. Then type what class you are
doing this sheet for.
You can't use Insert | Date like you can in the Header/Footer. If you are not
sure of the date, hover over the time in the Windows tray at the bottom right of
your screen. The date will
popup.
- Click in an empty cell to close the comment.
Comment: Format
- Open the Drawing bar, if necessary, with the
 Drawing button. Drawing button.
-
Right
click on cell G1 and from the popup menu select .
Notice that this popup menu also includes and while the Insert menu only shows . Who would guess that??
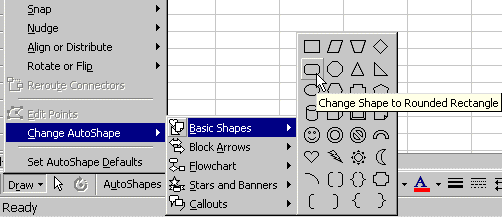
- Format comment: With the comment selected (border is
dotted), change the shape with | | and select the rounded rectangle.
If the shape choices are grayed out, you are in Edit mode in
the comment box. Click on the border of the box and try again.
-
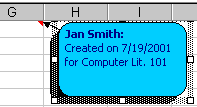
 Set the Fill color to
Sky Blue, the Line color to Black, and the Font color to Dark Blue with the buttons
on the Drawing bar. Set the Fill color to
Sky Blue, the Line color to Black, and the Font color to Dark Blue with the buttons
on the Drawing bar.
If you do not see the color choices in the palettes when you try to change the fill and font color, you do not have the comment box border
selected.
-
 Create a drop shadow
that is down and to the left from the palette of the Create a drop shadow
that is down and to the left from the palette of the
 Shadow button on the Drawing bar.
- Click on any cell to close the comment.
Comment: Edit
Next you will add some text to the existing comment.
-
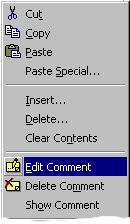 Right click on cell
G1. Right click on cell
G1.
- From the popup menu select . The comment box appears with handles and a cursor
at the end of the existing text, ready
for your editing.
- Create a line break with SHIFT + ENTER, just like in
word processing.
 Don't get confused! In a cell you must use ALT + ENTER
to create line break but in a comment use SHIFT + ENTER like in
Word. Don't get confused! In a cell you must use ALT + ENTER
to create line break but in a comment use SHIFT + ENTER like in
Word.
- Add a new line to the comment:
Purpose: to show results of World Travel's special trips offer
- Resize the comment box to cover the range H1:J3.
-
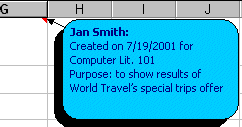 Click on an empty cell to close the Comment box. Click on an empty cell to close the Comment box.
-
 Create on your Class disk a folder named excel project5 Create on your Class disk a folder named excel project5
-
 Save as trips32.xls to the
excel project5 folder. Save as trips32.xls to the
excel project5 folder.
|

![]()
![]() trips31.xls - sheet Specials (saved
in previous lesson)
trips31.xls - sheet Specials (saved
in previous lesson) From the menu select | . The default comment box
appears with handles for resizing and a cursor ready for your typing.
 If necessary, change the user name to your own
name.
 Create a drop shadow
that is down and to the left from the palette of the
 Right click on cell
G1.
  Click on an empty cell to close the Comment box.