Format & Arrange:
Format Cells

Did you want Working with Numbers: 2007,2010,2013,2016 or
español![]()
|
|
Format & Arrange:
|
|
||||
|
|
||||||
|
|
Adding formatting to your spreadsheet not only makes it more attractive, it can also make it easier to read and use. The right font, the right font size, the right color, and the right background can combine to make the most important information pop right off the sheet. Handling the blank areas is also important. Without enough "white space" (blank areas), your data can be hard to read. Columns and rows need to have some breathing space so your eye will see a break between them. Excel's sheets behave in many ways like Word's tables. There are some important differences, as you will see in this project.
Word tables and Excel sheets look similar |
|
Project
3: Format & Arrange Search Glossary Appendix |
||||
|
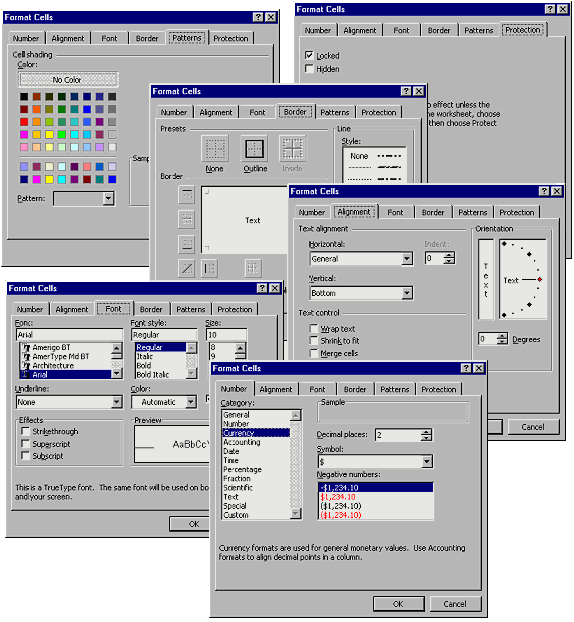
In this project you will apply formatting in several different ways. You will probably find that you prefer one approach, but you can not choose your favorite until you have seen them all! Below is a brief introduction to the formatting methods you will use in the Step-by-Step pages. Format Cells dialogThe dialog Format Cells has six tabs, each with several characteristics that you can set. The Number tab allows you to pick from a large list of number formats, or you can create a custom one. The Alignment tab includes both horizontal and vertical alignment choices. It also contains the Text control choices: Wrap text, Shrink to fit (the cell), and Merge cells, plus Orientation, which rotates text. The Font tab is nearly the same as the Font dialog in Word. The Border tab includes all the edge borders you used in Word plus diagonals. The Patterns tab is for background colors and patterns. The Protection tab allows you to keep certain cells from being changed by someone using your sheet and to hide parts of the sheet.
Copy FormattingTo copy formatting you can use the Format Painter or the Paste Special command. Format Painter:The Format Painter button
To use Format Painter to format several cells that are not
next to each other, double-click the Format Painter button. The pointer will
remain as
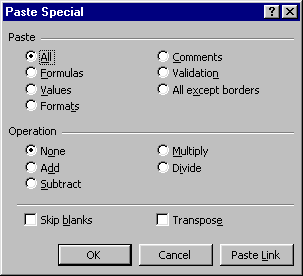
Paste Special:
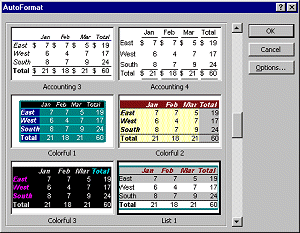
Or choose one of the Paste options and paste just that characteristic. Of special interest for this project is the choice to paste just the Formats. You can even paste everything but the borders. This is very useful when some rows have borders and some don't. If you choose one of the Operations, the operation is performed on the pasted contents when you paste. Pasting multiple cells with Skip blanks checked leaves the previous data in place if the new data has a blank cell in that position. Transpose will paste columns as rows and rows as columns, which can be quite useful and certainly saves a lot of time. AutoFormat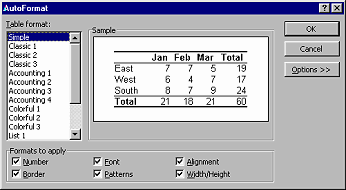 AutoFormat
( | )
supplies complete table formats for you to choose. These designs include borders,
colored fills, and different formatting for column and row labels. Word
has a similar but longer set of formatting schemes in its Table AutoFormat dialog. AutoFormat
( | )
supplies complete table formats for you to choose. These designs include borders,
colored fills, and different formatting for column and row labels. Word
has a similar but longer set of formatting schemes in its Table AutoFormat dialog.
Clicking the Options button on the AutoFormat dialog reveals a list of characteristics
that you can choose to apply. For example you could apply alternating colors
or borders to long data rows by selecting the format List1 and checking only
the Patterns checkbox.
AutoFill FormatsYou can use Excel's AutoFill feature to copy formatting into multiple cells, while leaving the data in the cell's alone.
Clear FormatsAfter all this formatting, what do you do if you want to just start over? How can you get rid of all these formats, called clearing formats? Menu: The menu | | returns all the fonts to the Normal font, removes fills and borders, and splits merged cells. It does not change row and column sizes. Data that was lost in a merge is not restored. AutoFormat dialog: In the AutoFormat dialog the last table format in the list is None, which will also clear formats. It does not split merged cells, however. |
|||||||
|
|
~~ 1 Cor. 10:31 ...whatever you do, do it all for the glory of God. ~~ |
 The
The
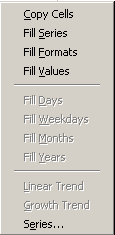 If you drag
the AutoFill handle with the right mouse button, a menu appears that
lets you choose to fill just the formats:
If you drag
the AutoFill handle with the right mouse button, a menu appears that
lets you choose to fill just the formats: 