
Jan's Working with the Web
Navigating: Address Bar
Getting to Web Pages You've Visited Before
The Address Bar can get you to a web page in two ways:
- Type it: Type the web address into the Address Bar and
press ENTER.
Of course you must know the address! It is a great method when you do not have a shortcut in Favorites/Bookmarks to the site or it's an address that you can remember. (It was probably a short one!) - Drop list:
 IE: The addresses that you typed previously in the Address Bar are kept in a list that drops from the bar. New places will
eventually replace the old addresses on the list. Only the addresses that you
typed yourself show in this list.
IE: The addresses that you typed previously in the Address Bar are kept in a list that drops from the bar. New places will
eventually replace the old addresses on the list. Only the addresses that you
typed yourself show in this list. 
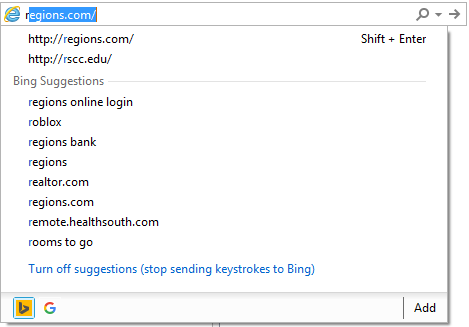
Once you start to type in an address, IE lists matching addresses and Bing Suggestions.
 Chrome: Drop list of 'matching' sites from History
and popular sites from Google searches (not just your own searches). The
icons mark which is which. The star is for a Bookmark. The magnifying glass is
for a
Google search. The page icon is for an address from the browser's History.
Chrome: Drop list of 'matching' sites from History
and popular sites from Google searches (not just your own searches). The
icons mark which is which. The star is for a Bookmark. The magnifying glass is
for a
Google search. The page icon is for an address from the browser's History.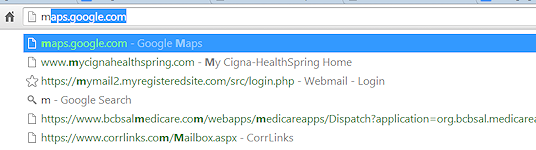
 Firefox: Drop list of 'matching' sites from Bookmarks
  and the browser's History
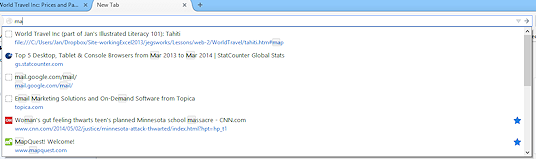
| |
Step-by-Step: Address Bar |
|
|
What you will learn: |
to clear browser cache |
Start with: ![]()
![]() , stop watch or clock that shows seconds
, stop watch or clock that shows seconds
The first icon above means "Connect to the Internet." You must be actually connected to the Internet for most of the following steps to work. A page on your hard drive or on a CD will load too fast for you to do some of the steps below. If you do not have an Internet connection, just read the directions to see how it works.
For the purposes of this section it does not really matter what site you view as long as it takes a while to load the page. Web sites are updated and completely rearranged from time to time. Do not be surprised that the illustrations below do not match what you see.
If a web address in the directions doesn't work, use any address that does work. Sometimes we have to get creative!
Clear Cache
For this exercise, you first need to clear the cache (Temporary Internet files only) to make the browser download the page instead of using a previously downloaded copy. This is not something you need to do normally. You will be looking at what happens as a page is loaded, so read the directions first and then follow them.
Each browser has its own way to clear the cache.
![]() IE:
Delete Temporary Internet Files
IE:
Delete Temporary Internet Files
-
Click on Tools
 > Internet Options > Browsing history section >
Delete... button
> Internet Options > Browsing history section >
Delete... button
The dialog Delete Browsing History appears.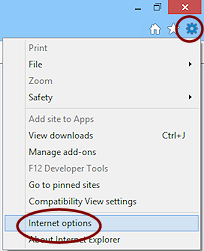
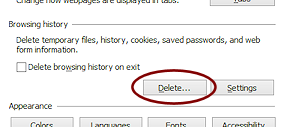
 Check or clear the check
boxes as needed to have only the first two checked - Preserve Favorites website data and Temporary Internet files and website files.
Check or clear the check
boxes as needed to have only the first two checked - Preserve Favorites website data and Temporary Internet files and website files.
- Click the Delete button.
The browser's cache is cleared of the checked information and you are returned to the dialog Internet Options.
- Click on OK to close the dialog Internet
Options.
![]() Chrome: Clear Cache
Chrome: Clear Cache
- Click the Customize button
 and then on Settings.
A web page of choices opens in a new tab.
- On the right at the bottom, click on the link 'Advanced settings...'.
The page expands to show more settings.
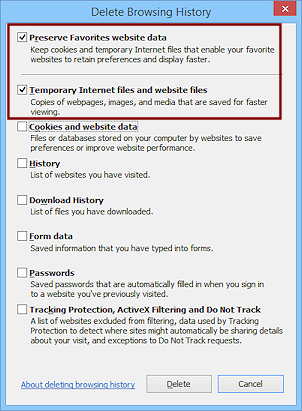
 In the Privacy section, click on the button Clear browsing data....
A new dialog opens, floating on top of the page.
- Check and clear check boxes
to leave only 'Cached images and files' checked.
- Set the time interval to what you think is
reasonable.
You do NOT have to select 'the beginning of time'!
- Click on Clear browsing
data.
The popup window closes and you are back to the browser Settings page.
- You may close the tab with Settings displayed if you wish.
![]() Firefox: Clear Cache
Firefox: Clear Cache
- Click on Firefox menu
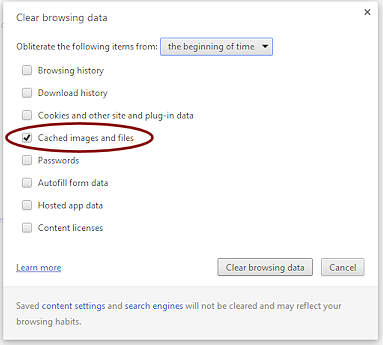
 > Options > Privacy tab > link: 'clear your recent history..'.
The dialog Clear Recent History appears.
 Check and clear check boxes
to leave only Cache checked.
Check and clear check boxes
to leave only Cache checked.
- Set the time range to what seems appropriate
to you to.
We want to try to remove any pages from microsoft.com from previous visits, whether or not they were part of working on these lessons.
- Click the button Clear
Now.
Address Bar: Enter Address
You need a stop watch or a clock that can show the seconds to time how long it takes for the page to load. Your smart phone may have a stop watch app.
How to tell when a page is finished loading: The icon on the page tab stops spinning and changes to the page's icon instead of a spinning arrow. The part of the page that you can see in the browser may finish before the parts that you have to scroll to see. You must watch the tab icon!
READ ALL DIRECTIONS BEFORE STARTING!!
-
In the Address Bar type http://www.microsoft.com/argentina/ and check the time with a stop watch or clock that has a second hand. You want to measure the time from when you press ENTER until the page finishes loading. Watch for the tab's icon to stop spinning.
Tab icon spinning while loading:

Tab icon after page has loaded:
- Press ENTER and start timing. Watch the tab icon!! Note the elapsed time when the tab icon stops spinning.
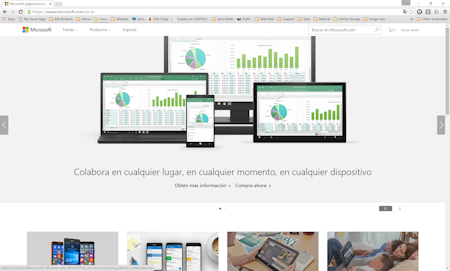
Screen shot of site - June 4, 2016. Your page may look different.
How long did it take for the page to finish loading all of the items? Write the number of seconds down.
What is the URL in the Address Bar now?
It changed! Problem: Did not measure the time for the page to load.
Solution: You must clear cache and then try again. If you do not clear the cache, the browser will load the page from cache, which is much faster. -
Refresh the page by pressing the F5 key. Watch the Status bar for messages as the browser contacts the site and starts loading the default page for this directory.
The messages might flick by too fast to read. You might see status messages about resolving host, waiting, contacting, or connecting. 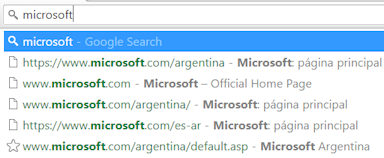 In
the Address Bar type the following nine characters: microsoft
In
the Address Bar type the following nine characters: microsoft
The browser will offer choices to automatically complete the address. What you see depends on the browser, what sites you have visited, and what Favorites/bookmarks you have. Do not accept any of these this time.
The highlighted parts of the suggested address will be ignored in the next step.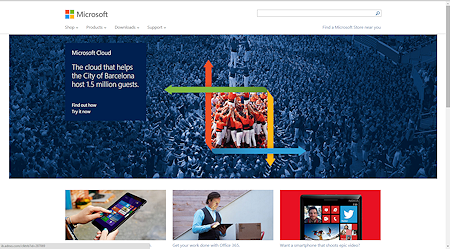
 Key
Combo to complete address:
Key
Combo to complete address:
Hold down CTRL and press ENTER.
(CTRL + ENTER) Your key combo adds www before and com after what you typed in the Address Bar. The browser then proceeds to
load the page, Microsoft's home page for your browser version. You can use
this keyboard shortcut for any address that starts with www and ends with com.
Stop Loading
Sometimes a page loads very s l o w l y because of a problem somewhere along the path between your computer and the web server. Or the page may be pulling content from different web sites. Or perhaps the page has large images. Stopping the process and starting it again often results in the page loading faster. This time we also want to see what a page and an image look like when they do not finish loading. I have created a page with several large photos with addresses at a different web site. This page should take longer than usual to load. The browser may have trouble loading the images at all!
- While a page is showing in the browser, locate the Refresh button.
This button turns into a Stop button while the page is loading. - Open a new browser window or a new browser tab.
- Copy the following URL and paste it in the browser Address Bar:
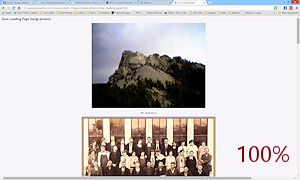
www.jegsworks.com/Lessons/web-2/basics/slow_loading_page.htm
-
[Be prepared to be fast!]
Press the ENTER key to load the URL you just put in the Address Bar and quickly click on the Stop button, before the page finishes loading,.
This will stop the process of loading the page.What you might see:
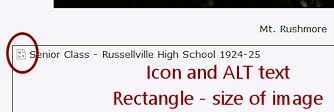
- Icon
- Rectangle the size of the image that has not yet loaded or a default-size rectangle
- Part of an image with the rest either blank or some kind of background
- Blank area where missing image goes


If your connection is fast and you are close to the server, the page may load too quickly for you to stop it. That is not too likely if you cleared the temporary Internet files earlier.
Problem: Clicked too late to stop photos from
loading.
Solution: Clear the temporary files and try again. If you don't clear the temp files, the browser will load the images from cache and not download again. Much faster, of course. - Scroll the page and look for what parts did not load.
Images that are not loaded yet may show an icon or just a blank area. The ALT text may show in the blank area or not, depending on your browser. Before an image loads: If the browser knows the height and width of an image, it will
display an outline that is the size of the image. If the height and
width are not included in the source code, you will see just the
standard size icon until the browser can calculate the size. The
page will rearrange after the browser calculates the size of each
image. This can make the page jump around a lot! Very annoying!
Before an image loads: If the browser knows the height and width of an image, it will
display an outline that is the size of the image. If the height and
width are not included in the source code, you will see just the
standard size icon until the browser can calculate the size. The
page will rearrange after the browser calculates the size of each
image. This can make the page jump around a lot! Very annoying! -
Click on the Refresh button to load the page again. This time let it finish loading.
Problem: Page stops loading but some or all photos are not showing
Solution: Press the F5 key or click the Refresh button to reload the page. At some point the browser should recognize that it has finally downloaded all of the photos. The large size and the different web address seem to confuse the browsers. Just what this example is trying to demonstrate!
Zoom with Scroll Wheel
It is annoying when a picture is too big to fit on the screen or you need to compare two or more images and they don't fit in one window.
Happily, browsers have a Zoom feature so you can enlarge or reduce the size of the page in the window. Different browsers offer different levels of Zoom. The minimum zoom available is IE 10% (with Custom zoom), Chrome 25%, and Firefox 30%. The maximum zoom available is IE 1000% (with Custom zoom), Chrome 500%, and Firefox 300%.
For all three browsers:
 Experiment: Zoom web page with scroll wheel
- Move your mouse pointer over the web page.
- Hold the CTRL key down and roll the scroll wheel on the mouse away from you, toward the top edge of the mouse.
The view enlarges, zooming in. - Hold the CTRL key down and roll the scroll wheel the other way, toward your wrist.
The view of the page reduces, zooming out.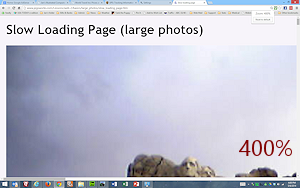
- What percentages are available with this method?
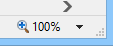
How to see those percentages: IE:
Zoom control on the Status bar. Chrome:
Zoom control in Address box shows when the page is zoomed, or while you are zooming with mouse.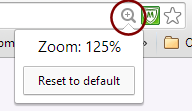 Firefox:
Zoom control in menu palette.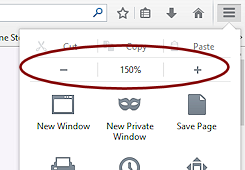
IE does not show the Status bar by default. To show the Status bar, right click on the Title bar or a blank area beside the tabs to show a context menu. Click on Status bar if there is no check mark beside it.
Zoom without Scroll Wheel
All three browsers have ways to zoom in and out without using the scroll wheel. IE is the only one that lets you type in a percentage. Chrome and Firefox restrict you to certain percentages.
![]() IE: Zoom
IE: Zoom
-
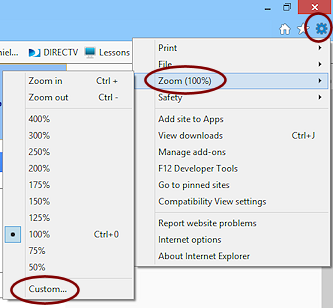 Click the Tools button to open its menu.
 -
Hover over Zoom to expand its submenu.
Alternate method: If the Status Bar is showing across the bottom, there is a Zoom button at
 the far right. It's
arrow opens the same menu of percentages
the far right. It's
arrow opens the same menu of percentages -
Experiment: Zoom Size
-
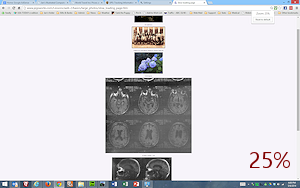
Try different percentages for Zoom until the whole page of four photos shows in the window.
-
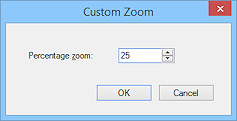 Click on Custom... to get a dialog where you
can type in your own number for the percentage.
Click on Custom... to get a dialog where you
can type in your own number for the percentage. -
What's the smallest number this dialog will accept?
-
Reset to the original size with the key combo
CTRL + 0.
-
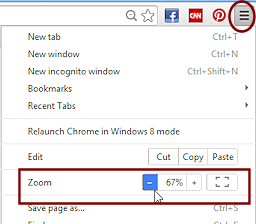
![]() Chrome: Zoom
Chrome: Zoom
- Click the Customize button to open its menu.
The item Zoom shows the current percentage of Zoom in a text box.
The - and + buttons decrease or increase the Zoom percentage.
-
 Experiment: Zoom Size
 -
Click on the - and + buttons to change to expand its submenu.
-
What is the smallest Zoom you can get?
-
Reset to the original size with the key combo CTRL + 0.
-
![]() Firefox: Zoom
Firefox: Zoom
The Zoom control is on the 'hamburger' menu, ![]() at the top right of the window.
at the top right of the window.
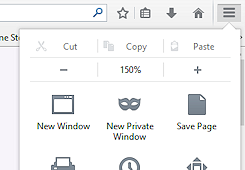 Click the menu button to expand the palette.
The Zoom control is above the icons, - % +.-
Experiment: Zoom Size
-
Click on the Zoom In and Zoom Out commands until the Zoom level is small enough to show the maximum amount of the page at once.
-
How many times can you Zoom In or Out?
-
Reset to the original size with the key combo CTRL + 0.
-
Experiment: Use History and Address Bar List to return to a page
First you will visit a few pages and then use the drop list to return to them. You will see that the drop list only remembers certain addresses that you visited. Which ones?? It will depend on which browser you are using.
Again, it does not matter what pages you visit for this exercise. But, be sure to use the same methods as in the directions, so you can see what happens with the drop list.
Links on page:
- Open the Microsoft home page again, www.microsoft.com.
- Move the mouse around to see where it changes to the hand shape
 .
.
Those areas are links, either text links or image links.
- Click a link or two within the site. Explore a bit.
Don't get too interested! You are just passing through for now.
Link in Address Bar Drop List
![]()
![]() IE and
Firefox:
IE and
Firefox:
Click on the arrow at the end of the Address Bar.
A list of URLs appears but the list does not include the pages you just looked at within the site.
The items in the list are those that you reached by entering the address in the Address Bar.
A complete list of all pages that you have seen is in the browser's History, as the next step will show.
![]() Chrome does not have an arrow at the end
of the Address Bar to drop a list.
Chrome does not have an arrow at the end
of the Address Bar to drop a list.
Type microsoft.com or the site you were touring in the Address bar again.
A drop list appears. But the recent pages you visited are not here.
Link in History
You learned how to open the history in the lesson Browser Basics: History.
- Open the browser's History.
The History lists the sites that you visited and then the titles of the pages you saw. Hover over a page title and a screen tip will show the full URL.
- Open several folders (if your browser uses folders here) in the History and inspect the entries.
- Click on one to go to that page again.
- Repeat for several History items.
- Close the History.
Return to Page
- Open the drop list on the Address Bar again or open the History list
and choose http://www.microsoft.com/ .
You should be able to tell that it loaded faster this time. On this return visit to the page, your browser could use what it had stored in the temporary files on your hard drive.
|
|
| © 1997-2017 Jan Smith All Rights Reserved |
Site Map What's New |
Privacy Policy Terms of Service Copyright Acknowledgements |
~~ 1 Cor. 10:31 ...whatever you do, do it all for the glory of God. ~~
Last updated: March 22, 2017