
Jan's Working with the Web
Tables: Data Table
Table were designed to display information that can be logically arranged in rows and columns.
Example of a data table:
| First Quarter Sales | |||
|---|---|---|---|
| January | February | March | |
| widgets | 1090 | 2450 | 2018 |
| wangles | 450 | 392 | 874 |
| whatsits | 2045 | 500 | 3920 |
| Total: | 3585 | 3342 | 6812 |
Merged Cells:
The header cells in row one of the example table, First Quarter Sales, were merged to create a single cell across all four columns.
Source code for the first row of the example table, First Quarter Sales:
The part that merges the cells is COLSPAN= the number of columns to merge.
You can also merge rows with ROWSPAN. You will use that in Exercise Web 2-2.
Don't get too crazy with merging cells when you are coding manually. It can get very difficult to keep track of how many cells there really are!
| |
Step-by-Step: Data Table |
|
| What you will learn: |
to create a data table to add data to cells to float the table with inline style to format the table with inline style to format cell contents with internal style sheet to add a row and merge cells to add a caption to table |
Start with: ![]() , hector21-Lastname-Firstname.htm, text editor
, hector21-Lastname-Firstname.htm, text editor
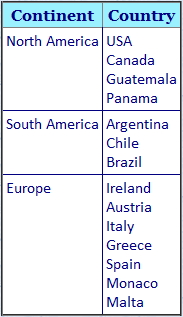
You will add to Hector's page a data table listing the countries he has visited. It would naturally fit in the Travel section.
Create Table
-
 If necessary, open hector21-Lastname-Firstname.htm in your text editor.
 -
 Save
as hector22-Lastname-Firstname.htm.
Save
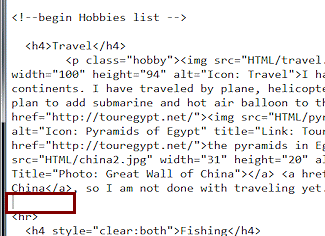
as hector22-Lastname-Firstname.htm. - Create, if necessary, a blank line in the source code below the paragraph
about Travel and above the horizontal rule.
-
Type the following code to create a table with two columns and one row.
<table border="1">
<tr>
<td></td>
<td></td>
</tr>
</table> -
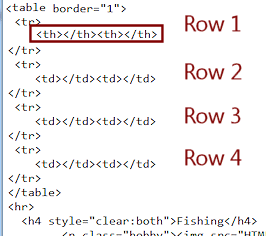 Select the 4 lines from <tr> through </tr> and Copy.
These lines create a row with two cells. -
Click in the blank line above </table> and Paste.
-
Repeat twice to create a total of 4 rows.
-
Edit the tags for the first row to use TH instead of TD since that row will have headers.
-
Type data in the cells, as shown below in the screen shot of the source code in Notepad.
You will use <br> to create a line break between country names inside a cell.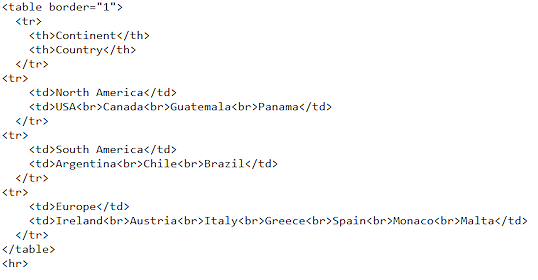
-
Save.
[hector22-Lastname-Firstname.htm] - Switch to your browser and view hector22-Lastname-Firstname.htm.
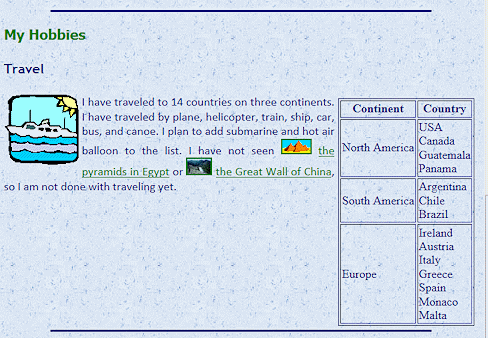
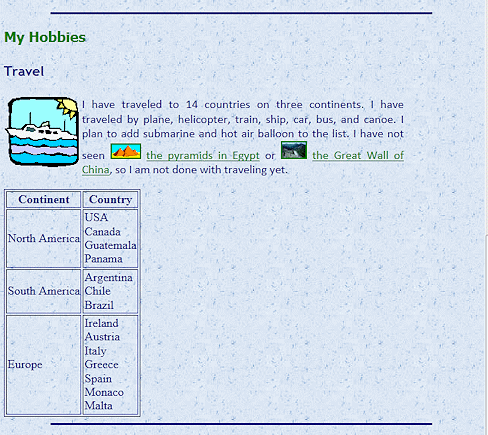 The page now has a table of places that Hector has visited, but it does not
look particularly nice.
The page now has a table of places that Hector has visited, but it does not
look particularly nice. - The table is using the browser's default font and borders.
- The first column text is in the vertical middle of the cell. That's a nice look for short cells but Europe is getting a bit lost in its taller cell.
- The text looks crowded in the second column, bumping into the borders.
- The table is at the far left, which makes the page look unbalanced.
- The background of the page shows through the table cells, which looks odd.
Next you will use CSS to position and format the table and its cells.
Inline Style: Float Table
First you will make the table float at the right in a way that puts the text between the Travel icon and the table. This means moving the table code so that it appears before the IMG code. Copy and Paste to the rescue!
You will also need to add a bit of margin around the table so
that the text and the horizontal rule won't be too close.
-
Switch to the text editor showing the source code for Hector's page.
-
Select all of the table's code, from the opening table tag through the closing table tag.
-
Copy.
-
Press the DELETE key to delete your selection.
- Click at the right of the closing H4 tag for "Travel".
- Press ENTER to create a new blank line.
-
Paste.
The code for the table is pasted. -
Edit the TABLE tag to add an inline style to keep the table away from the text and the horizontal rule:
<table border="1" style="float:right;margin-left:5px;margin-bottom:5px;">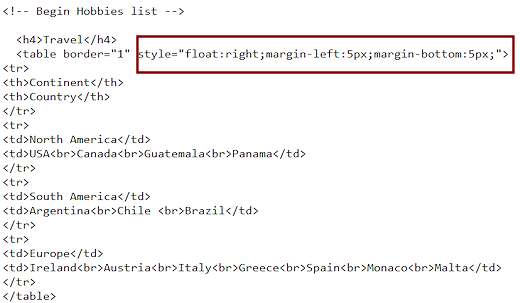
-
 Save.
Save.
[hector22-Lastname-Firstname.htm] -
Switch back to the browser and Refresh.
The table pops over to the right and up.
There is still some blank space below the paragraph, but that is common in web pages.
Inline Style: Format Table
Those double lines in the table border come from having a table border, a cell border, and a bit of spacing between the cells.
- Cell spacing: Space between the borders of neighboring cells
- Cell padding: Space between the cell border and the contents of the cell
To squish those table lines together, you just need to remove the cell spacing.
You will also add color to the table background, the table border lines, and the text content. The 'table lines' go around the outside of the table. Cell borders create the lines inside. You will deal with those and cell padding in the next section.
-
Switch to the text editor showing the web page source code.
-
Edit the TABLE tag to remove cell spacing (collapse the border), set the width of the border line, add color to the line and to the text, and add background-color.
<table border="1" style="border-collapse:collapse;
border-width:2px;
border-color:navy;
color:navy;
background-color:white;
float:right;
margin:5px;">That's a lot of styling! When writing long inline styles (not recommended), you can space the properties out just like you do in an internal or external style sheet. It makes it much easier to proofread what you wrote!
-
Save.
[hector22-Lastname-Firstname.htm] -
 Switch back to the browser and Refresh.
The table now has a single line border around the outside that is 2 px wide and navy in color.
The table background is white. Text color is navy.
Internal Style Sheet: Format Cells
Now you can work on the formatting of the cells inside the table using an internal style sheet. Why use an internal one instead of external? Tables on other pages on this site might need entirely different formatting. Later you could move the style to an external style sheet, if you find that it is useful on other pages.
You will add color to cell border lines, change the vertical alignment to put the text at the top of the cell, and change the font. For the header cells you will add a different background color, chosen to coordinate with the Travel section icon.
Some padding keeps the text from getting too close to the border. Extra space created by setting Padding uses the background color. But space added by setting Margin does not! Pick the right one for the effect that you want.
-
Switch to the text editor showing the web page source code.
-
In the HEAD section of the page, create a STYLE section.
<style type="text/css">
</style>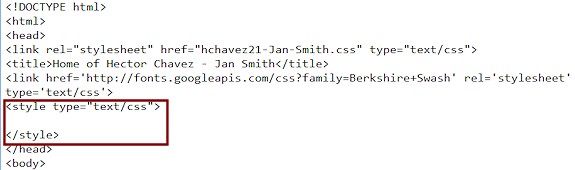
-
Add the following styles to format the header cells and the other table cells.
th {
padding: 3px;
background-color: #9bf1ff;
padding: 3px;
font-family: Georgia, Times, serif;
border-color: navy;
}
td {
padding: 3px;
font-family: Calibri, Arial, sans-serif;
vertical-align: top;
border-color: navy;
}[Remember: Do not copy and paste this code or the browser may ignore it.]
Of course, if you planned to use this same type of formatting in other tables on your web site, you would put these styles in the external style sheet instead. If you have more than one look for tables, you should create classes instead of formatting the TH and TD elements directly.
-
 Save.
Save.
[hector22-Lastname-Firstname.htm] -
Switch back to the browser and Refresh.
- Border color is navy in all three browsers.
- The continent names popped up to the top of their cells.
- The header cells got a different background color and font.
- The other cells got a new font, which is the same as the web page's paragraphs.
(Some people recommend using a font in tables that is different from the body text font.) - All of the cells got a little inside padding to keep the
text from bumping into the borders.
Nicely coordinated!
You did not set a height or width for any of the cells so the table expanded automatically to fit the widest and tallest parts.
Add Row and Merge Cells
The table is looking much better but it does not quite tell us what it means. It needs a bit more information. You will add another header row and merge the cells on that row.
-
 Create a new blank line above the TH line for
the table.
Create a new blank line above the TH line for
the table. -
Add another header row with the following code to merge the cells:
<tr>
<th colspan="2">Hector's Travels</th>
</tr>
-
Save.
[hector22-Lastname-Firstname.htm] -
Switch back to the browser and Refresh.
The table has a new header row with just one merged cell it.
Add a Caption
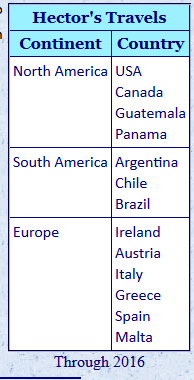
The CAPTION tag must be placed directly after the TABLE tag. The text for the caption appears, by default, above the table and centered over the table. You can change the alignment with the TEXT-ALIGN property. You can switch the position to below the table with the CAPTION-SIDE property.
-
 Switch to your text editor with the source code.
 -
Add directly after the TABLE tag a CAPTION tag:
<caption>Through 2016</caption>
-
Save.
[hector22-Lastname-Firstname.htm] -
Switch back to the browser and Refresh.
The caption appears above the table in the browser's default font. Did you expect that?
You can format the caption and move it to the bottom side of the table. -
Switch to your text editor with the source code.
-
Add a STYLE property to the caption:
style="caption-side:bottom;" -
Add to P tags around the text in the CAPTION tag:
<caption style="caption-side:bottom;"><p>Through 2013</p></caption> -
 Save.
Save.
[hector22-Lastname-Firstname.htm] -
Switch back to the browser and Refresh.
The caption appears below the table with paragraph formatting.
|
|
| © 1997-2017 Jan Smith All Rights Reserved |
Site Map What's New |
Privacy Policy Terms of Service Copyright Acknowledgements |
~~ 1 Cor. 10:31 ...whatever you do, do it all for the glory of God. ~~
Last updated: March 22, 2017