
Jan's Working with Databases
Basics: Access Objects: Table Datasheet
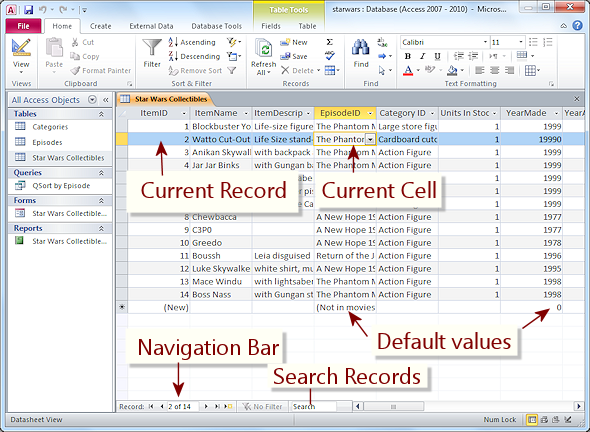
The Table Datasheet View shows the records in a table. Each row is one record. The columns are the fields from the table's definition. This table looks a lot like a spreadsheet, but it does not behave quite like a spreadsheet.
Example: starwars.accdb
The gray box at the left of a row is the record selector. Click it to select the whole record.
The record selector is always blank except when an asterisk ![]() marks the row for entering a new record.
marks the row for entering a new record.
The gray boxes across the top are column selectors. Each column is labeled with the name of the field whose values are in the column.
The Default Datasheet Layout:
The Blank Database template may not use these defaults!
- Fields are in the same order as in the Table Design View.
- All rows are the same height. 12.75 pt or 14 pt in Access 2013 or 14.25 pt in Access 2016.
- All columns are the same width = 11.75 characters = 15.667 pts = 1 inch
- The default font for the data is Calibri, 11 pts.
- Default colors: black text; background color in alternate rows - white and gray.
The asterisk * in the row header of the row below the last record means that the row is for a new record. Only the fields with default values will show anything in the new record row.
Change default datasheet layout: You can change the datasheet defaults
in the Options dialog on the Datasheet page. These choices apply to all datasheets.
If a datasheet is open, you will have to close it and reopen it for your
changes to be applied.
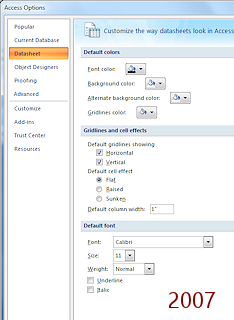
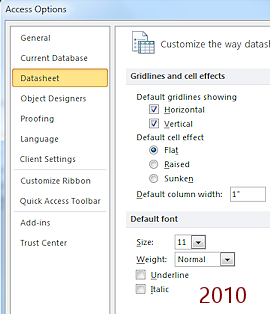
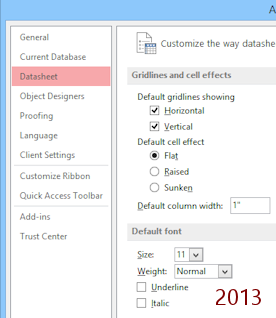
Dialog: Options - Datasheet
Navigating Records
Navigation Bar:
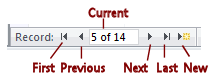 At the bottom of the Table Datasheet window is a navigation
bar with buttons to
help you move through the records. These buttons are especially helpful
when there are a large number of records.
At the bottom of the Table Datasheet window is a navigation
bar with buttons to
help you move through the records. These buttons are especially helpful
when there are a large number of records.
The New Record button ![]() moves you to a blank record at the end of the table.
moves you to a blank record at the end of the table.
The Last Record button ![]() moves you to the last existing record.
moves you to the last existing record.
Methods to Navigate a Datasheet:
-
Type the row number of the record you want in the navigation box.
 Point of Confusion: The row number may not be the same as the
AutoNumber field used as a primary key! The records may be sorted or filtered. When records are deleted, the
AutoNumber value
does not change so there may be gaps in the numbering.
Point of Confusion: The row number may not be the same as the
AutoNumber field used as a primary key! The records may be sorted or filtered. When records are deleted, the
AutoNumber value
does not change so there may be gaps in the numbering.
-
Click a navigation arrow.
-
Scroll to see the record that you want.
-
 Using keystrokes:
| TAB or ENTER | Next field to the right. If in the last field in a record, moves to the first field in the next record. |
| SHIFT + TAB | Backs up one field to the left |
| HOME | First field in current record |
| END | Last field in current record |
| CTRL + HOME | First field in the first record |
| CTRL + END | Last field in the last record |
| Arrow keys | One field to the left/right One record up/down in the same column. |
Changing Defaults for Behavior of Keys:
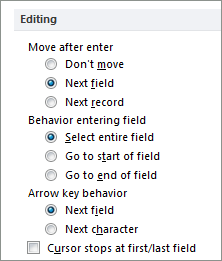 The default behaviors for the ENTER and arrow keys can be
changed in the Options dialog on the Advanced (2007) or Client Settings (2010) page. The choices are the same in both versions
The default behaviors for the ENTER and arrow keys can be
changed in the Options dialog on the Advanced (2007) or Client Settings (2010) page. The choices are the same in both versions
Undo Changes: Adding or Editing Records
Access can undo up to 20 typing actions when you are adding or editing records, in both Datasheet View and Form View. But... once you switch to a different window, apply or remove a filter, or edit a different record, you cannot Undo anything about the record you were last working on.
- Undo button


 or CTRL + Z:
In Datasheet view, the Undo button reverses your most recent changes to fields in a record. In Datasheet View, that would be all of the edits you made to a record. This could be a whole record! You can undo edits only until you make changes to a different record. Then the Undo list is wiped clean and only remembers what you are doing to the current record. - ESC key: Removes changes to a record, ONLY IF you have not yet left the record.
| |
Step-by-Step: Table Datasheet View |
|
| What you will learn: | to open an existing database from Recent list to open a table in Datasheet view to add records to a datasheet to save a record to navigate from record to record and field to field |
Start with: ![]() , Access open but no database open, mytrips-Lastname-Firstname.accdb from previous lesson
, Access open but no database open, mytrips-Lastname-Firstname.accdb from previous lesson
Open an Existing Database from Recent Databases
-
Open the list of Recent Databases:
 Access 2007: Office button > list is on the right
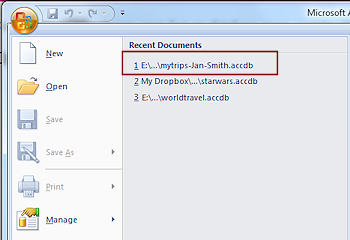
 Access 2010:
File tab > Recent > Recent Databases
Access 2010:
File tab > Recent > Recent Databases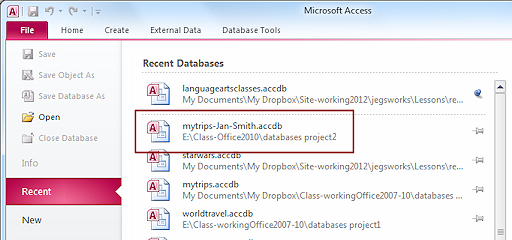

 Access 2013, 2016: File > Open > Recent
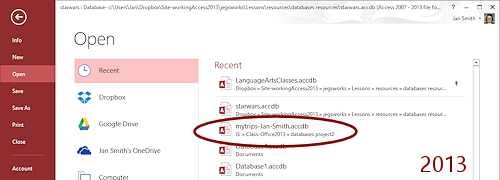
-
 Click on mytrips-Lastname-Firstname.accdb,
which will be the first document in the lisit if you have just finished the previous lesson.
Click on mytrips-Lastname-Firstname.accdb,
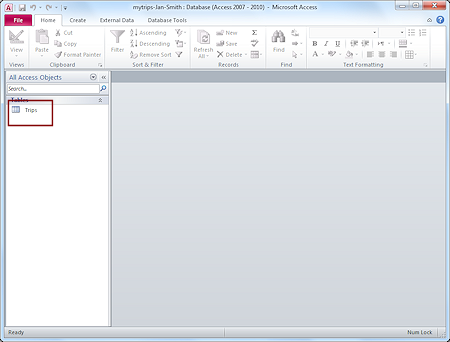
which will be the first document in the lisit if you have just finished the previous lesson.The database opens with one object showing in the Navigation Pane, the Trips table.
 Problem: Do not see mytrips-Lastname-Firstname.accdb in the list:
You either have not done the previous lesson or you have opened enough databases since then to move the database off of the list.
Solution: Either create the database - previous lesson
OR, Choose Open on the menu instead, and navigate to where you saved mytrips-Lastname-Firstname.accdb and open it.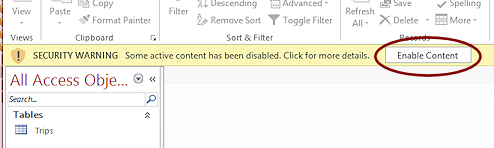 Problem: Security Warning appears
Solution: Click on the button Enable Content.
Open a Table
-
 Double-click the table Trips in the Navigation Pane.
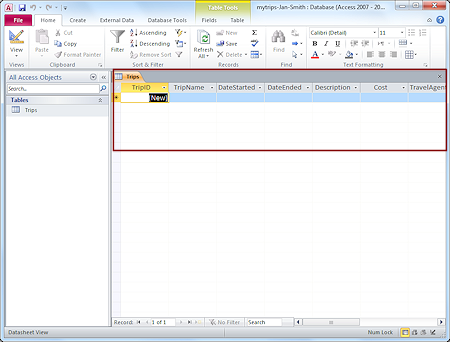
 The table displays in Datasheet view.
 Your field names show as column headings.
Now you can enter some records. Don't get too excited! This is a tedious part of working with databases.
Add a Record
Now you can put in your first record. It's not much fun working directly in the datasheet, but it can be done! The TAB key is your friend here! It will move you to the next field to the right.
-
Try to type the number 1 in the first field, TripID, which is selected when the table opens.
You should hear the computer's error sound and a message shows on the Status Bar.
Fields with the data type AutoNumber automatically put in a number, but only after you have finished entering data for that record.
- Press the TAB key. The cursor moves from the TripID field to the
next field to the right, TripName.
- Type the data below into the matching field. Use the TAB key to move on to the next column.
Note: The datasheet columns cannot show all of the text in the memo fields. That is OK! It's still there. Just keep typing. Later we will create a form that will make this easier to see.Your datasheet window is probably not wide enough to show all of the fields at once.
TripName Kauai DateStarted 2/26/1990 DateEnded 3/5/1990 Description Convention. Flew TWA from Nashville to Honolulu, then Hawaiian Air to the island of Kauai. Stayed at the Westin Kauai. Cost $950.00 Travel Agent Arranged through company sponsoring the convention. Diary Just us two. Beautiful weather. Rented car and drove around the island, well… as far as you can get on a road! Lovely canyon park - Grand Canyon of Hawaii. Smelled and looked just like the Great Smoky Mountains. Who knew! Flew over to the Big Island and and took a helicopter tour of the volcano. It was erupting with smooth lava flow that fell into the sea! Such heat and steam!! - When you finish entering the Diary field text, press the TAB key to move to the next record.

The TripID is now showing 1 for this first record.
Add Another Record
A table with only one record is not of much use. You need to add some more trips!
- Press the TAB key to move to the second field, TripName.
- Type the following in the matching fields to create a new
record:
TripName Alaska cruise DateStarted 8/7/2005 DateEnded 8/14/2005 Description Norwegian Star, port Seattle. Flew in on Southwest through Dallas. Cost $5,500.00 Travel Agent Jorge Martinez, World Travel Inc, jmartinez@worldtravelinc.net Diary Just us two. Rainy to start but the Inside Passage was smooth and beautiful. Saw Ketchikan, Juneau, and Skagway. Jumping salmon right by the ship. Mendenhall Glacier in Juneau was so cool! We took a boat out to look for whales and saw three different kinds.
Some columns are too narrow to show all of the text. Some are wider than needed. You will work on that in the next lesson.
Save Records
Your new records are saved as you go!
-
Save the changes by moving to another record.
You can TAB or use arrow keys or just click in another record.When you leave a record, all of your data changes are automatically saved!!
The Status bar has the message Calculating...
 while it is saving the record. Did you see it? For small tables the process
can finish too fast to show the message.
while it is saving the record. Did you see it? For small tables the process
can finish too fast to show the message.
![]() Commerical databases may not save automatically! A
database programmer can change this behavior so that records are not
automatically saved. Know your database!!
Commerical databases may not save automatically! A
database programmer can change this behavior so that records are not
automatically saved. Know your database!!
![]() To
save data changes without leaving the record:
To
save data changes without leaving the record:
![]() SHIFT + ENTER
SHIFT + ENTER
Add Another Record
- Type the following in the matching fields to create a new
record:
TripName Disney World DateStarted 6-4-03 DateEnded 6-11-03 Description Drove to Orlando. Stayed at Disney Polynesian Resort. Cost $5,000.00 Travel Agent none Diary Left 2 hours late due to a flat tire. Arrived in Orlando in a rain storm. Reservations were not correct, but the desk clerk was very cooperative and straightened it out. No yelling required! Kids slept like logs but woke up at first light. So excited!!
Did you notice? When you type the date as 6-4-03, it is automatically reformatted to the style mm/dd/yyyy.
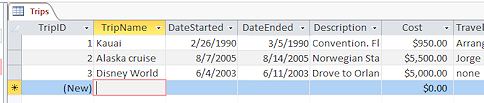
Trips table after entering three trip records
![]() Problem: Date did not reformat as mm/dd/yyyy (like 6/4/2003)
Problem: Date did not reformat as mm/dd/yyyy (like 6/4/2003)
You did not assign the Date/Time data type to the field.
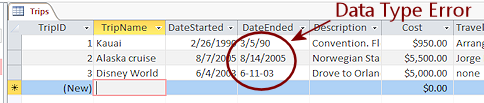 The illustration shows the effect of assigning Text/Short Text data type to the Date Ended field instead of Date/Time. The numbers remain exactly the way they were typed because they are treated as text.
Solution: Return to Table Design view and make corrections to the data type. You may see warning messages. Changing a data type after records are created can be tricky. You may have to re-enter the dates that were not correctly formatted.
Navigating Records
There are several methods for navigating between fields and between records. Now that you have some records in your table, you can do a little practice.
- Practice moving from field to field with the TAB key and the other key methods listed at the top of this page.
- Practice moving from record to record with the navigation buttons at the bottom of the Datasheet window.
- Close the table by clicking its Close button

 at the far right of the datasheet tab, but
do not close the database.
at the far right of the datasheet tab, but
do not close the database. - Close the database without closing Access.
(Office button or File > Close)
|
|
| © 1997-2017 Jan Smith All Rights Reserved |
Site Map What's New |
Privacy Policy Terms of Service Copyright Acknowledgements |
~~ 1 Cor. 10:31 ...whatever you do, do it all for the glory of God. ~~
Last updated: March 22, 2017