
Jan's Working with Databases
Forms & Reports: Exercise Access 4-3
You need to use what you just learned and what you learned in the previous project, and maybe learn a little more. The exercises with databases will require more steps than in the other lessons!
Complete all parts of the following exercises. Don't forget to backup your Class disk when you have completed the exercises or whenever you stop for the day and saved a document along the way.
Exercise Access 4-3: Computers Today
| What you will do: | Link tables Create data entry form with subform Create report calculating totals Create report with subreport in each record |
Start with: Access open with no databases open, resource files
The fictional company Computers Today publishes several magazines and newsletters. You will create some forms and reports about the subscriptions to their various publications. This is a much-simplified database for managing such information! We will not deal with credit card numbers, or special prices for multiple-year subscriptions, or shipping addresses that are different from customer's address.
Computers Today needs forms to enter customer info and data about each order and what items were ordered.
Computers Today can use reports to answer a number of questions, like:
- How many subscriptions to which publications did we get for each month? Altogether?
- What is the total price of subscriptions sold?
- How much commission did each salesman earn?
Computers Today uses two databases to manage their subscriptions- one for the actual data tables and one for the queries, forms, and reports. There are two advantages to splitting a database in this way.
- Customizing: Different people or different departments can create their own forms and reports based on the same database of tables, without cluttering up the database for everyone else.
- Editing: It is easier to transport the smaller database of forms and reports for editing. The bulkier database of tables can stay in one place and keep collecting new data while a database designer works on updating/revising the other database.
There is one important disadvantage to splitting your database this way.
- Moving: If you move one of the two databases, your links will break. The tables can be re-linked, but you must know where the database of tables is!
Link Tables
- From your resource files, copy the file computerstoday-data.accdb to your databases
project4 folder on your Class disk.
- Create a new blank database named ex4-3-computerstoday-Lastname-Firstname.accdb .
- Link to all of the tables in computerstoday-data.accdb from the new database.
Delete the initial blank table that Access created.
-
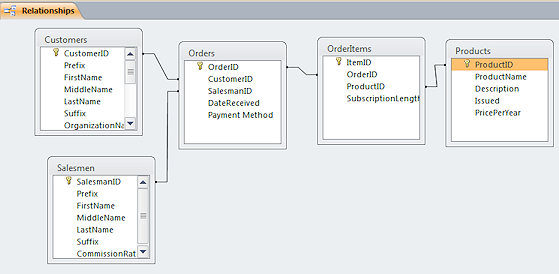 Check the Relationships.
Rearrange similar to the illustration so you can see the relationships better.Each order has a customer, a salesman, and one or more items ordered. It takes all five tables to manage one order.
You may need to remove some automatically created backbround tables and add the linked tables.
Form with Subform Containing a Subform
To completely describe an order, you need information on the Customer, on the order as a whole, and on what individual items were ordered. That's why there are so many tables for this info and why you need 3 forms. Once you have the basic forms, you can modify them to use as subforms. So the actual form that a salesman would fill in will have a subform inside a subform! This is cool but offers many opportunities to make a mess!!
(In the interest of preserving the sanity of students and their teachers, I have omitted much of the detail that would actually be needed to do real orders of this type.)
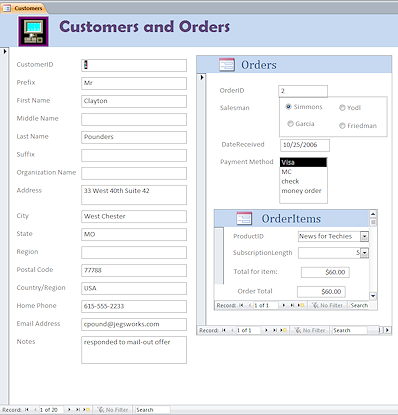
- Create a form for the Customers table information, and name it Customers.
- Include a Form Header labeled Customers and Orders.
- Add the logo icon, computerstoday-logo.gif, from the resource files to the left side of the Form Header.
- Change the Detail section's property Force New Page
to After Section.
This will make each new customer start on a new page.
- Create a form for the information in the Orders table, and name it Subform-Orders.
You can start from a blank form or you can use the Form Wizard and make changes.- Inspect the Salesmen table and write down the names and ID numbers of the four salesmen that are in the Salesman table.
-
 Create an Option group for the SalesmanID. Use the Option Group tool in the palette of controls and a wizard will walk you through the setup.
Note: New salesmen will not be added automatically to an Option group. You will have to revise the form yourself. - The Payment Method box is a List Box because in the Orders table this field is a Lookup field. You cannot add new payment methods here. Make it tall enough that scrollbars won't appear and only wide enough to hold the widest entry.
- Create a form named Subform-OrderItems with the Form Wizard.
- The Record Source is a query that includes all of fields from the OrderItems table and the PricePerYear field from the Products table.
- Change the Default View for the form to Continuous Form view.
- Do not show the Order ID or the order's ItemID in this subform.
- The ProductID control should be a Combo Box, showing the name of the publication while storing the ProductID number.
- Subscription Length should be a list box with values are 1, 2, and 5. Make sure all three values show and there is no scoll bar.
- In the Detail section, add a control that calculates the total for the item ordered, by multiplying the price by the number of years subscribed.
- In the properties of the Detail section, set Keep Together to
Yes.
This will keep the customer record together on one page. - In the Form Footer, add a control that calculates the total
for the order and shows in Currency format.
(This will be a sum of calculated controls! How does one do that??? Do you remember?)
Note: To display this kind of total with the order info on the Subform-Orders, you must do the calculation in a query underlying the form because you cannot sum calculated controls.
 Add the Subform-OrderItems to
the form Subform: Orders as a
subform.
Add the Subform-OrderItems to
the form Subform: Orders as a
subform.
-
Add the Subform-Orders to the form Customers.
Size the controls and the forms so that there are no horizontal scroll bars. That can take a lot of tweaking!You may arrange and format your form to look quite different from the illustration. This is just a suggestion. One alternative would be for all customer info to be at the top with Order info below it and the items ordered at the bottom with the total for the whole order.
You probably will want to set the Alternate Back Color for all three forms to No Color.
-
Check Print Preview.
Make sure the form fits within the width of the page. You may need to edit the subforms and their controls or rearrange controls or change the orientation.
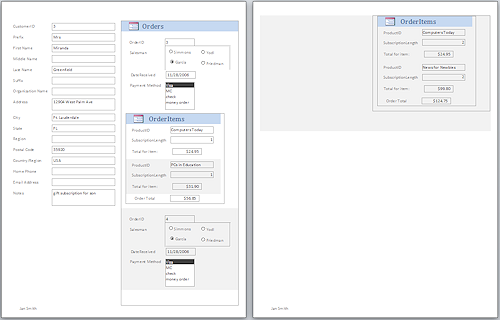
What happens with customers who have more than one order, like customer #3? The orders may flow onto a new page. The Order subform does not include the customer's name or ID number. That's fine for form view, but possibly a problem for printed forms! Another reason creating a report can be better than printing forms.
 Add your name to the Page Footer.
 -
 Save your changes.
 -
 Print the 2 pages for CustomerID #3.
These should be pages 3 and 4.
The Form Header does not print with this customer. It prints only with the first record. For forms that you will be printing often, it may work better to put such title info in the Page Header or even in the Detail section.
Report: Counting Orders
- Create a query named QOrdersbyMonth that
will be the source for a report.
- Use the tables Orders, Customers, and Salesmen.
- Include all of the fields from Orders.
- Include the name parts from Customers and from Salesmen.
- Create two new fields, CName and SName, that concatenate the name parts,
last name first, for Customers and Salesmen. This is not so easy this time.
Read the following notes:
You will have to include
the name of the table in the concatenation expression. Both the table
of customers and the one for salesmen use the same field name for the
parts of a name. Not good choices!
For example, instead of using [LastName] in the expression for the new column, you must use [NameOfTable!LastName].
Be careful not to introduce any spaces into the expression!
Another issue is extra spaces in the resulting name when there is no Suffix. You will need an IIf expression that shows nothing if the Suffix field is empty. Otherwise it shows a comma plus space and then the suffix part.
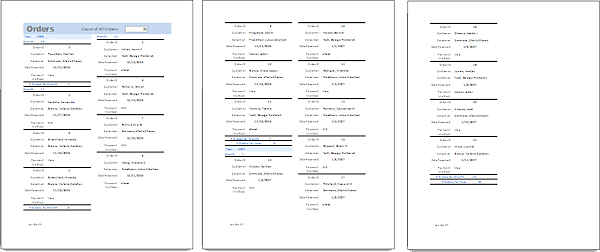
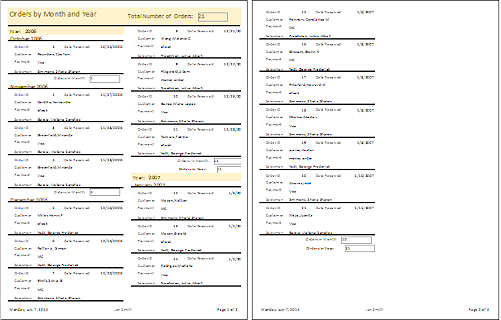
- Create a report named Orders by Month and Year,
based on the query you just created.
- Group the orders by DateReceived but change it in the Group, Sort, and Total pane to 'by year' and then do a second group on DateReceived 'by month'. Show group headers
and footers. This automatically creates an expression that will show just the year or just the month part of the DateReceived.
(This uses the same field twice but different Group On values.) - Sort the orders by OrderID after the groupings.
- In the group footer show the total count of the number of orders in each month.
- In the group footer show the total count of the number of orders in each year.
- In the Report Header show the total count of the number of orders for the whole report.
- Add your name to the Page Footer.
- Create two columns, going Down and then Across.
- Make adjustments so that the report is easier to read but fits on no more than 3 pages. Can you get to fit onto 2 pages??
- Save your changes.
- Print.
Your report may look a lot different from he examples.
Examples:

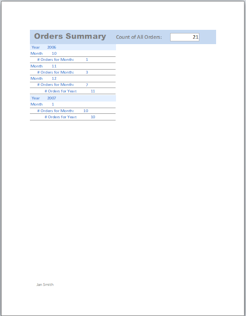
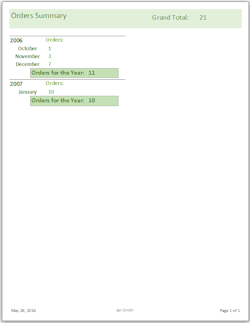
Report: Summary only
- Copy the report and rename it Orders by Month and Year, Summary
- Remove the details, leaving only the group and report totals.
- Change the title to Orders Summary.
- Make any formatting changes necessary to make the report easy to read and to understand.

- Save your changes.
- Print (1 page).
Your summary report may look much different from the examples.
Report: Group Totals of a Calculated Value
Computers Today wants to know commission paid to each salesman. You will have to calculate the total of sales and multiply by the commission rate for each salesman in the underlying query, otherwise you cannot get the totals you want in the report. Remember the problems with trying to add up calculated values!
- Create a new query to be the record source for the report. You
will need a full name for salesmen. You already did that in another
query, so you might as well start with that one and adapt it.
- Copy the query QOrdersbyMonth and paste it to the Navigation pane.
Rename it as QSalesman Commissions. - Delete the Customers table from the query, which deletes any fields from that table.
- Delete the calculated CName field from the grid.
- Drag the CommissionRate field from the Salesmen table to the grid.
- Add the tables Products and OrderItems to the query.
- Drag the fields SubscriptionLength and PricePerYear to the grid.
- Create a calculated field named CommissionAmount to calculate the commission paid for the items ordered.
You must multiply the cost of a subscription item by the number of years for the subscription and then by the commission rate. But the rate is stored as an integer like 10 or 8, instead of a percentage like 0.10 or 0.08. Your expression must correct for this.
- Copy the query QOrdersbyMonth and paste it to the Navigation pane.
-
 Create
a new report named Salesman Commissions
Create
a new report named Salesman Commissions
- For the source for the report, use a query QSalesman Commissions.
- Do not use AutoReport or Report Wizard.
- Group on the full name of the salesmen.
Access will automatically sort ascending and show the Group Header. - Reduce the height of the Detail section to zero. You only need the group header for this report.
- In the Group Header, add the following controls:
- SFullName - enlarge width to at least 2".
- Control to add up the CommissionAmount values.
This is the total amount of sales by the current salesman.
Format as Currency. - Name this control TotalforSalesman and edit its label to read just Total Commission:.
Move the label to the Page Header.
Rearrange the control and its label closer to the salesman's name.
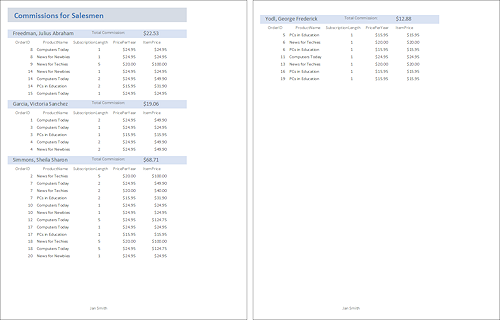
- Add a title to the Report Header that reads Commissions for Salesmen.
- Add a label that shows your name in the center of the Page Footer.
- Make formatting changes as you wish to make the report more readable or attractive.
- Save your changes.
[Salesman Commissions] - Print (1 page).
Your report can look quite different from the illustration.
Report with Subreport
To the report you just created, you will add a subreport that will list the orders for each salesman.
-
 Create a new report named Subreport-OrderItems.
- Use Query Builder to create a query for the Record Source property. Add the tables needed to include the fields mentioned below.
- Include the OrderID and SalesmanID in the subreport.
- For OrderID control, change the property Hide Duplicates to Yes.
- For the SalesmanID control, change the Visible property to No. Position this control underneath the other controls.
- Show the name of the publication ordered but not its ItemID
- Show the price of the item and the number of years subscribed. Change the control for the number of years from a list box to a text box.
(Right click > Change To > Text Box) - Show a calculated total price, ItemPrice, for each subscription where the calculation was done in the source query.
- Arrange the controls in a single line with the labels in the Report Header, similar to the illustration. This allows the labels to show when the report is a subreport and there are no 'pages'.
- Resize the report to its minimum width and height with only the Report Header and Detail section showing.
- Create a new report:
- Copy and paste the report Salesman Commissions to the Navigation Pane.
- Name the new report, Salesman Commissions, with subreport
- Open the report Salesman Commissions,
with subreport in Report Design View.
- In the Group, Sort, and Total pane, add a grouping on SalesmanID and show just the group header
and set it to 'keep header and first record together on one page'. Also set the first group, on SName, to 'keep header and first record together on one page'.
- In the new group header, add a subreport control by dragging the report Subform-OrderItems and dropping it.
Drag to create a control that is about as wide
as the page width. Delete the label for this control. It may be hiding under the top left corner of the control.
- Select the subreport control and in the Property Sheet set the properties Link Master Fields and Link Child Fields to SalesmanID.
- Move the label Total Commission to the main report's Report Header.
- Check the Print Preview.
Make any changes needed to save space so that the report will print on two pages and also to make the report more readable.
Your document may look quite different from the illustration but all the same parts should be there.
- Save your changes.
- Print (2 pages).
Your report may be quite different from the illustration. The example shown removed Alternate Back Colors everywhere and made all borders Transparent. The group header was formatted with larger font size and dark blue color for the text.
Export
- Export the report Salesman Commissions,
with subreport to your databases
project4 folder on your Class disk, using the default names, in
the following formats:
- TXT
- RTF
- XLS
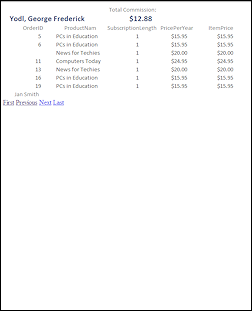
- HTML
- View each of the new files in an appropriate program.
Any unexpected results?? Your results will differ from the illustrations depending on your formatting choices in the original.
TXT: 
RTF: 
XLS: 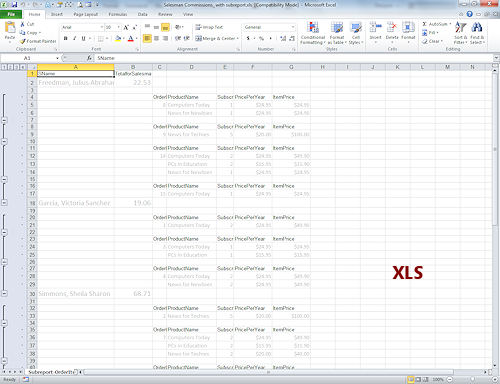
HTML: 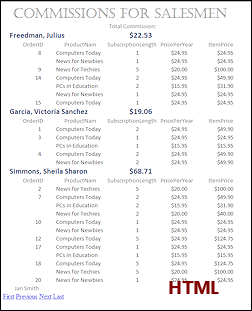
|
|
| © 1997-2017 Jan Smith All Rights Reserved |
Site Map What's New |
Privacy Policy Terms of Service Copyright Acknowledgements |
~~ 1 Cor. 10:31 ...whatever you do, do it all for the glory of God. ~~
Last updated: March 22, 2017