
Jan's Working with Databases
Tables & Queries: Tables: Design Table
Good table design requires some logic and thinking ahead. Are you wasting any disk space? Will the same value, like a company's name, be spelled the same in all records? If the company's name changes, can you update it in just one place? Will your design allow for fast searches? What if there are thousands of records?
Goals for Table Design
- Save disk space
- Save time and effort
- Avoid data errors and inconsistencies
- Keep database functions fast
How to accomplish these goals? You will need to follow a few rules and then think ahead about the future needs of your database. Getting it right the first time is ever so much better!
Common Sense Thinking
-
Set field size to allow for the largest possible values, not just the current values.
-
Use Lookup fields to keep data consistent.
That may mean setting up a lot of small tables that are only used by Lookup fields. -
If a field is empty for many records, consider whether you need this field at all. Could it be combined with another field in some way? Does it belong in a different table?
- Don't rely on the order of fields for meaning.
The order of the fields in the Design or Datasheet views can change without affecting the record. Forms and reports don't care about the order of the fields in the underlying tables.
![]() Forms
for data entry: Plan to use
forms to enter and edit your data. Normalized tables in datasheet
view are not user-friendly, as we saw in the previous lesson. They tend to have a lot of columns
with just ID numbers. Who can remember what the right number should
be?!
Forms
for data entry: Plan to use
forms to enter and edit your data. Normalized tables in datasheet
view are not user-friendly, as we saw in the previous lesson. They tend to have a lot of columns
with just ID numbers. Who can remember what the right number should
be?!
![]() Table
Analyzer: Table Analyzer on the Database Tools ribbon tab can help you get your
tables in good shape. But, you have to know what is going on in your tables and
in your database overall. Following the suggestions of the Table
Analyzer blindly can make a really big mess of things.
Table
Analyzer: Table Analyzer on the Database Tools ribbon tab can help you get your
tables in good shape. But, you have to know what is going on in your tables and
in your database overall. Following the suggestions of the Table
Analyzer blindly can make a really big mess of things.
| |
Step-by-Step: Design Table |
|
| What you will learn: | to think through the steps to design and redesign of a table
to change field size to add records and use spell check to rename a table to create a table manually, including a primary key to copy and paste data between tables to copy and paste data from browser to table to use a foreign key to create a relationship between tables to view subdatasheets |
Start with: ![]() , Access
open but no database open.
, Access
open but no database open.
The story so far:
World Travel Inc. wants to include in their own database some information
about various projects and which staff members are involved with which
projects.
You will walk through the design process, and make some bad decisions along the way. Not that YOU would do that in real life, of course! But experiencing awkward design steps will help motivate you as a database designer to create tables the 'right' way.
Think First
What fields do you need to keep track of company projects and which staff members are assigned to each one? An ID code for the project, a project name, staff members' names, name of the Project Director. Does not sound too complicated, does it?
For one or two projects, most anything will do! To keep track of a large number of projects over several years, however, is a different matter. You do not want to waste disk space and your design must work for many different projects.
Create Table: Projects (First Effort)
You have to decide how many people might be working on a project. It's easy to find out how many there are right now. What about future projects?? Hmmm. We may run into a problem really quickly! For now, let's assume that there are at most 4 staff members plus a project director.
-
 Create a new blank database and save it as projects-Lastname-Firstname.accdb to your Class disk in the folder databases project3. (Create the folder if it does not already exist.)
 The database opens with a new blank Table1 open in Datasheet View.
 Switch to Design View, using the name Projects for the table.
The primary key field is already set up as an AutoNumber field.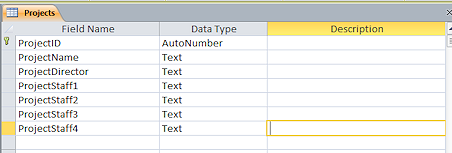 Create fields for the table:
AutoNumber field: Change name from ID to ProjectID
Text or Short Text fields:
ProjectName, ProjectDirector, Project Staff1, Project Staff2, Project Staff3, Project Staff4
-
 Save the table.
Edit Field Size
All of the text fields have the default size of 255 characters. That is too many for the name of the project
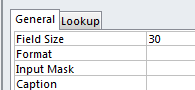
Click on the field ProjectName to select it.
-
In the General tab at the bottom of the window, change the Field Size to 30.
- Similarly, change the Field Size for each of the director and staff fields to 50.
That should be enough for first and last names. - Save the table.
Add Records and Use Spell Check
-
 Switch to Datasheet View and add records as shown below, including the capitalization error in record 1:

-
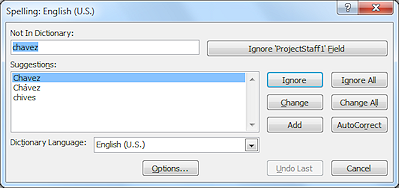 Spell
Check: From the Home ribbon tab, click on the button Spelling
Spell
Check: From the Home ribbon tab, click on the button Spelling  and make any needed
corrections.
and make any needed
corrections.
The illustration shows a capitalization error.Notice that there is a button for ignoring the whole field while checking spelling. That can save a lot of effort for fields like web site addresses and email addresses, which won't be in the dictionary.
When all spelling has been checked, a new dialog appears.
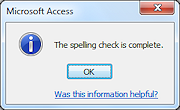
Click on OK
Thinking Again
Inspect the table so far. Do you see any problems or potential problems with this design?
Thought 1: Some fields are blank in some records. That is wasted space.
Thought 2: Future projects might have more than 4 staff members assigned. You could just add another field, but it would be blank for many records.
Thought 3: The table only shows the job for the director. You cannot see if other staffers have particular job assignments for the project. Different projects might have different jobs so you cannot change the field names to job titles.
Thought 4: There is no information about the project itself - like due date or goals or a description of what it is all about.
Changes Needed:
Split the table into a table of project information and a table of about the project staff. Create a relationship between the tables, which will allow you to see a subdatasheets of staff members while in the Project table. A truly cool feature! These subdatasheets can show up in forms as subforms. Very useful! That would put all of the staff info on the same form with the project info. Super cool! You will work with subforms in the next project, Forms and Reports.
Rename Table; Create New Table
To reduce wasted space, to provide more information, and to allow for different numbers of staffers for different projects, you will now create two tables. You can save yourself some typing by copying and pasting some of the data you already entered.
-
Close and save changes to the Projects table.
- In the Navigation Pane, right click the
name of the Projects table and choose Rename.
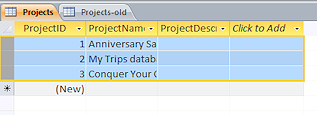
- Change the name to Projects-old.
- On the Create ribbon tab, click on Table Design
 to start a new table.
The Table Design View appears. This time the primary key is not already set up.
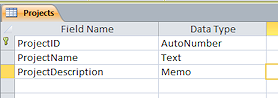 Add fields for:
ProjectID as AutoNumber and make it the primary key:
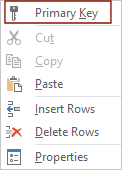 Method 1: Right click the field and choose Primary Key from the context menu
 Method 2: While the field is selected, click the Primary Key button on the ribbon tab, Table Tools: Design.
ProjectDescription as a Memo or Long Text field
-
Save the table as Projects and keep it open.
Copy and Paste Data
You can copy and paste the data from one table to another, if you do your selecting correctly.
You can also copy data from another application (like this browser) and paste to a table. Very helpful!
Between Tables
You can copy data from one cell in a datasheet and paste it into a cell in another datasheet - if the data types match. Or you can select a whole column and paste to a column in another datasheet. But you must select the whole column in the destination table before you can paste. This is different from spreadsheets!
-
Open the table Projects-old to
Datasheet View.
-
 Select the column ProjectName by
clicking its heading.
Select the column ProjectName by
clicking its heading.
-
 On the keyboard, hold the CTRL key down and press the C button.
The selected data is copied to the Windows Clipboard.
- Switch to the new table, Projects,
in Datasheet View.
-
Click the column heading ProjectName to select the column.
-
 On the keyboard, hold the CTRL key down and press the V button.
The data you just copied is now pasted into the table.
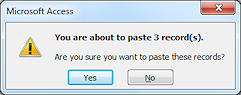
A message appears warning you that you are about to paste 3 records.
Click OK.
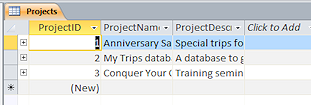
Your new table now has three records with names, but no descriptions.Of course the data type and field size for the new field must be compatible with the old one. In this case both fields were text. The destination field size was large enough to hold all of the text.
-
Close the table Projects-old.
Between Applications
Copy each of the descriptions below on this page, one at a time, and paste to the ProjectDescription field in the matching record in the new table Projects. The column will not enlarge to show the whole sentence when you paste.
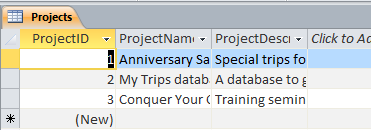
Record 1: Special trips for volume or long-time customers to celebrate our anniversary.
Record 2: A database to give to our good customers in which they can record information about their trips. Goal date: June 15.
Record 3: Training seminar on computers with emphasis on agency software. For our own staff. Date: Dec. 15
-
Save the table
and Close All.
Create Project Staff Table, include a Foreign Key
Now you are ready to create a new table, Project Staff, for information about the staff. This table needs to show each staff member who is part of the project and what his/her job is on the project. The Project Staff table should not have any of the contact information; that will be in another table about company employees similar to the Contacts table you did earlier in another database.
The new table needs to include the field that is the primary key for the Project table. This field will be a foreign key in the new table. You need such a shared field to set up a relationship between two tables - in this case, to connect the project information with the staff members working on the project.
Having a separate table for staff assigned to a project means you do not have to guess how many staff members will be working on a project. Each member for each project will have a record in the new table. So a particular person might appear several times, once for each project on which he/she worked.
-
 Create a new table.
- Add fields:
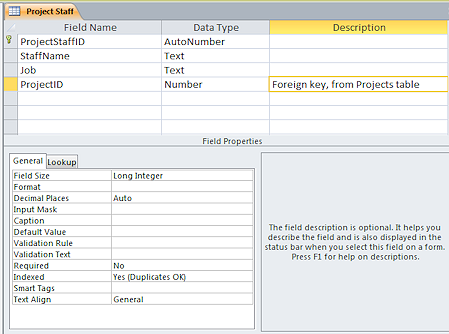
Project StaffID, as AutoNumber and primary key
StaffName, as Text, 50 characters
Job, as Text 20 characters
ProjectID, as Number with field size Long Integer. In the Description section: Foreign key, from Projects table -
Save the table as Project Staff.
Enter Data
The data from the original table is not laid out in a way that makes it easy to copy and paste it into the new Project Staff table. For these few records, it will be just as easy to type it all in. The old table did not have all of the job information anyway.
-
 Switch to Datasheet View of the Project Staff table.
-
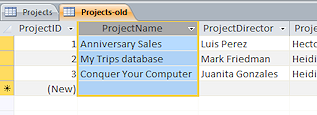
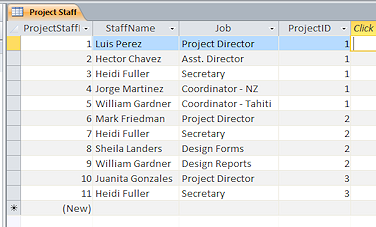
Enter the data previously as shown in the illustration.
The names and who was the director was in Projects - old, but the assigned job for other people was not in that table at all.
The ProjectID values are for the matching project records. Clearly it would be easier to pick from a list.
(Your columns will not be quite as wide as in the illustration.)
- Spell check.
Did you have any typing errors? Some capitalization errors won't show. Many other errors, like typing the wrong ProjectID number, won't show as an error either! Proof read carefully. -
Save and close the table.
Relationship
Next you need to create a relationship between the tables. The primary key of one table should be joined to its duplicate field in the other table. It is called a foreign key for that table.
-
 From the Database Tools ribbon tab, click the Relationships button
  .
.
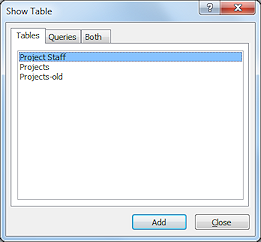 The Show Table dialog opens since no relationships have been created yet.
- If necessary, click the table Project Staff to
select it.
-
Click the Add button.
The table appears in the Relationships window. -
Repeat for the table Projects.
Both tables appear in the Relationships window.
-
Close the dialog.
-
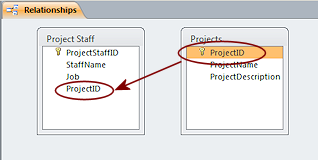 In the Relationships window, drag the field ProjectID from the list of fields in Projects and drop it onto the field ProjectID in the list of fields in Project Staff.
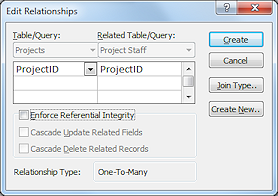 The dialog Edit Relationships appears.
-
 Click on the button Create.
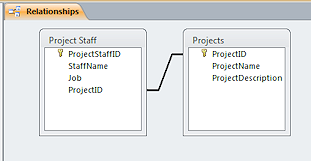
The dialog closes.In the Relationships window, a join line appears that connects the two fields.
-
Click on the Close button
 in the Relationship Tools: Design ribbon tab.
A message appears asking if you want to save changes to the layout of Relationships
-
 Click on Yes.
The Relationships window closes.
View Datasheet and Subdatasheet
Now that you have defined a relationship between the tables, you can use subdatasheets to see who is assigned to which project directly in the datasheet. Such a useful feature!
-
 Open the Projects table in Datasheet View.
Each record has a icon at the far left but the subdatasheet might be blank.
 Problem: No + icons at the left
Why: You left the table open while creating the relationship.
Solution: Close the table and open it again to refresh the display.
-
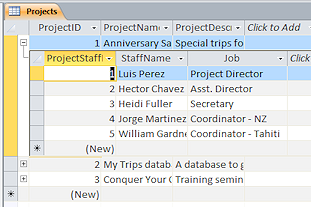 Click on the Expand icon at the left of the first record, Anniversary Sales.
The icon at the left changes to the Collapse shape, .
.A subdatasheet appears below the record, showing you the records in the Project Staff table that are related to this Project.
You can quickly view the related records. You can widen the columns in the subdatasheet. You can even edit the related records for any project, directly from the table view. This works well when there are just a few fields in the subdatasheet.
- Expand all of the subdatasheets.
Hint: Click the top left corner of the datasheet and then click a button.
- Collapse all of the subdatasheets.
Hint: With the whole datasheet selected as above, click a button. -
Close the table.
Thinking Some More
Using subdatasheets is quite handy but it does not take very many fields to make the subdatasheet too wide to see all of them at once. You need a better way to view and edit. That's what forms are for! You will learn more about forms and subforms in the next project.
In the Project Staff table, it will be easy to make errors when entering a staff member's name. For example, William Gardner and Will Gardner and William P. Gardner are all the same person. Which way will you enter his name next week? To make sure that names are the same throughout the database, you need a separate table for staff information that is linked to the Project Staff table. This is part of the process of normalization, discussed previously.
|
|
| © 1997-2017 Jan Smith All Rights Reserved |
Site Map What's New |
Privacy Policy Terms of Service Copyright Acknowledgements |
~~ 1 Cor. 10:31 ...whatever you do, do it all for the glory of God. ~~
Last updated: March 27, 2017