
Jan's Working with Databases
Tables & Queries: Tables: Link
In some situations it is better to link to the existing data instead of bringing it into the Access database. Linking allows you to see the current version of the data in Access and yet keep it available for other programs to use. You could still use the data with the original program, for example, a spreadsheet program.
You can only link tables, not queries or other objects like charts, logos, or images.
Icons for Linked Tables
The icon in the Navigation Pane for a linked table has an arrow and an icon for the type of object it is.
Examples of Icons for Linked Table:
![]() Access
table
Access
table
![]() Excel worksheet
Excel worksheet
![]() Text
file
Text
file
![]() dBase
file
dBase
file
Broken Links
If you move or rename the source file for a linked table or rename the table inside the source file, the link breaks. Links will NOT be updated automatically. You can manually update the link(s) with the Linked Table Manager or recreate the link(s). But, you must still have access to the source file and know how to tell Access where it is from the location of the Access database. This will be difficult unless you have planned for it! You must think carefully before deciding to link.
Method to Link
- To include in an existing database, use the Link Wizard:
Ribbon tab External Data > Button for type of file you want to link to.
In the Get External Data dialog, choose the third option, "Link to the data source by creating a linked table."
Proceed through the Link wizard, which is very similar to the Import wizard. - To start a new database with a linked table (not an Access table):
From inside Access, File or Office button > Open. Select a format (spreadsheet, text file, etc) and a file.
A new database is created with a linked table.
Note: If you select an Access database in the Open dialog, the current database will close and the selected database will just open. No links are created in this case. - To start a new database that will have a linked Access table:
Create a blank database and use the Link Wizard.
Properties for a Linked Table
For most table and field properties you must make any changes to the source table from inside the original program.
If the design of a linked table is changed in the original program, Access will use those changes, too, but you will probably need to relink to the table with the Linked Table Manager. If you change your password or user name to access the table, you will have to relink to the table.
Changes allowed from inside Access (Does not affect the original table):
- Rename the table in the new database.
- Edit the Format, DecimalPlaces, InputMask, and Caption properties for fields in a linked table, but not the other properties.
- Format the table's Datasheet View.
Work-around for some properties: Create a form or report and set the properties for the controls that are bound to your fields. But... any properties that were set in the source table, like a ValidationRule, are still in effect. So be careful!
Relationships: If you import or link to two or more tables from a database, any relationships between those tables are imported also.
| |
Step-by-Step: Link to Tables |
|
| What you will learn: | to link to a table to create relationships between tables to add a Currency data type fields to linked table to type a character not on the keyboard to break links by changing database name to repair broken links with Linked Table Manager to break links by changing table name |
Start with: ![]() , worldtravel-Lastname-Firstname.accdb, projects-Lastname-Firstname.accdb
, worldtravel-Lastname-Firstname.accdb, projects-Lastname-Firstname.accdb
You created a Projects database in earlier in this project and saved it to your Class disk. The new World Travel database has more data on the staff than the Projects database has in its Staff table, but it does not have any of the data on projects. You will link to the tables in the Projects database and create a new relationship. The StaffID numbers are the same for both tables, or else this would not work well!
Link to a Table
-
If necessary, open the database worldtravel-Lastname-Firstname.accdb from the databases project3 folder in your Class disk.
 Have you made a backup of the database lately?
-
From the ribbon tab External Data in the Import & Link tab group, click on the Access button
 .
.
The Get External Data - Access Database dialog appears. -
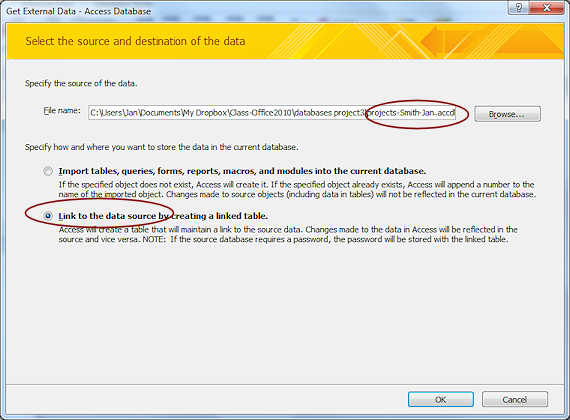
Navigate to your Class disk to the folder databases project3 and select the file projects-Lastname-Firstname.accdb.
-
Click on the option "Link to the data source by creating a linked table."
-
Click on OK.
The Link Tables dialog appears.
-
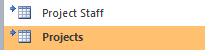
 Select the tables Projects and Project Staff.
-
Click on OK.
 The
tables show in the Navigation Pane with the icon for a linked table.
The
tables show in the Navigation Pane with the icon for a linked table.
Create Relationships Between Tables
Linked tables that have a relationship still have that relationship in the new database.
-
 Click on the Relationships button
  in the Database Tools ribbon tab.
-
If necessary, click on the Show All Relationships button
 .
.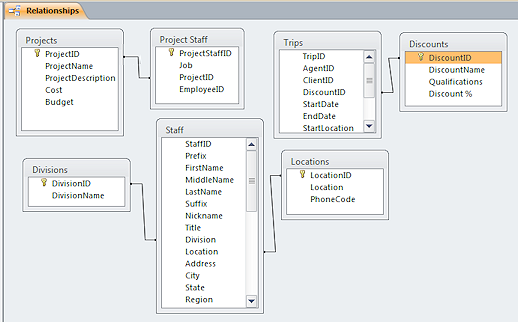
There are three sets of joins:
- Linked tables:
Projects and Project Staff - Imported tables:
Trips and Discounts - Lookup wizard:
Divisions and Locations are joined to Staff
- Linked tables:
-
Click on
 the Show Table button to open the Show Table dialog, and add the missing table Clients.
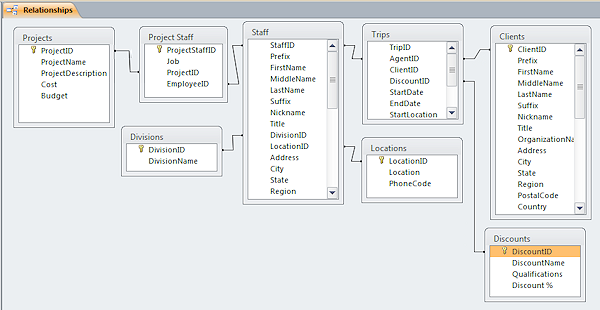
Arrange them neatly, similar to the illustration:
-
Create the relationships shown in the illustration:
Project Staff to Staff matching StaffID with EmployeeID
Trips to Staff matching AgentID with StaffID
Clients to Trips on ClientID Problem:
Wrong fields were matched
Problem:
Wrong fields were matched
You dragged a matching field from one table to another but dropped it on the wrong field,
Solution: Click on the join line to select it. (It will get wider.) Press the Delete key. A confirmation message box appears. Click on OK to continue to delete the relationship.
Note: When linking tables, you must be careful to match the correct fields and that those fields have the correct data types. The field names do NOT have to be the same for the relationship to work correctly. But the data type MUST match. This is a particular problem with linked tables, where mismatches can easily occur.
-
 Click the Save button on the toolbar to save your changes.
-
Close the Relationships window.
Add Currency Fields to Linked Table
The Projects table needs more records and two more fields, Cost and Budget. You can add data to a linked table and make some changes to the table design, but not many. The properties Format, Input Mask, Decimal Places, and Caption can be changed. The table's name can be changed, also.
 Open the linked Projects table in Datasheet View.
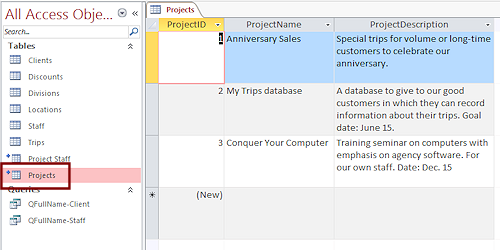
There are three records with three fields.
 Switch to Design view for the table.
- Add a new field named Cost.
-
Select the data type Currency.
The currency formatting will match the default currency from the Regional and Language Options dialog in the Control Panel. If you choose English - American, you see $ as the currency symbol and a period before the decimal part of a number. If you choose Spanish - Paraguay, you see Gs as the currency symbol and a comma before the decimal portion of the value. You must know what country you are in!
The default value for a number field is zero. You won't have a null value for this type of field.
- Add another field named Budget with the same characteristics.
 Save the table.
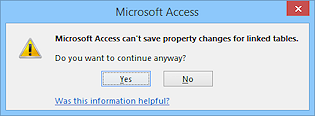
Whoops. Access shows a message telling you that it cannot change fields in a linked table.- Click on No.
- Close the table.
Another message box appears, asking if you want to save changes to the table.
- Click on No.
To add new fields you must go to the original database.
- Start a new instance of Access and open the Projects-FirstnameLastname database from your Class disk.
You now have two databases open. - Open the table Projects in Design View.
- Add two new fields, Cost and Budget, both with Currency data type.
-
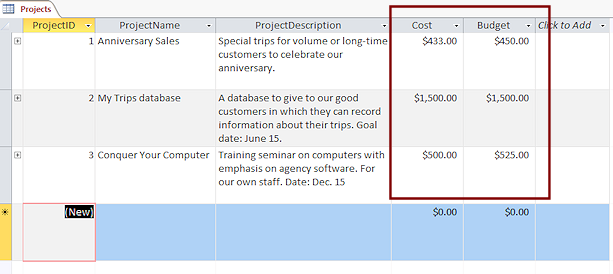
Complete records 1-3 with their cost and budget numbers, as in the illustration.
- Save the table but do not close it or the Projects database.
Type Character Not on Keyboard
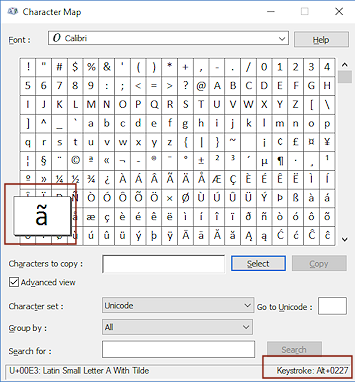
A standard font has more characters in it than show on the keyboard. There are special key combos that will let you type these characters. The Character Map app can show you what the key combo is. One of the new records you will enter below has a Portugese character that is not on an English keyboard.
![]() Problem:
How to type characters not on the keyboard
Problem:
How to type characters not on the keyboard
To type ã in the medical conference record
below (for São Paulo), hold the ALT key down and on the numeric keypad press 0227. Now you know one code! You can find the code for other characters in the Character Map program that comes with Windows. If your keyboard does not have a numeric keypad, you will have to open Character Map and copy and paste the symbol.
- Switch to the World Travel database and open the linked Projects table in Datasheet View.
The linked table looks just like the table you just edited. - Add the following additional records:
ProjectName ProjectDescription Cost Budget Late Winter Sale Promoting travel to warm climates at end of winter season $225.00 $250.00 Recruitment for Australia Campaign to hire agents and other staff for the new Australia regional office $5,125.00 $5,000.00 BMA Medical Conference Meeting planning/setup for medical conference in São Paulo, Brazil $8000.00 Networking Upgrade Researching choices for systems and vendors for a new network $100.00 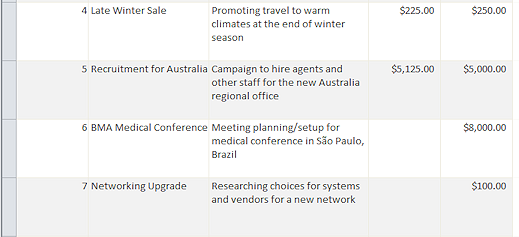
Some versions use the default value of $0 when a Currency field is left blank.
- Delete any zeroes ($0) in the new records.
-
Close and save the table.
-
Switch to the Projects database.
The Projects table shows the new records. Sweet! Problem: New records are not showing
Solution: Refresh the view by pressing the F5 key on your keyboard or click the Refresh All button on the Home ribbon tab.
Propagate Field Changes
-
Close the Projects database and return to the World Travel database.
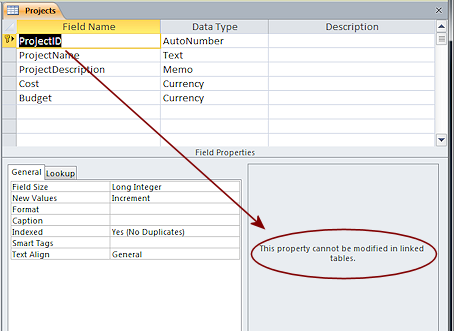 Switch to Table Design View for the linked Projects table.
A message appears at the bottom right of of window tells you that the current property (the ProjectID field) cannot be modified in a linked table.
If you do not notice this message and make a change anyway, you will see a popup message.

That's not completely true. Some properties apply only in the current database.
- Inspect each of the properties in the bottom of the Design view for each of the fields.
Most show the warning.
-
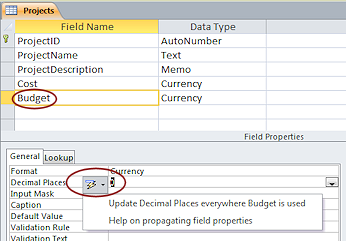 For the Budget field, change the property Decimal Places to zero.
A button appears for Property Update Options.
-
Hover over the options button until the down arrow appears, then click.
Two choices appear - to update this change everywhere the field Budget is used or to open Help about such updating.
-
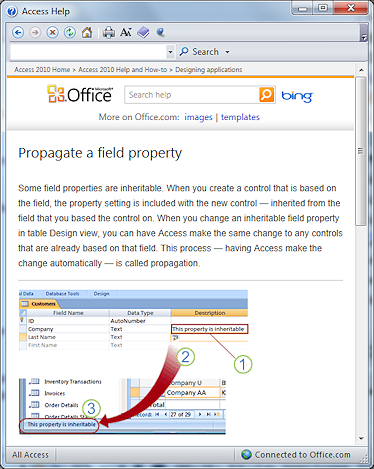 Click on "Help on propagating field properties" and read the
article that appears. (This article is in the online Help articles.)
Click on "Help on propagating field properties" and read the
article that appears. (This article is in the online Help articles.) A field's properties which are set in the table's design are carried forward to any controls on forms and reports that use that field. But, if you make a change to the field later, you must propagate the change or those controls will not know about the change.
- Close the Help window.
- Open the Property Update Options again and select the
first choice, Update Decimal Places....
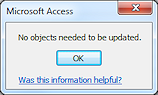 A
message appears. No objects need to be updated. Well, of course not! You have
not yet created any forms or reports in this
database! But it's nice
to know how this works BEFORE creating a lot of objects.
A
message appears. No objects need to be updated. Well, of course not! You have
not yet created any forms or reports in this
database! But it's nice
to know how this works BEFORE creating a lot of objects.
- Click on OK to close the message box.
- Close the linked Projects table and save changes.
Break Links: Change Database Name
If the Projects database is renamed or moved, the links to its tables will break.
- Open a File Explorer/My Computer window and navigate to the
folder on your Class disk where you saved the Projects database. Do not open the database.
- Rename the file as projects2-Lastname-Firstname.accdb , with your own first and last names, of course.
- Switch back to Access with worldtravel-Lastname-Firstname.accdb open.
-
 Open the linked table Projects in Datasheet View.
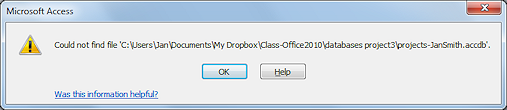
Whoops. A message appears telling you that Access cannot find the database file that contains the linked table. Of course not! You changed its name. The same message would appear if you moved the file to a different folder or disk or if you moved the World Travel database.Nothing about the link in the Navigation Pane changed to show you that there was a problem.
- Click on OK to close the message.
Repair Broken Links: Linked Table Manager
Access has a utility feature called Linked Table Manager to help you repair the link. You just have to be able to find the database!
-
On the External Data ribbon tab, click on the button Linked Table Manager

 .
. The Linked Table Manager dialog appears listing the linked
tables and the path to the source database for each one.
The Linked Table Manager dialog appears listing the linked
tables and the path to the source database for each one. The dialog allows you to update the links individually if you wish. If all the linked tables are from the same database, you can update them all at once.
- Click the button Select All.
A check mark appears beside each linked table.
 Click on OK.
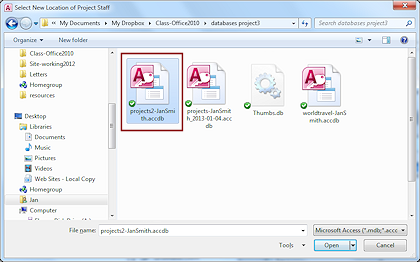
A dialog appears for you to select the correct database.
The title for the dialog mentions only the first linked table but all items that were selected will be updated to the new source location.
- Navigate to your Class disk to the folder databases project3
- Select the database projects2-Lastname-Firstname.accdb .
 Click on Open.
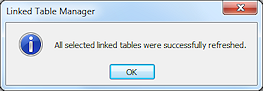
A message appears telling you that you were successful.
- Click on OK.
You are back in the Linked Table Manager. - Click on Close.
You are back in the Access window. - Open the linked table Projects in Datasheet View.
Success! - Close the table.
Break Link: Change Table Name
Another way to break a link is to change the name of the table in the original database.
- Open the database projects2-Lastname-Firstname.accdb from your Class disk.
- Rename the table Projects as Project, without the 's'.
(Right click on the name and choose Rename from the context menu.)
- Switch to the database worldtravel-Lastname-Firstname.accdb.
-
Open the linked table Projects .
An error message appears telling you that Access cannot find a table with that name.
This is a different message from when the name of the database changed.
- Click on OK.
-
Switch back the the Projects database and change the table's name back to Projects.
 When you do not want to change a
table's name back, you can use the Linked Tables Manager to update the link to
the new table name.
When you do not want to change a
table's name back, you can use the Linked Tables Manager to update the link to
the new table name.
- Close the database Projects-Lastname-Firstname.accdb.
- Switch to the World Travel database and try to open the linked table Projects again in Datasheet View.
Success!
- Close the table Projects.
|
|
| © 1997-2017 Jan Smith All Rights Reserved |
Site Map What's New |
Privacy Policy Terms of Service Copyright Acknowledgements |
~~ 1 Cor. 10:31 ...whatever you do, do it all for the glory of God. ~~
Last updated: March 27, 2017