
Jan's Working with Databases
Tables & Queries: Queries: Select Query
A select query ![]() does just that...
it selects records and fields to show. Such a query might just sort records into a
particular order or pick out a few of a table's fields for display. But,
usually a query includes criteria that the records must match.
does just that...
it selects records and fields to show. Such a query might just sort records into a
particular order or pick out a few of a table's fields for display. But,
usually a query includes criteria that the records must match.
Your query can pick out records that match a particular value or that do not match a value or that fit between two values. So many choices!
Criteria Expressions
The criteria that you enter to pick records are expressions. An expression is like a formula in an spreadsheet. It can be as simple as ="California" or >57 or it can be quite complex.
Expressions combine values with operators, identifiers, constants, and functions.
- Operator: Includes normal operators for arithmetic like +, -, *, or / and logical comparisons like =, <, >, <>, Not, Is Null, Is Not Null
- Identifier: name of a field, control, or property
- Constant: something that remains fixed while Access is running. True, False, and Null are the most commonly used constants.
- Function: Access has a large number of built-in functions, like Avg for averaging, Min which finds the smallest value, Max which finds the largest value, and Date which provides the current date.
Expressions are used in:
- Validation rules
- Default values
- Calculated fields, in queries
- Calculated controls, in forms and reports
We will stick to simple expressions in this lesson. In the following lessons on calculated values you will get a bit more complicated with your query criteria expressions. You will also use expressions in the Forms and Reports lessons.
Examples of Query Criteria
For criteria in the query design grid, you do not have to type the equals sign (=). Access assumes that is what you mean unless you type something else. In other situations, you may have to type it in.
| Example | What it means |
|---|---|
| =45 ="Greenfield" ="12345" |
Equal to 45, a Number
data type Exact match to Greenfield, a Text data type Exact match to 12345, a Text data type, like a zip code. [Quotes surround text values but not numbers!] |
| <45 >119 <>8 <="T" |
Less
than 45 Greater than 119 Not equal to 8 Alphabetically before or equal to the letter T. Includes T but not Ta. |
| Between "A" and "G" | Text that is alphabetically between A and G, including A and G, but not Ga. |
| Between 100 and 1000 |
Numbers between 100 and 1000, including both the values 100 and 1000. |
| Not "New York" | Matches any value except "New York" |
| In ("Smith", "Jones", "Wang") | Matches any one of the values in the list |
| Like "Los Angeles" Like "L*" Like "*ang*" |
Matches exact value only. Matches any value that starts with L Matches any value that contains the letters ang, anywhere in the value. So Los Angeles, angle, language, and fang would all match. |
| Is Null | Matches when the field is null |
| Is Not Null | Matches when the field has any value at all, including zero-length string like "" |
Using Wild Card Characters
The Like operator compares values to a pattern that usually includes wild card characters. These characters are placeholders, either for 1 character or for an unknown number of characters.
| Character: | Matches in an expression: |
|---|---|
| ? or _ (underscore) | Any single character |
| * or % | Zero or more characters |
| # | Any single digit (0 — 9) |
| [listofcharacters] | Any single character in listofcharacters |
| [!listofcharacters] | Any single character not in listofcharacters |
Examples:
Like "A*" - values that start with the letter A
Like "A????" -values that start with A but have exactly 5 characters
Like "A[d,p]*" - values that start with Ad or Ap
Like "##QR#*" - values that start with 2 digits, then the letters QR, then another digit, followed by any number of other characters. For example, the registration code for a copy of Windows 95 that came with a new computer had the form #####-OEM-########-#####, where OEM stands for Original Equipment Manufacturer.
| |
Step-by-Step: Select Query |
|
| What you will learn: | to open query design view to add all fields from a table at once to grid to clear the query design grid to add fields to query design grid to sort with multiple fields to move columns in grid to use criteria in a select query to use multiple criteria rows to use OR to combine criteria in a select query to use NOT to eliminate results in a select query to find Null or Not Null values to use Like operator to name and save a query |
Start with: ![]() , Projects database (projects2-Lastname-Firstname.accdb) from previous lesson open.
, Projects database (projects2-Lastname-Firstname.accdb) from previous lesson open.
First you will create and modify a basic Select query. Then you will experiment with different types and combinations of criteria.
 Query Design View
-
 Back up this database now so you will have a good copy to use if you need to start over. This works well while the database is small.
 Access 2007:
  > Manage > Back Up Database
 Access 2010: File > Save and Publish > Back Up Database > Save As button
 Access 2013, 2016: File > Save As > Back Up Database > Save As button
 - With
the database projects2-Lastname-Firstname.accdb open, in the Create ribbon tab, click the button
 Query Design.
A blank Query Design grid appears and the Show Table dialog opens automatically.
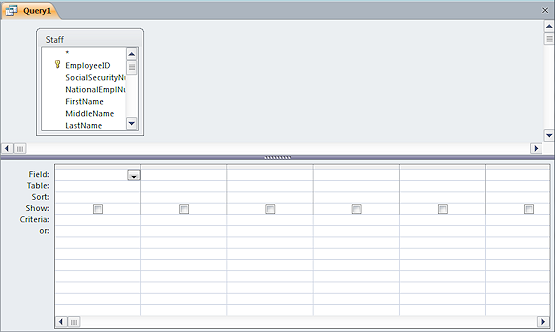 Click on the table Staff and then click on Add to add the table to the top section of the grid.
- Click on OK to close the Show Table dialog.
Include All Fields in Query
You add fields to the query by dragging them from the table at the top and dropping them onto the grid. If you need ALL of the fields from a table, there is a special entry to use.
-
 Move your mouse pointer over the * asterisk at the top of the list of fields in
the table.
Move your mouse pointer over the * asterisk at the top of the list of fields in
the table.
-
Drag the * down to the first column and drop.
The illustration at the right is an animated GIF. Refresh the browser window to see the animation run. (Press the F5 key) The animation will stop after 5 times.The * asterisk represents all of the fields in the table.
-
Click the Run button
 to execute this query.
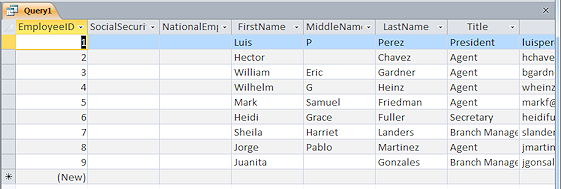
 The datasheet shows all of the fields and all of the
records in the Staff table.
The datasheet shows all of the fields and all of the
records in the Staff table. Of course this query is not very useful! You might as well have used the table itself.
Clear Grid
The query you will construct does not really need ALL of the fields from the Staff table. It is easy enough to select and delete the single column that you have so far. But, there is a Clear Grid command that removes ALL of the columns at once, but it is not in the Query Tools: Design ribbon tab. Let's go find it!
- Switch back to the Query Design View.
-
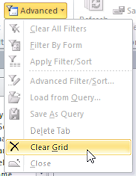 On
the Home ribbon tab click the Advanced button in the Sort & Filter tab group to open its menu.
On
the Home ribbon tab click the Advanced button in the Sort & Filter tab group to open its menu.
Only one command is available for the Query Design View. - Click on Clear Grid.
The grid is now blank again. This command is especially useful when there too many fields to select them all easily. Remove column: You can also select the columns you don't want and press the DELETE
key.
Remove column: You can also select the columns you don't want and press the DELETE
key.
Add Fields to Query Design Grid
Next you will pick out the fields that you need.
When selecting fields to drag to the query design grid, you can use the normal selection methods.
- Single field: Drag any single field.
- Adjacent fields: Hold SHIFT down to select all items between the two you click on.
- Non-adjacent fields: Hold CTRL down to select items individually which are not next to each other.
 Single field:
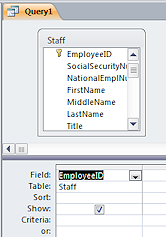
Click on the field EmployeeID and drag it down to the design grid and drop it on the first column.
The field's name and the table name appear in the design grid.
- Multiple
fields:
-
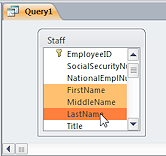 Click on the field FirstName.
Scroll, if necessary, until the field LastName shows.
- Hold the SHIFT key down and click on the field LastName.
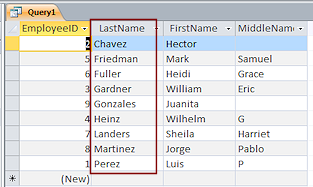
Three fields are selected: FirstName, MiddleName, and LastName.
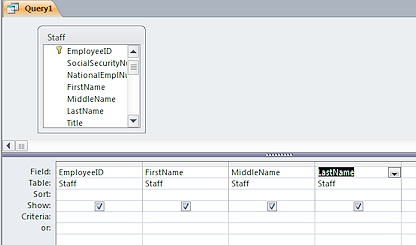 Drag the selection down to the design grid and drop on the
second column.
Drag the selection down to the design grid and drop on the
second column.
All three fields appear, in the same order as in the table list.
-
Sort: Multiple Fields
Recall that sorting rearranges the records while using criteria filters the results to show only some records.
You will often want to sort several fields in your query.
![]() Order in Query Design grid: Sorting and criteria are applied starting with the
left-most column and moving to the right.
Order in Query Design grid: Sorting and criteria are applied starting with the
left-most column and moving to the right.
- Click in the Sort row in the second column, FirstName.
-
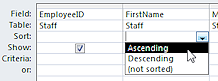 Click on the arrow that appears to open the list of choices and select Ascending.
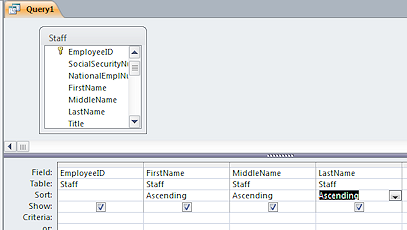 Repeat for the fields MiddleName and LastName.
-
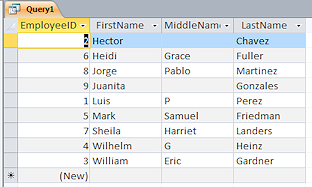 Switch to Datasheet view.
 Hmmm. The first names are in alphabetical order. What we really want is to sort on the LastName and then on FirstName and then on MiddleName. Happily, this is easy to fix!
 Run or View Datasheet?
Be careful of using the Run button instead of the View button to switch to datasheet view. When your query is an action query, you will want to view the datasheet before actually performing the action!
Move Columns in Grid
- Switch back to Query Design View.
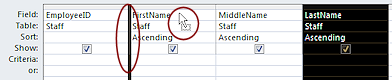
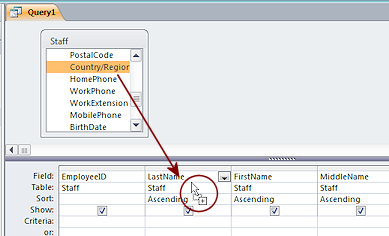
- Move your mouse pointer over the top of the LastName column until it turns into the Select Column shape
 and then click.
The whole column is selected.
-
 Position your mouse pointer over the top of the LastName column until it changes to the Select shape
  .
.
 Drag to the left.
The mouse pointer changes to the dragging shape .
.
A black bar between two columns shows you where dropping will place the column that you are dragging.
-
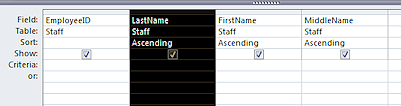 Drop to the left of the FirstName column.
The LastName column moves.
 Switch to Datasheet View.
Aha! Now you have the sort order that you need. Of course since none of the first or middle names are the same, it is hard to be sure!
Set Criteria
To select only some of the records, you must enter something in the Criteria row in the Query Design View. Only records that fit those rules will be shown in the datasheet.
To make things a bit more interesting, let's add a field to the query.
 Switch back to the Query Design View.
- Scroll the table fields list at the top of the window until you see the field Country/Region.
- Drag the field and drop it on the second
column.
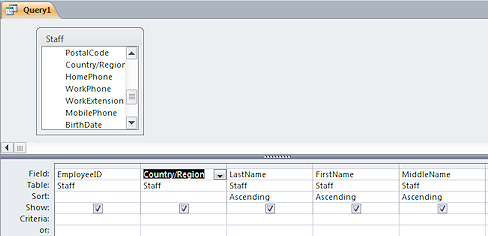 Unexpectedly, this field does not replace the second column.
The new field appears between the Employee ID and Last Name columns.
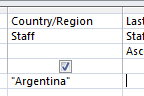
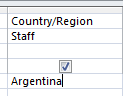
In the Criteria row for the Country/Region column, type Argentina in the second column and press TAB to exit the cell.
Access adds double quote marks around your text automatically after you exit the cell.
You did not have to type an =
before the value. Access assumes that it is there
in the Criteria row unless you type something else, like < or >, for
example.
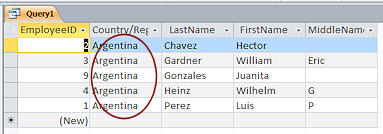
 Run the query by clicking the Run button.
Only records with Argentina in the second
column show in the datasheet of results.
Multiple Criteria Rows
You can use as many different criteria in your query as you want and in any combination.
The records in a query's results datasheet must match the entries in one whole row in the Criteria section. Each row, however, is a separate set of criteria.
- Switch back to the Query Design View.
-
 In
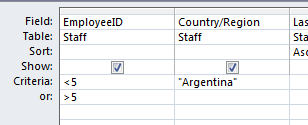
the first Criteria row in the first column, type <5.
In
the first Criteria row in the first column, type <5.
- In the second Criteria row in the first column, type >5.
You now have two different criteria. The query will display records for which:- EmployeeID < 5 AND Country/Region = "Argentina"
OR - EmployeeID > 5
- EmployeeID < 5 AND Country/Region = "Argentina"
-
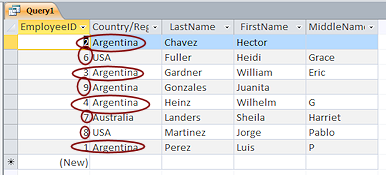 Run the query.
Eight of the nine records fit one or the other of the two criteria
sets. Records 6, 7, and 8 do not have Argentina as their
Country/Region, but they do have EmployeeID numbers > 5. The choice of criteria did not reveal anything interesting, but it did show what can happen when you choose badly!
Notice that the records are still sorted on the name fields, as before, and not by which criteria they met.
Using OR for Criteria for a Field
You can combine criteria for a single field with OR, such as:
>15 OR <5
"Chavez" OR "Fuller"
- Switch back to Query Design View.
-
 Delete the criteria in column 1.
-
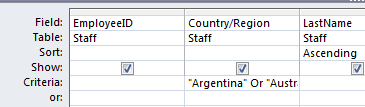
In column 2, edit the criteria to read "Argentina" Or "Australia".
Your typing will not all fit in the default width column. Happily the typing scrolls as you type.
-
TAB to the next column.
Access adds any missing quote marks and capitalizes the Or, if you did not.
 Run the query.
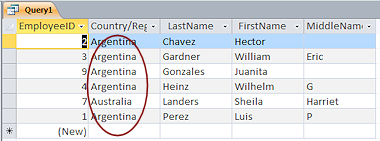
Six records match either Argentina or Australia.
Handling Multiple Criteria: You
would get the same results by putting Argentina and Australia on
separate Criteria rows. However, if there are also criteria for other columns, you would have to repeat those entries on the second row.
Using NOT
To eliminate records that match a value, the NOT operator is handy.
- Switch back to Query Design View.
-
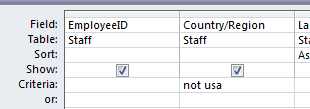 Replace the entry in the Criteria row for column 2 with Not "usa".
 - Run the query.
You get the same results as before! The only
values available in the Country/Region field right now are Argentina, Australia,
and USA. So Not "usa" turned out to be the same thing as the earlier results from "Argentina" Or "Australia"
Criteria and capitalization: You did not have to match the capitalization of the value USA in the records.
Finding Null or Non-Null Values
It is common to search tables for blank values. These may be Null or zero-length strings. In the Table Design View, you can choose whether or not to allow those sneaky zero-length strings. The default is N, so none of the fields in the Staff table are allowed to hold a zero-length string.
- Switch back to Query Design View.
- Delete the entry in the Country/Region criteria row.
-
In the Criteria row for MiddleName, type Is Null.

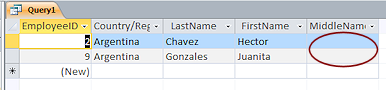 Run the query.
Only two records are missing a middle name.
- Switch back to Query Design View and change the criteria to Is Not Null.
- Run the query.
This query now shows the 7 records which do have a value for MiddleName.
![]() Finding Null or
zero-length string: You can combine two criteria if you do not know
whether or not the field allows zero-length strings, like Is Null Or "".
Finding Null or
zero-length string: You can combine two criteria if you do not know
whether or not the field allows zero-length strings, like Is Null Or "".
Using Like
Sometimes you want to see records that match a pattern rather than matching a particular value exactly. For example, you might want to see all names that start with L.
With the Like operator you can create a pattern using wildcard characters. This is a very flexible and powerful method.
- Switch back to Query Design View.
- Delete the existing criteria.
-
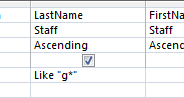 In
the Criteria row in the LastName column, type Like "g*".
In
the Criteria row in the LastName column, type Like "g*".
The asterisk * is a wildcard character which stands for "any number of characters". So this criterion will match any text value that has the letter g as the first character. Without the *, the query would match only text that had g as the only character.
-
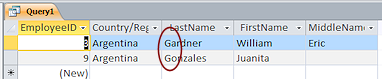 Run the query.
Two last names start with the letter g.
- Switch back to Query Design View.
-
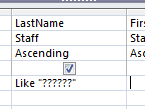 Edit the criterion to read Like "??????".
The question mark ? is a wildcard character that stands for 1 character. So this criterion asks for values with exactly 6 characters.
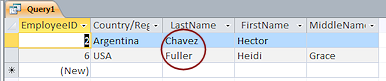 Run the query.
Two last names have exactly 6 characters.
Save and Name a Query
Later it will be useful to you to be able to tell a query from a table from just its name. Queries and tables are shown alphabetically in the lists from which you choose a source for your forms and reports.
Naming objects:
Many database programmers start the name of a database object with an abbreviation for the kind of object it is, resulting in hard-to-read names like tblStaff for a table or qryStaffNames for a query or rptStaff for a report. Such names can be useful when writing the small programs (macros and procedures) that the programmer uses to control how the database behaves. Recently programmers are getting away from that style of naming. Programmers generally avoid using spaces in names to make it easier on them to write their programs.
- Switch back to Query Design View.
- Remove all of the criteria.
 Click the Save button on the Quick Access Toolbar.
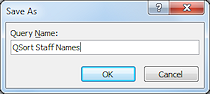
The Save As dialog appears. Notice that you are not saving the database file, just the query.- Name your query QSort Staff Names.
-
 Click on OK to save the query and close the dialog.
The Navigation Pane now shows a Queries category with your new query. -
Close the query by clicking its Close button
 at the far right of the tab.
 Problem: Query does not show in Navigation Pane
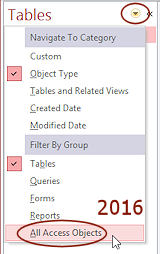
The Navigation pane is filtered. The default for a new database is to show just Tables.
Solution: Click the down arrow at the top of the Navigation pane. Click on All Access Objects. You may need to click on the down chevron
  to expand a category.
|
|
| © 1997-2017 Jan Smith All Rights Reserved |
Site Map What's New |
Privacy Policy Terms of Service Copyright Acknowledgements |
~~ 1 Cor. 10:31 ...whatever you do, do it all for the glory of God. ~~
Last updated: March 27, 2017