|
Exercise Databases 4-1: Scouts
|
What you will do: |
Import data and objects from external sources in different formats
Create relationships and correct imported queries
Create data entry form
Create a query to use as row source for form
Create form based on crosstab query
Create form for printing
Create form with subform
Create report with groups
Edit an existing report to show different data
Create a report with Totals
Create a chart report
Create a report with a subreport |
Some years ago when I was the Service Unit Manager (head local
volunteer), I created a database for managing the Girl Scout troops
and leaders in our service unit. I have reduced the number of
records and objects and have somewhat
normalized the database for use here.
I have learned more over the years about how this should have been done
to start with!
You
will import data in various formats to create the tables, so you
won't have to enter many records. (Hurrah!) I actaully took my working copy of the
database and exported the objects that you will import.
The process of exporting changed some of them! You will see what kinds of
difficulties that
creates! It is fairly common to share tables with others or to
purchase names/addresses list in various formats. You need to know what
kinds of issues that can raise!
Disclaimer:
All of the names, phone numbers, and addresses are fictional and any
correspondence to actual persons is coincidental. Girl Scouts of the
USA has not approved this database in any way.
Start with:
Access open with no databases open,
resource files
Importing:
Note: Be careful that you choose the correct file type in the Open
dialog or you won't see the files you are looking for.
- Create a new blank database and name it
gscouts-ex4-1.mdb.
- Import all of the tables and queries in the database
gscouts-for import.mdb which should be in your
resource files. Some of the queries will not work until you finish
importing other tables.
If you have not downloaded the whole set of resource files, you
can find this file and others for the exercises at
http://www.jegsworks.com/Lessons/resources/databases resources.
- Import the text file Training Types.txt
from your resource files
as a new table named Training Types.
For the Import Text Wizard you need to know:
- The file is comma delimited text.
- There is only 1 column of data.
- The first row contains column headings.
 The
text qualifier is a double quote ("). The
text qualifier is a double quote (").
If you do not specify the text qualifier, all of the values will
include the quote marks!- Choose the field Event as the primary key. The values are unique.
- Open the Table Design View and reduce the field size of
the Event to 50.
- Import the spreadsheet file Adult Info.xls
from your resource files
as a table named Adult Info. (Remove the
underscore that Access includes.)
For the Import Spreadsheet Wizard you need to know:
- First Row contains column headings.
- Import all fields.
- Select AdultID as primary key.
Note: The original field names Home Phone
# and Work Phone # were changed
during the export process, dropping the # symbol and instead using a
period, like Home Phone . and
Work Phone . That's strange enough, but,
when you imported these fields, the periods were left off. Go figure!
- Import the dBase IV file TRAINING.dbf
from your resource files.
The Import Wizard runs all by itself. You don't need to make any
choices! But you do need to know some quirks about DBF files:
- dBase names are limited to 10 characters
- dBase names can contain only letters, numbers, and the underscore character. No
spaces!
- dBase names must start with a letter.
DBF format is often used for transferring data between
different programs. You must be aware of the disastrous effects that
these restrictions on names can have!
Exporting into DBF format made several changes from the original.
Sometimes these differences make a big difference.
- Name of the original table
Training Taken was changed to just
Training, because of the space in the name.
- The file's name and the field names
were turned into all caps.
- AutoNumber data was changed to just a number.
-
Rename the table back to its original name, Training Taken.
- Change the Event field to be a Lookup field,
using the Training Types table as its
source.
-
Delete the TRAININGID field, which is
not an AutoNumber field, and create a new AutoNumber
field named TrainingID. Make it the primary
key.
(Once there is data in a
record anywhere, you cannot change a field's data type to AutoNumber!
AutoNumber fields are exported in other formats as just number fields.)
Relationships:
A troop can have several leaders or assistant leaders. An adult can be
a leader in more than one troop and can take many different trainings. So
you have several One-to-Many relationships. You can create joins but to
enforce referential integrity (to get the symbols on the join lines) you
must make some changes.
- Create relationships between the tables as shown below.
The 3 fields
named AdultID or ADULTID
do not all have compatible data types! This is common with imported data
when the primary key values are imported and are numbers. Access will not
assign AutoNumber as the type to such fields. Complicating matters, once there is data in a
record anywhere, you cannot change a field's data type to AutoNumber! You could
delete the ID field and create a new ID field that has AutoNumber data
type like you did above, BUT that might change the values for AdultID
in the Adult Info table so that they would no
longer match the values that already exist in the
Leaders and
Training Taken tables. So what can we do??
- Change the data type for all three fields (AdultID or ADULTID)
to Long Integer.
- Enforce referential integrity on the three joins.
- Allow Cascading Updates.
Now, if you change an AdultID or Troop #, the related records can
update automatically. Sweet! The downside is that the id fields are
not AutoNumbers. You must number them yourself.
 Examine the records and the design view of each table. Do you
understand what kind of
information goes in each one?
Correcting Broken Queries:
Some queries that you imported use
tables that you imported from other sources. The joins may be missing
and field names may be different! The dBase format, in particular, does
not like long names or names with spaces. Eek!
- Open each query in Query Design View and create simple joins
where needed.
Some of the imported queries lost track of their tables.
- For
any field that starts with Expr and a number,
like Expr1:[Date] or
Expr2:[Adult Info].[Last Name], revise to use an existing
field from one of the displayed tables.
You may only need to delete the new name, Expr1: or similar. Or, you may need to delete the column and drag the
correct field
down again yourself.
Data Entry Form:
- Use AutoForm to create a simple form for the
Training Taken table with which to add records when new training
is given.
- Make it a Data Entry type (so that it opens directly to a
blank record and does not show existing records).
- Name the form
Add Training records.
-
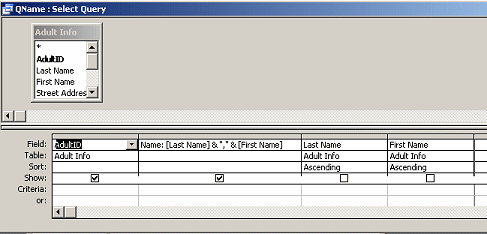
Create source query for a control:
-
Change the ADULTID control to a combo box.
(Right click on the control. Choose Change To, Combo Box.)
- Use the Query Builder for the Control Source for the
control to create a query as shown below.
(Click in the source property in the Properties dialog and then on the
ellipsis button.)
The query should show AdultID from the
Adult Info table and a
calculated
Name field, which combines the last name and
first name of the person. To sort alphabetically you must also include the
Last Name and First Name
fields, but you do not wantr them to show in the query results.
- Save it as
QName.
- Make any needed changes in the controls properties so that you
will see the names in the drop list but the form will store the ID
number.
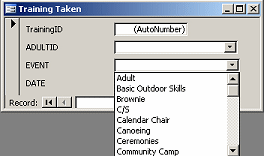
The AdultID control is now a drop list. The Event control is already a drop list
because it is a Lookup field in the table's design.
Add records:
- Use your new form to add a set of records for a
new First Aid training on 11/18/2006, attended by Jan Smith, Cindy
Brown, Carolyn Roberts, Lillian Felton, Jan O'Flannery, and Karen
Trapp.
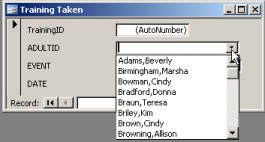
 Tip 1: AutoFill Tip 1: AutoFill
The combo box
controls will autofill as you type. (Names are listed with the last
name first in ADULTID). Just type the first letter of the last name that
you want and then the next letter...
Tip 2: Duplicate values
with key combo
When a sequence
of new records shares some of the same data, like the Date and Event for
this exercise, you must actually enter all of the values only for the first
new record. For the remaining records, when data is the same as the
previous record, just click in the
text box and use the key combo CTRL + ' (That is, hold the CTRL
key down and press the apostrophe key). The data from the preceding
record is copied into the control.
- Close the form.
Form for Viewing Data only:
- Open the Query Design View of the crosstab
query
QLeaders Trained In?
- If necessary, recreate the joins and remove any new column names
like Expr1: and Expr2:
- Inspect and run this query.
What does it do?? It
shows us the most recent date (Max function) that a leader or
co-leader took a training course. (Position Code less than 990 means the
person is still active)
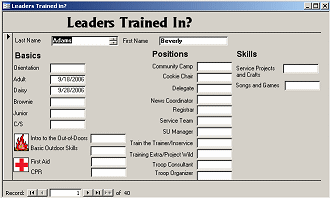
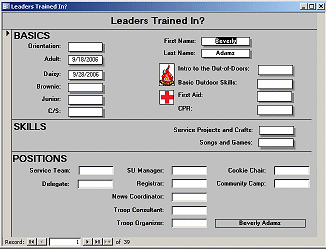
- Use the Form Wizard to create a form named
Leaders Trained In? to view the
results of the crosstab query. (This form cannot be used to change the
records since it is based on a Crosstab query.)
- Title: Add a title to the Form Header,
Leaders Trained In?.
- Resize: Revise the label and text box sizes so that all of the text shows and there is room for the widest
possible dates (2 digit
month, 2 digit day, 2006). Remember - the more wide characters that
may show, the wider the control must be.
- Layout: Rearrange the controls to put the trainings into
3 groups - Basics, Skills, Positions.
Basics includes Orientation,
Adult, age-level trainings, Intro to the Outdoors, Basic Outdoor
Skills, CPR, and First Aid. Positions includes training for particular
adult-level jobs. Skills includes trainings for particular kinds of
activities.
- Tab Order: Adjust the tab order so that a user can tab through
the controls in a logical order.
- Images: Add the images fire.gif and
redcross.gif from your resource files to your form, with solid
borders. Position the fire beside the two outdoor training items.
Position the red cross beside the First Aid and CPR items.
Below are two example layouts. Your form is allowed to look different
from the illustrations but should include the same kinds of groups! How
pretty do you want to get??
The first form below is a rearrangement of what the Form Wizard
produced. The second version is close to what I actually used. It
adds some
manually shadowed controls and a
calculated control at the bottom which pulls the person's name
together. So much easier to read than the two separate controls at the
top. Plus, it made sense to put the name near the navigation bar. My
eyes were already in that area as I looked for a particular person's
records. You can be more creative, if you wish!
 Save
and close the form. Save
and close the form.
Printable Form:
You will now revise the form to print a copy of the results to give to
leaders for them to use to verify the training taken. You need each
record to print on a separate page.
-
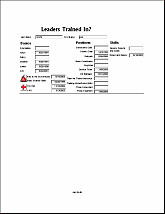 Copy the
Leaders Trained In? form and name the
copy Leaders Trained In? - printable. Copy the
Leaders Trained In? form and name the
copy Leaders Trained In? - printable.
- Make changes to the new form as needed so that it will print neatly,
without a background.
(Your form may look quite different from the illustration!)
The Form Header prints only once, so you must move the title to another
section, either the Page Header or at the top of the Detail section for
the new form.
- Add your name to the Page Footer.
- Save
the form.
 Print record #36 - Jan Smith.
Form with Tab Control:
All of those training groups could be put on tab pages to save a lot of
space. For some purposes a tabbed control would make the form more
awkward to use. It won't print well at all!
-
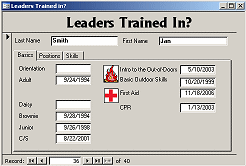 Copy the
Leaders Trained In? form and name the
copy Leaders Trained In? - tabbed Copy the
Leaders Trained In? form and name the
copy Leaders Trained In? - tabbed
- Add a tab control with 3 tab pages, named Basics, Positions, Skills.
- Move the training controls to the appropriate tab page.
(Your form may look different from the illustration!)
Be careful that you move the controls to the tab page and not UNDER the
tab page!
Form with subform:
-
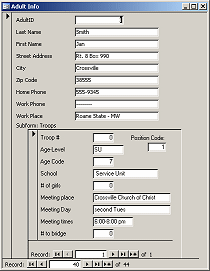 Use AutoForm to create a new form based on the query
QLeaders Info. This query sorts the
names. Use AutoForm to create a new form based on the query
QLeaders Info. This query sorts the
names.
-
Name the form
Adult Info.
- Create a new query that includes the table
Troop Info and the fields
AdultID and Position
Code from the table
Leaders. (You need a field that will
link to the data in the main form.)
- Name the
query QTroops with Leaders.
- Add a subform based on your new query to show the Troop
Info for that person's troop(s). The field AdultID does not need to be
on the subform, but the Position Code does.
(If you use the Troop Info table
instead of the query, you will see all troops, not just the ones that
match the leader! )
- Change the subform to show in Form View instead of the
default
Datasheet View. Enlarge the subform enough that the navigation bar at
the bottom shows. Some leaders may work with more than one troop!
The illustration shows the form that AutoForm produces, with the
default subform changed just to position the Position Code and remove
AdultID.
You can arrange and format your own form
differently. Be sure to adjust the tab order for the form and the subform if you move controls into a different order.
- Navigate through all the records. Which adults work with more than
one troop?
- Close the form.
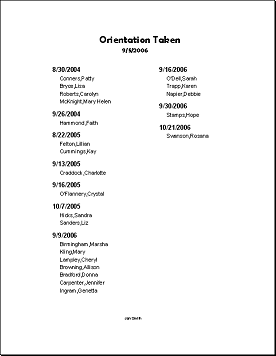
Report with groups:New leaders must take several trainings before starting to work with
the girls. You will create a report that lists who has taken
Orientation, grouped by date. This amounts to an attendance list of each
event.
- Create a new report, based on the
Training Taken table.
- Group the report on DATE. Keep
the group header with the First Detail.
- Change the report's using Query Builder to a query that
picks out just Orientation training and sorts the attendees
alphabetically, and includes a calculated field for the full name.
Do NOT save the query separately.
-
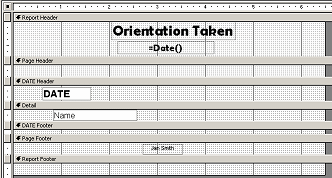 In
the Report Header, include the title "Orientation Taken" and
the current date, centered on the page. In
the Report Header, include the title "Orientation Taken" and
the current date, centered on the page.
- In the group header, include the field DATE.
- In the Detail section include the full name of each
attendee.
(from the query or as a calculated control)
-
 Increase
the font size for the names in the Detail section to 12 pts. Increase
the font size for the names in the Detail section to 12 pts.
- Format the group header and report header with
appropriately larger font size and more interesting fonts.
- Make the details use 2 columns.
- Add your name to the page footer.
- Save the report as Orientation Taken to Date
- Print
this one page report.
- Close the report.
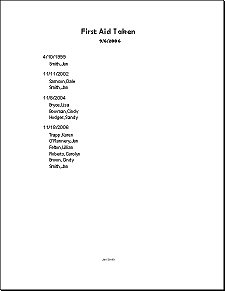 Modify
Report: Modify
Report:You can change the existing report to show other training
list. You just have to change the source. The formatting and layout are
all done! be sure that the new records you entered for 11/18/2006 show
up!
-
Save your report Orientation Taken to
Date with a new name, First Aid Taken to
Date.
- Make changes to the report so that it will list the First Aid
training instead of Orientation.
- Change the title to match.
-
Save your changes.
- Print
this one page report.
- Close the report.
Report with totals:One question asked every year is "How many girls do we have in
troops?" A related question is "What percentage of the girls are in
each age-level?" You will create a report to answer both of these
questions at once.
- Inspect the datasheet and design for the query
QGirls in Troop. You imported this
one.
What table is it based on? Are there criteria? Does the query sort?
- Add criteria so that results will not include zero as a Troop #.
Save the query.
- Start a new report in Design View based on the query
QGirls in Troop.
- Group the records on the Age Code
field and sort ascending on Troop #.
Include a group header and footer.
-
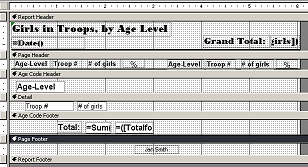 In
the Report Header, include as a title Girls in
Troops, by Age Level and the current date. Include a divider
line of 2 pts width, running across the header (6") In
the Report Header, include as a title Girls in
Troops, by Age Level and the current date. Include a divider
line of 2 pts width, running across the header (6")
- In the Report Header, add a control that calculates a grand total
for # of girls.
- In the Age Code Header, add a control for
Age-Level. This will work since there is exactly one Age-Level
for each Age Code. Keep whole group together.
Note: By using codes in addition to the names of the age levels, we
can set up the sort order that we want. Daisies are the youngest. Then
Brownies, Juniors, Cadettes, and Seniors. Not regular alphabetical
order!
- In the Detail section, include controls with no labels for
Troop # and # of girls.
-
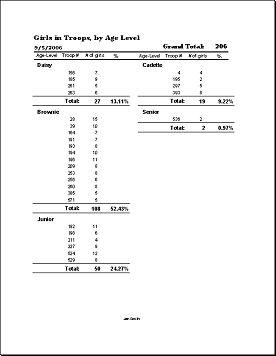 In
the Age Code footer, add a control that calculates the SUM of
# of girls. In
the Age Code footer, add a control that calculates the SUM of
# of girls.
- Also add a control that calculates the percentage of the
grand total each age level's SUM is. You will need to divide the group
total by the grand total and format the control as Percentage (in the
Properties dialog).
- To create column headings, in the Page Header add labels for
Age Level, Troop #,
# of girls, and %.
- Create two columns for the Detail section while letting the
Report Header extend across the whole page.
- Add your name to the page footer.
- Save
the report as Total Girls in Troops, by Age Level.
- Print
this one page report.
- Close the report.
Report with chart
- Start the Chart Wizard in the New Report dialog.
Use the table Troop Info as the source
for the report.
- Select the fields Age Code,
Age-Level, and # of girls to be in
the query underlying the report. You will need the
Age Code field to change the sorting from
alphabetical to from youngest to oldest later.
-
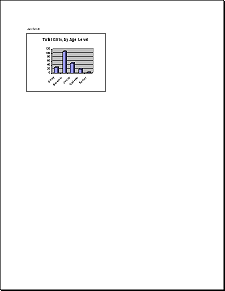 Choose a 3-D column chart as the type. Choose a 3-D column chart as the type.
- In the chart layout, the horizontal axis should be
Age-Level, which is the default choice.
The vertical axis should be Sum of# of girls,
not SumOfAgeCode.
- Enter for the title of the chart Total Girls,
by Age Level.
Do not display the legend.
- In Report Design View, resize the chart to be about 3" wide and
2.25"
tall.
Why so small? You are going to include this chart in another report
shortly.
- Add a label in the Page Header with your name.
- Revise chart:
- Select the chart and open the Query Builder for the chart's
source.
- Add the field Age Code to the design grid and sort it Ascending.
- Do not have this column display in the results of the query.
- Add criteria to the Age Code column ensure that values must be
less than 7. This will remove the SU column from the chart. There
are no girls in that category anyway.
- Save the changed query to the report, not as a separate query.
- Format the horizontal axis to angle the labels to 45 degrees.
-
Save the report as Chart: Total Girls, by Age
Level
- Print
this one page report.
Report with subreport:
Now you can put the chart into the report header for the report
Total Girls in Troops, by Age Level.
Because we carefully managed the columns and size of the chart, all
should still fit on 1 page.
-
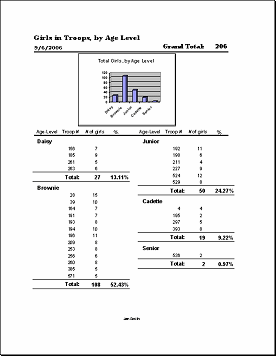 Open
the report Total Girls in Troops, by Age Level
in Report Design View. Open
the report Total Girls in Troops, by Age Level
in Report Design View.
- Arrange the windows so you can see the Database Window as well
as the report's design view.
- Drag the chart report from the Database Window and drop it at the
bottom edge of the Report Header for Total Girls in Troops, by Age Level.
- Delete the label for the subreport and center the subreport in the
enlarged Report Header.
- Save the revised report as Total Girls in Troops, by Age Level,
with chart.
- Print
this one page report.
|
