Exercise Databases 4-2: Ornaments
|
What you will do: |
Rename an existing database
Create and revise a form
Insert images into records
Print form records
Create a report that calculates totals
 Create an AutoExec macro
Document a macro |
Start with:
Access open with no databases open,
resource files
Many of us have collections, like coins, stamps, rocks, action figures,
Barbie dolls, salt and pepper shakers, ball caps, stuffed bears, books,
music CDs, etc. It can be hard to remember what you've got!
You are going to produce a form and some reports for a database for a
collection of Christmas ornaments. This is a variation of the database
that I created to keep track of my own family's ornaments. I cannot
always remember whose angel is whose! In the heat of setting up the
Christmas tree, such questions need a quick answer!
This database could be adapted for another holiday collection or
another type of collection altogether. Each type of collectible has its
own special characteristics that you might want to put in the records. A
database of coins could include the type of coin, country of origin, name
of the mint, year of minting, where you got it, what you paid for it, and
its condition. A database of books could contain the title and author,
publisher, year printed, original price, and whether you liked it or not.
My apologies for the fuzziness of some of the photos. They are from my
early days with a digital camera. For more recent ornaments I scanned the
box or the card! Much better.
Startup file
- From the resources files, copy Ornaments-startup.mdb
to your Class disk in the databases
project4 folder. (This file is about 9
MB.)
- Rename the file just Ornaments-ex4-2.mdb.
Create Form
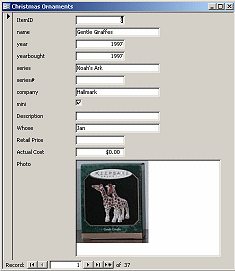 Open the Ornaments database.
- Create a new
form based on the Ornaments table, using AutoForm.
Records are sorted by id number by default.
- Scroll through the records.
Which controls need resizing? Does this layout read easily?
Some of the photos are cut off. Two records do not have a photo.
The Name and Description fields are far too small to show the maximum
number of characters allowed in the Table Design, which is 50.
Revise Form
- In Form Design View, change the Size Mode for the Photo
control to Zoom.
- Resize the photo control to be just large enough to
show the tallest and
widest image completely.
(You may have to resize the control and check the Form View several times to get
this just right!)
- Move the Photo control to the center right.
- Change the CanGrow property to Yes for the Name and
Description controls and then check the Form View.
Hmmm. The controls did not enlarge to show the missing text.
- Switch to Print Preview.
Aha! The controls grow only in preview, not in Form View. Rats!
The data is all there in the form. To see it, click in the field and use
the arrow keys to move the cursor through the hidden parts.
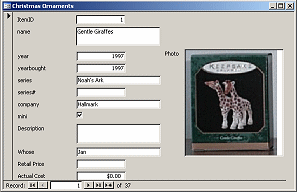 In Form Design
View, enlarge the Name and Description controls to show the
longest name and the longest description allowed in the table's design.
In Form Design
View, enlarge the Name and Description controls to show the
longest name and the longest description allowed in the table's design.
- Add your name to the Page Footer.
- Add the page number and number of pages to the Page Footer.
 Save
the form as Ornaments Form.
Save
the form as Ornaments Form.
Insert Images
- Open the form to record #12, Mrs. Snowman.
- Add the image mrssnowman.jpg to the
photo control.
(You may insert the image with the menu or drag and drop it from a My
Computer window.)
- Similarly, add the image mrsnowman.jpg
to the next record, #13 Mr. Snowman.
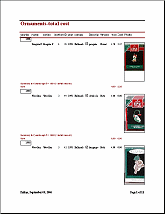
Print
Preview
 Open the Print Preview of the form and scroll through the pages.
Make sure that the names and descriptions are completely showing.
(Your computer pause after the first few page to format
the next batch of pages. Do not be impatient!)
Hmm. Some records are split across two pages.
- In Form Design View, change the Keep Together property of the
Detail section to "Yes".
- In Print Preview, inspect the records again. Make any corrections
needed.
 Print page 6, which has one of the two new images.
- Save
and close the form.
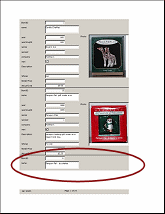
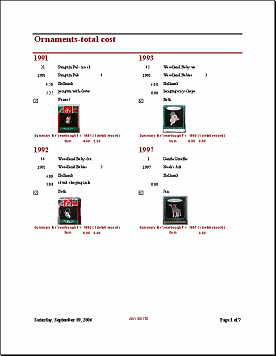
Create Detailed Report
AutoReport and Report Wizard both do a horrible job with the data in
the Ornaments table. But you can start with the Report Wizard's output
and rearrange it to make a useful report. For this report you want to
find out which ornament were bought in which year and how much they cost,
plus a total for all 37 ornaments in the database. (My actual database
has many more than this!)
 Use the
Report Wizard to create a new report.
Use the
Report Wizard to create a new report.
- Group on yearbought.
- Sort Ascending on name, series, series#.
- In Summary Options, choose to Sum the Retail
Cost and Actual Cost, showing both
Detail and Summary.
- Use the Stepped layout in Portrait orientation.
- Use Bold style.
- Name the report Ornaments-total cost
- Inspect the report.
This is bad! There is a lot of wasted space, the pictures are cut off,
the column headings and controls are not wide enough to read what is in
them!
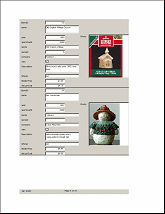
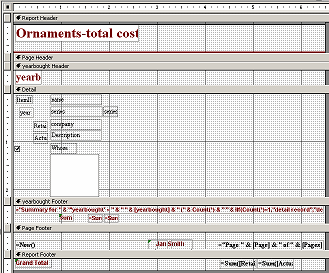
Revise Report
You can move the controls around and create a 2 column report that is
actually readable! You will have to forget about column headings and
arrange the controls so that they will fit in half the available page
width.
-
Page
Header:
- Move one of the divider lines in the Page Header up to the Report
Header.
- Delete all of the remaining controls in the Page Header section.
- Hide the Page Header section by dragging its bottom edge up to
meet the top.
- Group Header:
- Copy the formatting from the title
- Reduce the font size to 16.
- In Sorting and Grouping, set Keep Together = First Detail
-
Detail:
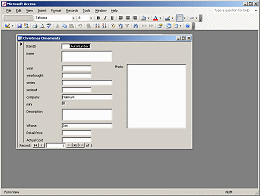
- Rearrange the controls in the Detail section as in the
illustration.
- Set CanGrow to Yes for Name, Series, and Description controls.
- Photo Control:
- Resize the photo control
- Move it underneath the other controls.
- Make its border transparent.
- Change the Size Mode to Zoom
- Group Footer:
- Move the Sum controls to be at the right under the Detail
controls.
- Page Footer:
- Add a label with your name in the center.
- Page Setup:
- 2 columns
- 3" wide
- Down, then Across
- Report Footer:
- Enlarge the two SUM controls to 0.75" wide.
- Reposition so that they do not overlap.
- Switch to Print Preview. There are 5 pages.
This is much better than the wizard created. But, there are some
controls without labels and it is not obvious what they represent. It is
easy to add some labels. Concatenating some values with some text would
help, too.
Add Controls
You need to add a few labels for some controls where it is not clear
what the values represent.
- To the left of the Retail Cost control,
add a label with text Retail:
- Similarly, beside the Actual Cost
control, add a label with text Actual:
- Add a label for the checkbox with text
Mini:
Calculated Controls
By concatenating values, you can avoid blank areas or having to guess
at how much space a control really needs. The Series name and number can
be combined into a single control, for example. You will need an IIF
expression to do something a little different when there is no series
number in the record.
- Change the source for the series
control to concatenate the series name with the series number.
- Change the name of the series control. (Your choice)
Otherwise your expression will cause an error because of the circular
reference.
- Delete the control series#.
- Switch to Print Preview.
All looks good until you get to the giraffes and Ewoks. They don't have
a series number so the series name is followed by the hash mark (#) but
no number. Ugly!
You can fix this problem with an IIF expression that uses a different
expression if there is no value in the field
series#.
- Create an IIF expression that shows a value like "Penguin
Pals #4" when there is a series # value but shows just the series name
when there is no series number.
(No, I am not going to tell you what to write this time!)
-
 In the Group Footer, delete part of the expression in the
control in the group footer that the
wizard created so that it produces: "Summary for 1998 (1 detail record)"
instead of "Summary of [yearbought] for 1998 (1 detail record)"
In the Group Footer, delete part of the expression in the
control in the group footer that the
wizard created so that it produces: "Summary for 1998 (1 detail record)"
instead of "Summary of [yearbought] for 1998 (1 detail record)"
Analyze this expression. Identify which parts are static text and which
get values from fields. What does the conditional
expression do? It ensures good grammar! Do you see how??
- Switch to Print Preview to check your work.
-
Print the first and last pages of the report.
- Save
and close the report. (Ornaments-total
cost)
AutoExec Macro
A macro that has the name AutoExec is automatically run whenever the
database is opened. Such a macro is useful for opening the object that
you usually want to use right away. For this database, the most common
task is entering a new ornament. You will create a macro that opens the
form as a data entry form.
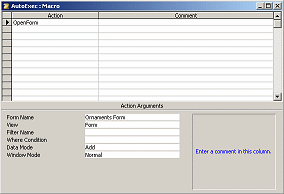 Start a new macro
from the Database Window.
Start a new macro
from the Database Window.
- In the Action column, select OpenForm.
- In the arguments at the bottom, select:
- Form Name = Ornaments Form
- View = Form
- Data Mode = Add
- Save
the macro with the name AutoExec
- Close the macro window.
-
 Close
the database and reopen it.
Close
the database and reopen it.
The form window covers the Database Window and does not show the
existing records. It is ready for a new record.
- Use the Documenter to create a report about your new macro.
(Tools | Analyze | Documenter)
-
Print the Documenter report.
