 |
You can link your spreadsheet data
to a pasted object in Word, or another program. If the original data changes,
the Word document will change, too. This is powerful stuff!
Unlike an embedded object, a linked object will open in the
original program. You can not edit in place.
 Click
on the illustration to see how an object in Word (Grade Calculator) that is linked to
an Excel sheet changes when you double-click
it to switch to editing. Click
on the illustration to see how an object in Word (Grade Calculator) that is linked to
an Excel sheet changes when you double-click
it to switch to editing.
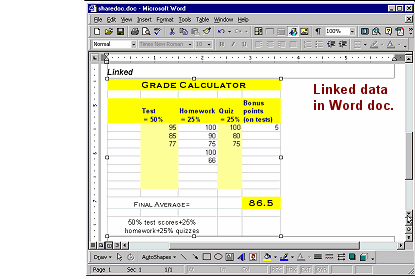
If nothing happens when you click, you can view the images on this page.
A linked object opens in its original program for editing. The destination
document updates with every change you make. This is pretty nifty!
|
|
Where you are:
JegsWorks >
Lessons >
Numbers
Before
you start...
Project 1: Excel Intro
Project 2: Excel Basics
Project 3: Format & Arrange
Project 4: Groups & Formulas
Project 5: Design
Analysis
What If...
Logical Tests
Sharing Data

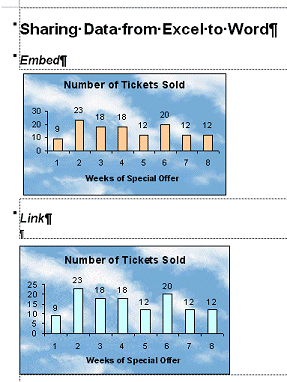
 Embed Embed
Link/Icon
Picture
Document Properties
Summary
Quiz
Exercises
Search
Glossary
Appendix |
|
Icon
When the document is going to be viewed on a computer, you don't even have to show the linked data at all. You can show an clickable icon instead. Clicking the icon opens the document in the original program.

|
Step-by-Step: Link/Icon
|
|
|
What you will learn:
|
to link a sheet in a Word document
to manage formatting issues with a linked sheet
to edit a linked object
to link with an icon |
Start with:
 trips37.xls
(saved in previous lesson)
and sharedata.doc (saved in
previous lesson)
trips37.xls
(saved in previous lesson)
and sharedata.doc (saved in
previous lesson)
You will continue building your Word document, adding
another method of sharing data from Excel.
Link: Create object
-
 Open
sharedata.doc from your Class disk in the
excel project5 folder. Open
sharedata.doc from your Class disk in the
excel project5 folder.
- With the cursor on the line below the embedded chart, type Linked and press
ENTER. Apply Heading 2 style.
- Switch to (or open) Excel with trips37.xls open and copy the
Tickets Sold chart again. The window may have resized when you opened the embedded chart
in the previous lesson.
Return to Word.
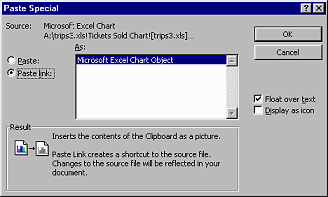
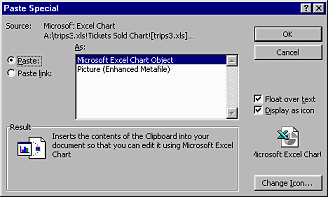
- Select | | .
If you don't have the Paste link choice, go back to Excel, unselect the chart
and reselect it.
-
 If you are using
Excel 97,
check the box for Float over text. If you are using
Excel 97,
check the box for Float over text.
- Click OK.
The chart is inserted as a linked object. Is it all there? If you worked
straight from the last lesson, the resized window may have chopped off the top of the original chart and it is missing here, too.
- Delete the linked chart, switch to Excel, resize the window to show the whole chart,
select it and copy it. Return to
Word.
- Again, | | .
-
Resize the pasted chart to about the same size as
the first one above it. Now you've got it!
Link: Edit
-
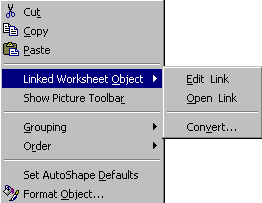 Right click on the new chart. The popup menu shows it to be a . Right click on the new chart. The popup menu shows it to be a .
- Select | . Excel opens the source for
you to make changes.
The Open Link command seems to do the same thing.
 -
Format the data series for the chart to use Light Turquoise fill. The hourglass
may be up for longer than usual as Excel not only changes the chart here but also updates the copy in
share data.doc.
This time the File menu does not show new commands, so do not close the document yet.
- Switch back to Word. Your second chart is already updated
to show your change.
(If the chart changed size, resize it... again.)
-
Save.
[sharedata.doc]
The next time you open this document your linked object may change to match the
source in formatting or size. If you have this problem, you will
need to size the original in order for the linked object to be the size
you want.
Icon: Create
-
 Switch to Excel and copy the chart again. Return to Word. Switch to Excel and copy the chart again. Return to Word.
- Create enough blank lines to get one
below the last chart. (You may need to drag the third chart back up again.
- On the line below the third chart, type Icon and press ENTER.
- Use | and choose. Check the box for
Display
as Icon.
If you are using
Excel 97,
check the box for Float over text.
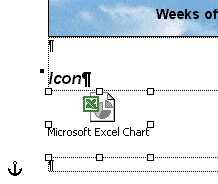 An icon appears on the page instead of the chart. An icon appears on the page instead of the chart.
- Double-click the icon
to open a window displaying the chart.
Clearly this method is of no use in a printed document but it's quite
useful on the screen
 Excel
2002 puts a gray background around the icon object. This shows that it
is a field. The gray does not print. Excel
2002 puts a gray background around the icon object. This shows that it
is a field. The gray does not print.
-
 Return to
Word. Return to
Word.
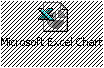
 Problem:
Icon has diagonal lines Problem:
Icon has diagonal lines
Not to worry! The diagonals indicate that the chart object is still open in Excel. The
diagonals do not print, even if they are shown in Print Preview.
-
Save.
[sharedata.doc]
|

Cause: Microsoft documents tend to grow beyond the minimum as you work, partly due to Undo and Tracking information. The more changes you make, the bigger the file.
Solution: (Covered later in Document Properties) Save the file with a new name. At this point your file should lose all that extra data and be much smaller.