 |
Step-by-Step: Add AutoShape
|
 |
|
What you will learn:
|
to insert an AutoShape
to color an AutoShape
to use AutoCalculate
to copy and paste an AutoShape
to delete an AutoShape
that shapes are attached to cells but are not in the cells |
Start with:
 trips24xls - Formatted Groups sheet
(saved in
previous lesson)
 On
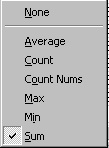
the Status bar there is a wide space that shows a value that is calculated
whenever you select cells. The default is to Sum the cells' values. But there
are several other choices, available on a right-click popup menu. To take
advantage of this feature, all you have to do is remember that it is there!
You are going to add a shape to draw attention to the
maximum Totals in the upper and lower tables. First you need to find out which
cells have the maximum values. Excel's AutoCalculate feature will help,
especially when there are many values to inspect.
AutoCalculate: Maximum
- Switch, if necessary, to the sheet Formatted Groups.
- Right click on the Status bar and click on Max, which
picks the Maximum value from the selection
- Select the whole column of Total Sale values, F5:F23.
-
 Inspect
the Status bar. It shows the largest of the values selected. Note
which cell contains the Max. You are going to insert an AutoShape
to point out this cell.
- Experiment with other functions on the popup menu and other selections. All this selecting and AutoCalculating does not change anything on the sheet.
AutoShape: Insert
-
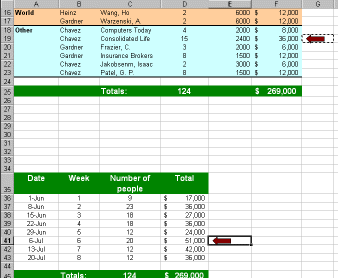
Select the cell to the right of the maximum value you found for the upper table.
- Show the Drawing toolbar, if necessary, by
clicking
 the Drawing button
-
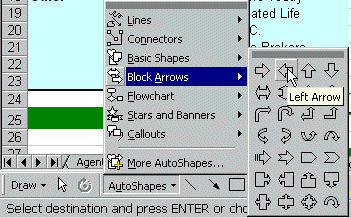
 Click on the AutoShapes button and choose Block Arrows and then
Left Arrow.
- Drag inside the cell you selected to create an arrow pointing
to the maximum value on the left. Make the arrow fit entirely inside the cell.
- Fill the arrow with Dark Red
 using the Fill Color button on the Drawing bar or the Formatting bar.

 Another
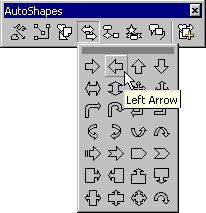
way to insert AutoShapes is from the menu ||.
An AutoShape toolbar pops up. From the bar you can open palettes of
shapes that match the cascading menu.
AutoShape: Copy with Cell
The AutoShape, like other drawings or images, is not actually in
the cell. But, it is attached to the cell, as the following steps show.
-
Select the cell (not the arrow itself)
 containing the arrow and
copy it.
- Select the Totals in the lower table, cells D36:D43.
- Inspect the Status bar to see what the Max is for the
selection.
- Select the cell to the right of the maximum
-
 Paste. The arrow is pasted along with the cell.
Of course you could have just selected the arrow itself and paste just
the arrow. But doing it this way proves that the arrow was indeed attached to the cell since it came
along for the ride when you copied the cell.
AutoShape: Delete
- While the cell is still selected
 ,
press DELETE to remove the arrow. Nothing seems to happen. The
arrow does not vanish! Only
the cell contents would be deleted. The AutoShape is attached to the
cell, but it is not counted as part of the cell's contents.
- Click on the arrow itself to select it.


 In Excel 2002/2003, handles are circles instead of squares.
The green circle is a rotation handle.
- Press DELETE again. Now it is removed.
- Undo so that you
again have 2 arrows.
 Save as trips25.xls .
 How to handle a full disk

![]()