 |
Sorting can be done in Excel from
a dialog or with a toolbar button.
 The
dialog has options of how to sort and allows 3 levels of sorting. For
example, you could sort on Last Name, First Name, and then Middle Name. The
dialog has options of how to sort and allows 3 levels of sorting. For
example, you could sort on Last Name, First Name, and then Middle Name.
The Sort Ascending and Sort Descending buttons
 do their
sorting based only on the first column in the selection. do their
sorting based only on the first column in the selection.
Excel remembers what sorting options you picked before for this
spreadsheet. The dialog will display them automatically. But the Sort
Ascending and Sort Descending buttons do not show what they are going to do!
 If your sort does
not work as expected, check in the Sort dialog under Options. Perhaps a
custom list is being used because it was used before. If your sort does
not work as expected, check in the Sort dialog under Options. Perhaps a
custom list is being used because it was used before.
|
|
Where you are:
JegsWorks >
Lessons >
Numbers
Before
you start...
Project 1: Excel Intro
Project 2: Excel Basics
Project 3: Format & Arrange
Project 4: Groups & Formulas
Subtotals

 Sort Sort
Subtotal
Format
Groups
Images & Drawings
Changes & Formulas
Summary
Quiz
Exercises
Project 5: Design
Search
Glossary
Appendix |
|
Sort Order
- Numbers: normal numerical order.
- Text: alphabetical order
- Combination of text and numbers:
0 1 2 3 4 5 6 7 8 9 (space) ! " # $ % & ( ) * , . / : ; ? @ [ \
] ^ _ ` { | } ~ + < = > A B C D E F G H I J K L M N O P Q R S T U V W X Y
Z
You may be surprised at how combinations are sorted. For example, in ID
numbers like A10, A11, A100, A120, Excel treats the numbers as text. Excel
sorts text by looking at the characters from left to right. The first and
second characters from the left in this example are the same, A and 1.
Sorting on the third character from the left puts 0 before 1 and 1
before 2. That makes sense until you look at the results of the sorting:
A10
A100
A11
A120
Apostrophes (') and hyphens (-) are usually ignored. The only exception: If
two text strings are the same except for a hyphen, the text with the hyphen is
sorted last.

|
Step-by-Step: Sort
|
|
|
What you will learn:
|
to copy a whole sheet
to sort on first column
to sort on multiple columns
to sort with a custom list |
Start with:
 trips21.xls (saved in
previous lesson)
trips21.xls (saved in
previous lesson)
You have decided to look at the subtotals for each of the three travel
agents who handled the special offers.
The data on the sheet Specials is currently arranged by Trip. You
could pick out the trips for each agent yourself and add them up. You
could easily overlook one though, even in a list as short as this one.
Excel's Subtotal command will be very useful in this situation. But, if
you subtotal right now, you will get subtotals where the trip
changes in the first column. To get subtotals for travel agents,
you must rearrange the data so that the rows for each travel agent are
grouped together. The data will be easier to read if Travel Agent is the
first column.
 Before you sort, be
sure that you selected all the data that goes together on each row. Before you sort, be
sure that you selected all the data that goes together on each row.
-
Open trips21.xls on your Class disk
in the excel project3 folder.
-
Save
As trips22.xls to your
Class disk in the excel project4 folder.
 How to handle a full disk
- Change the header for each sheet to read Excel Project 4. [Hint: Select
all the sheet tabs at once and edit the header. Do not forget to ungroup
the sheets!]
Copy: Sheet
-
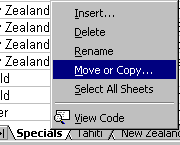 Select
the sheet Specials. Right click on the sheet tab and from the popup menu
select The Move or Copy dialog appears. Select
the sheet Specials. Right click on the sheet tab and from the popup menu
select The Move or Copy dialog appears.
-
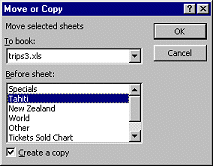 Leave
in the To book text box trips22.xls . Leave
in the To book text box trips22.xls .
- Select in the Before sheet text box Tahiti.
- Check Create a copy.
- Click on OK.
A new sheet named
Specials(2) appears containing a copy of the
data on the sheet Specials.
- Rename the new sheet Agents Totals . (Hint:
Double-click the tab and type. Press ENTER.)

- Delete Rows 25 through 38 since they
don't relate to the agents.
Move: Travel Agent column
The table will read better if its first column is the one you sorted
on. You will need to move the Travel Agent column to the far left.
- Select column B, the Travel Agent's column.
-
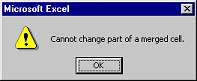 Right drag
and drop at the left of column A. From the popup menu select .
Whoops! A message appears. By selecting the whole column, you also
caught the merged title cells. You will have to try this another way. Right drag
and drop at the left of column A. From the popup menu select .
Whoops! A message appears. By selecting the whole column, you also
caught the merged title cells. You will have to try this another way.
- Select cells B4:B23, the cells in the Travel Agent
column that actually
have data.
- Right drag the selection and drop at the left of column A. From the popup
menu select . Success!
The Travel Agent data is moved to column A and the Trip data is shifted
over
to column B.
-
 AutoFit columns A and B. AutoFit columns A and B.
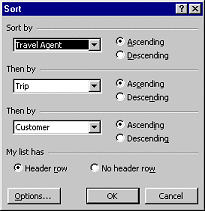
Sort: Dialog - on Travel Agent
Next you will to sort the table to get each travel agent's data
together.
A natural sorting method would be to use the Sort dialog and choose to
sort by Travel Agent, then Trip, and then Customer. But the trips would be
in alphabetical order instead of the Custom List order. You can only apply
a Custom List to the first column sorted. You will have to do the
sort in two steps to continue using the Custom List order for the trips.
-
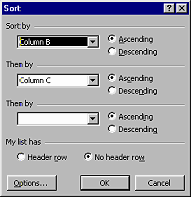
In the Name Box, type A4:F23 to select that range.
-
 From the menu
select | The Sort dialog opens. From the menu
select | The Sort dialog opens.
-
Match the choices in the illustration: Travel Agent first, then
Trip,
then Customer. Select Header row, since your
selection includes row 4.
If you do not include the
header row in your selection, the column labels do not show in the drop
lists, just column headers - A, B, C...
-
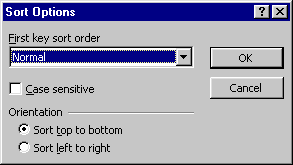 Click
on the Options... button. The Sort Options dialog opens. Be sure
that Normal is showing. Click
on the Options... button. The Sort Options dialog opens. Be sure
that Normal is showing.
-
Click OK to close Sort Options and then OK again to
close the Sort dialog
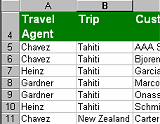
The data is sorted alphabetically by Travel Agent. Within each travel
agent's rows, the rows are sorted by trip. Within each travel agent's
trips, the customers are sorted in alphabetical order.

Sorted on Travel Agent, Trip, Customer with Normal order
But wait! You have been using a custom list for the Trips
= Tahiti, New Zealand, World, Other
In the Sort Options dialog you can pick a custom list to sort by - but it applies
only to the
first column in the sort. Trip is the second column.
You will need to work a little harder to apply
your custom list.
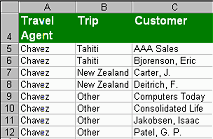
Sort: Dialog - Chavez rows only
-
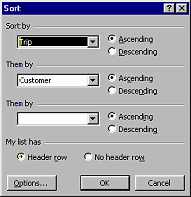 Select the column labels and the data cells for Travel Agent Chavez.
[A4:F12] Select the column labels and the data cells for Travel Agent Chavez.
[A4:F12]
- From the menu select |
The Sort dialog opens.
- Click on the radio button for Header row.
- Select to sort first on Trip and then on Customer.
-
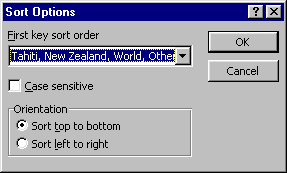 Click
on the Options button and select your Custom List of trips - Tahiti, New
Zealand, World, Other. Click
on the Options button and select your Custom List of trips - Tahiti, New
Zealand, World, Other.
Click OK to close the Options dialog. Click
OK to close the
Sort dialog.
 The
trips that Chavez handled are sorted in your custom list order! The other rows remain the same. The
trips that Chavez handled are sorted in your custom list order! The other rows remain the same.
Sort: Gardner & Heinz
-
Repeat the procedure to Sort the rows for the other two agents,
Gardner
and Heinz. These two do not have a header row directly above, so you will
have to use Column headings in the Sort dialog rather than column labels.
[Hint: Select rows for travel agent. Data | Sort. Sort by Column B, then
Column C. No header row. Set Options to the Custom list.]
-
Save.
[trips22.xls]
How to handle a full disk
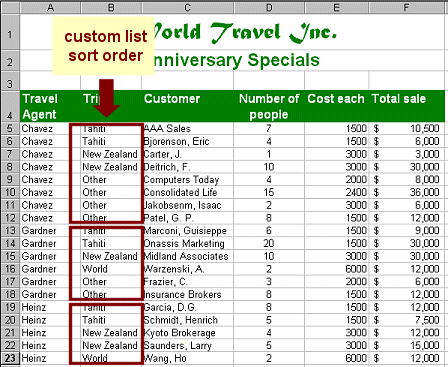
Sorted by Travel Agent
Trip and Customer with custom list
|
