
Jan's Working with Databases
Forms & Reports: Reports: Create Manually
You have much more control over your report if you create it yourself. You can arrange controls in a logical manner that still saves space. You should be able to get all of a record's controls onto one printed page. You can group the records in useful ways. You can control exactly how it prints.
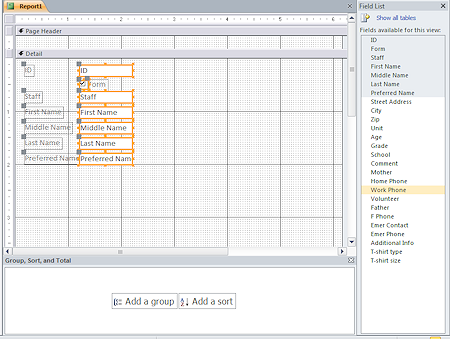
The Report Design View is almost identical to Form Design View. The only new feature is the Group, Sort, and Total pane at the bottom of the window.
Default Design View for new report.
Includes Page Header and Footer sections plus Group, Sort, and Total pane
Report Controls
You already learned a lot about managing controls in the lesson Controls in the section on forms. You worked with multiple controls at once in the lesson Creating a Form Manually. The same methods for selecting, formatting, aligning, and moving controls also work on reports. (If you skipped those lessons, you might want to review them now.)
Where to Make Adjustments
Getting a report laid out just right can be a frustrating experience. When controls are not quite lined up evenly, it is more obvious in a report on paper than it is in a form on the screen. Lines may print jagged if they are slanted. You cannot always tell from the Print Preview. The rendering on screen may not quite match what prints, especially for lines.
Common Settings to Adjust:
- Page Setup
- Page Margins - Default is 0.25" on all sides. That may be too narrow to look good or if you need to punch holes down the left side to put the pages in a binder.
- Columns - Number of columns; width of columns (usually the same as the width of Detail); column down then across or across and then down
- Page Orientation - Portrait or Landscape
- Report Design View
- Width -All sections must use the same width as the report. To reduce the width by dragging the edge or in the report's Property Sheet, you must first move or resize any controls that are in the way.
- Sections - Which sections are shown in the report.
- Section height - Reduce to fit controls. Set Can Grow and Can Shrink properties for the section to Yes if any control in the section has these properties set to Yes.
- Picture (as background)- Usually a bad idea to have a background image for a report.
- Background color
- Controls in Design View
- Align controls across report
- Align controls vertically on report
- Line width - Resize all lines before trying to reduce the report's width.
- Line slanting - If a line prints jagged, the line is slanted.
- Control width/height - Size to show maximum data expected.
- CanGrow/CanShrink: Allow for maximum size allowed by the field's DataType by using Can Grow/Can Shrink properties.
Errors in Expressions
When you use expressions to create calculated values, it is easy to make mistakes. Typing is not as easy as it looks!
Common types of errors in expressions:
-
Omitted equals sign (=) : In a report or form control, an expression must start with the equals sign (=).
-
Example: You can use =[Price]*0.0925 for the control source for a control in a form or report when the field Price is in the source for the report. Confusingly, [Price]*.0925 or SalesTax:[Price]*.0925 is correct syntax for a query.
-
-
Circular reference: The expression includes the name of the control that the expression is in.
This usually happens when you are putting an expression into an existing control that is named for a field and your expression includes the same field. In this case, you must rename the control.-
Example: You drag the field LastName to the report or form. Access creates a control and names it LastName with [LastName] as its control source. You edit the control source to read
=[LastName]&", "&[FirstName].
Error: This creates a circular reference because the control's own name is still LastName.
Solution: Rename the control to something else, like FullName.
-
-
Syntax: Occurs when your punctuation is not right or you have omitted part of a function. It is easy to omit a parenthesis ( ) or a square bracket [ ] or an ampersand & or a double-quote " or to leave off one of the required arguments.
-
Example: =[LastName]&", "[FirstName] Omits second & which should come before [FirstName].
-
Example: =IIF([MiddleName] is Null) Omits required two required arguments, what you want to see if True and if False.
You must state what you want if both cases.
-
-
Unknown function: Occurs when you misspell the name of a function.
-
Example: Typing IFF instead of IIF for a conditional expression.
-
-
Unknown field: Access cannot find a field whose name is not spelled correctly or which no longer exists!
- Example: Typing [FrstName] instead of [FirstName]
- Example: Deleting the field Photograph from the query used by a report but not removing the Photograph control from the report's design.
-
Using property or object name for a control/field: If you name a control something that Access also uses for a property or an object, unexpected results may occur.
-
 Example: You have a control or
field called Name, which is also the name of
a property for the Report and for each control. If you use [Name] in an
expression, you will see the name of the report or form instead of the
value you expected! Access is confused about which thing called
"Name" to use! Avoid this error by naming your fields and controls carefully.
Example: You have a control or
field called Name, which is also the name of
a property for the Report and for each control. If you use [Name] in an
expression, you will see the name of the report or form instead of the
value you expected! Access is confused about which thing called
"Name" to use! Avoid this error by naming your fields and controls carefully.
-
More on Access Error Codes and Error Messages
| |
Step-by-Step: Create Report Manually |
|
| What you will learn: | to create a blank report to add controls to create a calculated text value to remove unneeded controls and format calculated control to handle a circular reference in calculated control |
Start with: ![]() , resource files, worldtravel-Lastname-Firstname.accdb from folder databases project4 as updated in the previous lesson
, resource files, worldtravel-Lastname-Firstname.accdb from folder databases project4 as updated in the previous lesson
You are going to create a report that lists the clients of World Travel Inc. There are not too many records yet, but you have to start somewhere!
Think first! What arrangement will work well for the controls? Going across the page? Going down the page? Do you need all fields from the source or just some of them? What is the purpose for the report?? What order will the user need the data that you show?
In this case, World Travel Inc. wants to use the report to see an overview of where their clients are so that they can target their mailings and advertising better. You will only need the client's name and address this time.
Create Blank Report
-
On the Create ribbon tab, click the Report Design button

 .
.
 A blank report opens in Design View. It includes a Page Header and Page Footer but not a Report Header and Footer.
 - If necessary, click the Add Existing Fields button

 .
.
The Field List pane opens but probably shows only a link to 'Show all tables'. 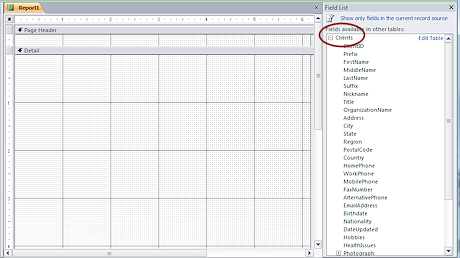 If necessary, click the link 'Show All Tables' to open a list of tables.
- Click the Expand icon
 beside the table Clients in the Field List pane.
A list of fields in that table appears. -
 Save the report with the name Clients Report.
Add Controls
You can add controls to your report by dragging them from the Field List or by using the control tools, just like you could for a form.
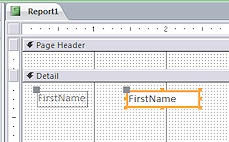
Select the field FirstName and drag it to the report Detail section.
- Click in the Field List on the field MiddleName, hold the SHIFT key down, and click on the field Suffix.
All fields between where you clicked are selected. - Drag and drop these fields just below FirstName.
-
 Repeat for the fields Address, City, State, Region, PostalCode, Country.
-
 Switch to Print Preview to see how this looks.
 Access 2007 does not show borders for the controls and does not use the Alternate Back Color for records.
Lots of wasted space! Each page holds only one record. That's 17 pages to print! Why is that?
You will check several features that can impact the number of pages:- Force New Page property for the Detail section.
When set to Yes, each record must start at the top of a new page. There CAN be reasons to do that, but not this time. - Report width and total height compared to paper width and height; Section heights
- Keep Together property for the Detail section.
When set to Yes, if there is not room on the page for the whole record, it moves to the top of the next page to print. It will flow onto more pages if necessary. Of course this can leave extra blank space at the bottom of the previous page.
- Force New Page property for the Detail section.
- Switch to Design View.
- Click the Property Sheet button
 on the ribbon tab Report Design Tools: Design.
The Property Sheet pane replaces the Field List pane. -
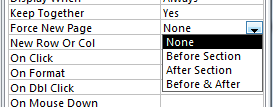 With the Detail section selected, inspect the Force New Page property.
That property can be set to None, Before Section, After Section, or Before and After.In this case the property was set to None, so this property is not what put each record on its own page.
- Change the Property Sheet to show properties of the Report.
-
Inspect the Width property for the Report.
The width is under 8", the width of the paper. So that's OK. 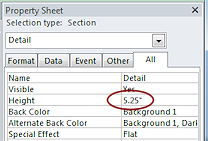 Inspect the Height property for the Detail section.
You need to do some arithmetic!The page is 8½ x 11 inches if you are using Letter size paper like Access assumes (in the USA edition). So the page is 11" tall.
- Page Header = 0.25"
- Page Footer = 0.25"
- Top margin = 0.25"
- Bottom margin = 0.25"
- Detail = 5.25"
That gives a total of 6.25", leaving 4.75" for another record. But the second record also needs 5.25".
So why doesn't the second record start on the first page and finish on the second page? Let's look at another property.
- Inspect the Keep Together property for the Detail section.
It is set to Yes.That's why each record winds up on its own page!
The Keep Together property tells Access to keep all of the controls for one record together on the same page. If there are too many controls to fit, then Access will continue printing onto the next page. But it won't start a record on a page with another record unless there is room for a complete record.
 Drag the bottom edge of the Detail section up to just below the Country control.
-
Switch to Print Preview to see how this looks.
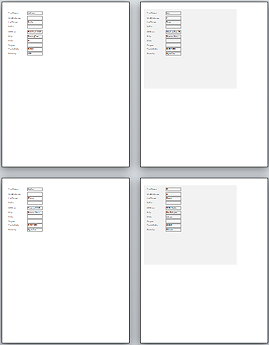
Access 2007 does not show borders for the controls and does not use the Alternate Back Color for records.Three records fit on a page now. It would take 5 or 6 pages to print, depending on exactly how tall your Detail section is. That's better, but not enough better!
Next we will look at what you can you do to use the vertical space better for each record.
Create Calculated Text Value: FullName
It is more natural for people to read complete names and addresses instead of individual fields. You can concatenate the text to create those values. Recall that the ampersand character (&) is used to glue together text values.
You will edit some controls to combine text values to form a complete name and address. Then you can delete the rest of the labels and controls and move the remaining controls into a neat arrangement. This is like what you would do to create a template for mailing labels.
-
 Switch to Design View.
 -
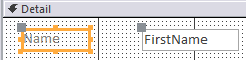
Select the label FirstName and edit it to read Name.
The default Caption for a label is the name of the Control Source for the matching data control. You can edit a label without breaking anything. The label's name is actually Label0 in the Property Sheet.
-
 Select the text box FirstName.
-
If necessary, open the Property Sheet.
You are going to change the Control Source to an expression that will combine the name parts.
-
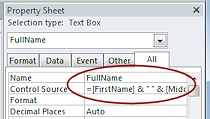
Change the value for the Name property from FirstName to FullName.
Why change the name? To avoid a circular reference! You need to include FirstName in the expression for the complete name in this same control.
-
 Click in the Control Source property, which
still reads FirstName, and then on the ellipsis button
Click in the Control Source property, which
still reads FirstName, and then on the ellipsis button  (with 3 dots) that appears.
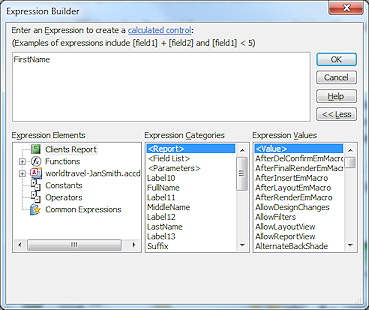
The Expression Builder dialog opens.
This dialog gives you point-and-click access to all of the existing objects and functions in your database. It can really help when you are not quite sure of the syntax of a function or the name of an object or control.
You don't really need these helpful features this time. The names of the fields are easy to remember. The large text area just gives you room to see what you are typing. You could type the expression directly in the Property Sheet. Unless your expression is very, very short, it will be easier to use the Expression Builder.
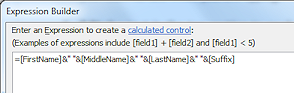 Edit the text in the top section to read:
=[FirstName]&" "&[MiddleName]&" "&[LastName]&" "&[Suffix]
- The expression for a calculated control MUST start with the equals sign (=).
- The ampersand is the glue between two values.
- The values can be fields, like [FirstName] or literal text like " ", which produces a
single space in the resulting text. Also common for calculated names
is ", " which produces a comma followed by
a space.
- Click on OK to accept the new value for Control Source.
-
 Click out of the Control Source property.
Now Access applies your expression to the control. Problem: Error Message
If your typing was not accurate, you may get an error message, depending on what kind of mistake you made. Read it carefully. Some are helpful. Others are bit like yelling "Watch out!" Watch out for what??Common mistakes are leaving out the equals sign =, an ampersand &, a bracket [ ], or a double quote ".
 Switch to Report View.
Report View is good for checking to see if controls are large enough and for copying data to paste in another program. It is similar to Print Preview but without page breaks. You can scroll to see how the records will print. You cannot edit the controls in this view.
-
 Inspect each record. How do the records look?
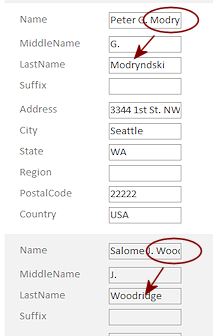
- Some names are cut off.
You can make the control wider. - You do not need the MiddleName, LastName, and Suffix fields after you make the FullName control wider.
It was smart to leave them in place until after checking the width of the Name control. Sometimes it might not be clear whether or not characters have been cut off unless you can see the other fields. For example, if you see the name "Salome J. Wood", is the last name actually "Wood" or is it "Woodridge" or "Woodville" or "Woods"?
- Some names are cut off.
Remove Unneeded Controls; Format Calculated Control
You can now get rid of several controls and labels and resize the calculated control.
-
 Switch to Report Design View.
- Delete the controls and labels for MiddleName, LastName, and Suffix.
- Delete the label for the FullName control.
- Select the FullName control.
- In the Property Sheet, change the Width to 2".
Alternate method: Drag the right edge of the control to the right, using the ruler to determine when the control is 2" wide.
The Property Sheet is easier if you want exact sizes.
- Change the Can Grow property to Yes.
This will wrap the text onto another line if it won't fit.
The Clients table allows a total of 75 characters between the fields FirstName, MiddleName, LastName, Suffix! By allowing the control to grow, you are prepared for whatever the table will allow.
- Click out to accept the change.
-
 Switch to Print Preview.
How do the records look? The longer names show completely!You must use the Navigation Bar at the bottom of the window to move on to the next page. Not as easy as scrolling the Report View.
What changes do you need to make.
- Extra white space where deleted controls were means that you need to move controls and resize the report to reduce wasted space.
- The address control is too narrow.
Need to make it wider. - You can combine the other address fields in a calculated value.
Handle Circular Reference in Calculated Control
You will concatenate several fields to create the second line of an address. When it is obvious to the users what the data represents, you can omit the labels. These changes will create a more normal name and address for each client.
Avoid circular references! A circular reference occurs when the name of the control you are editing is also in the calculation. That would create an infinite loop. It is easy to forget this when changing an existing control to a calculated control.
- Switch to Report Design View.
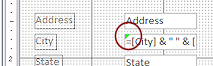
- Edit the Control Source for the City control to concatenate the fields City, State,
Region and PostalCode.
=[City] & " " & [State] & " " & [Region] & " " & [PostalCode]
-
 Click on the report's background to deselect the control.
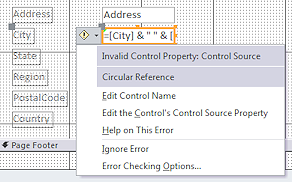
Surprise! There is a green triangle in the upper left corner of the control. This means that there is a problem.
-
 Click on the control again to select it.
A button appears.
- Hover over the button and a down arrow appears.
- Click the down arrow and a menu appears.
The problem is a circular reference in your expression. You used the name of the current control in the expression that defines the value for the control. This will not work!
- Click on .
The Property Sheet shifts if necessary to show the Name property for this control.
- Change the Name to CityStateRegionPostalcode and click out of the property to accept the change.
The button and the green triangle disappear. Neat, and very helpful, too!
- Delete the controls for State, Region, and PostalCode.
-
 Delete the labels for Address, City, and Country.
- Select the Address, CityStateRegionPostalcode, and Country controls.
- Change the Width property to 2" wide.
(The Property Sheet shows 'Multiple Selection' so everything you do applies to all selected controls. Some properties are not available when multiple controls are selected. Dragging works too when the selected controls are the same width to begin with.)
- Change the Can Grow property to Yes.
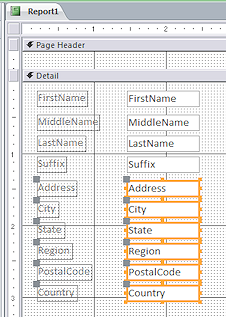
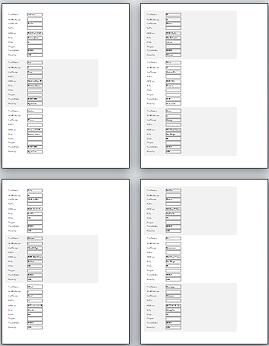
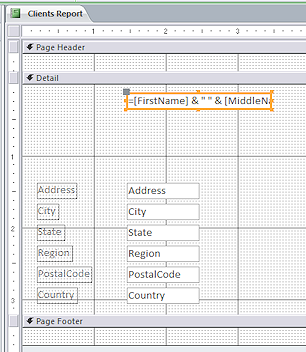
- Move the controls to new positions to match the illustration.
- Drag the bottom edge of the Detail section upwards,
to reduce the section to leave 3 rows of dots below the Country control.
- Add a horizontal line at the bottom edge of the Detail section using the Line tool.
- Set the Width property for the line to 3".
-
Drag the right edge of the Detail section to the 3" line.
Problem: Cannot drag form to 3"
Your controls are in the way, probably the line.
Solution: Select the line and use the arrow key to move the control(s) left and try again.
 Save the report.
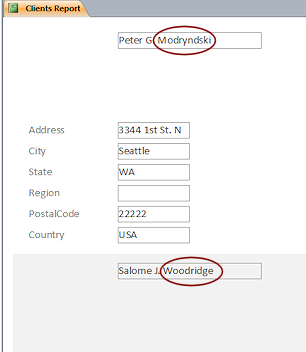
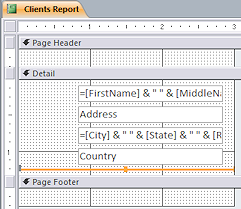
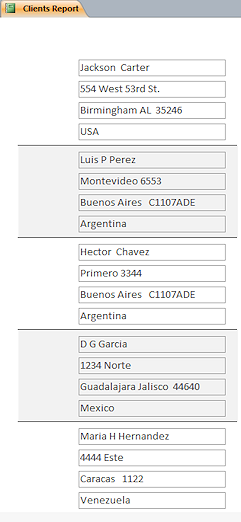
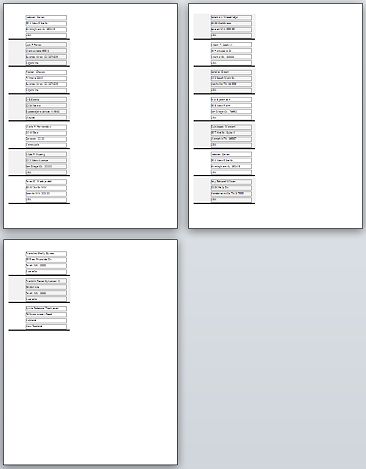
[Clients Report]
- Switch to Report View.
- Scroll through the records and inspect the way the data fits into the controls.
Access 2007 does not show borders for the controls and does not use the Alternate Back Color for records. Which records fall on which pages is different from the illustrations. - Switch to Print Preview.
How do the records look?
Better. It takes just 3 pages now.
(Access 20007 manages to put 8 records on a page while Access 2010, 2013, and 2016 put only 7.)
This report is still not really easy to read. In the next lesson you will make more changes.
|
|
| © 1997-2017 Jan Smith All Rights Reserved |
Site Map What's New |
Privacy Policy Terms of Service Copyright Acknowledgements |
~~ 1 Cor. 10:31 ...whatever you do, do it all for the glory of God. ~~
Last updated: March 22, 2017