
Jan's Working with Numbers
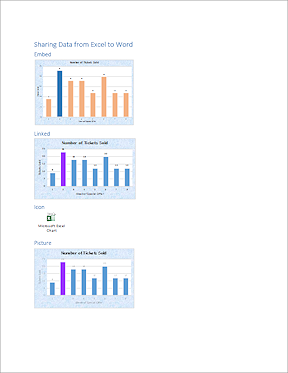
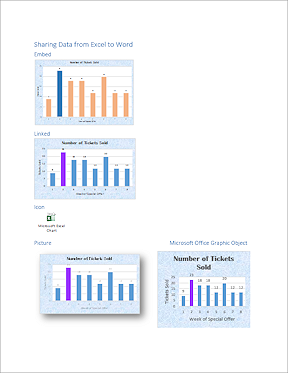
Design: Sharing Data: Picture
Some programs do not work with embedding and linking. These are usually older or simpler programs. To get data into such a program you may need to resort to brute force - use a picture.
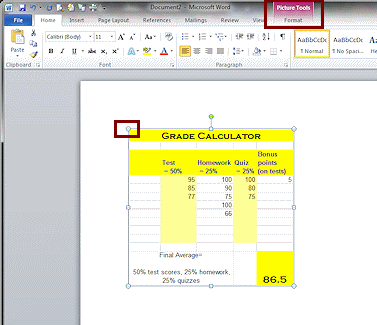 You
know its a picture by the type of resizing handles you see and whether or not
the Picture Tools ribbon tab shows up when you select it.
You
know its a picture by the type of resizing handles you see and whether or not
the Picture Tools ribbon tab shows up when you select it.
There are several formats for pictures offered in the Paste Special dialog, depending on what you copied - Windows Metafile, Bitmap, GIF, JPG, PNG.
There are actually advantages to using a picture of your sheet. Sometimes you want a fixed copy of your sheet instead of one that can be changed and updated. A picture cannot be accidentally changed. A picture shows how things were at a particular point in time.
Another choice in the Paste Special dialog is Microsoft Office Graphic Object. You might think that is just another type of picture. Nope! You will get Word's own Chart Tools ribbon tab when you select a chart that was pasted as a graphic object. Not a picture at all. Unexpected!
| |
Step-by-Step: Picture/Graphic Object |
|
| What you will learn: | to insert a sheet as a picture to format a picture to insert a graphic object to edit a graphic object |
Start with: ![]() trips36-Lastname-Firstname.xlsx (saved in previous lesson) and sharedata-Lastname-Firstname.docx(saved in previous lesson)
trips36-Lastname-Firstname.xlsx (saved in previous lesson) and sharedata-Lastname-Firstname.docx(saved in previous lesson)
You will continue building your Word document, adding another method of sharing data from Excel.
Picture: Create Object
- Open sharedata-Lastname-Firstname.docx, if necessary.
- Put the cursor on the line below the icon. Type Picture , apply Heading 2 style, and press ENTER.
- Switch to Excel with trips36-Lastname-Firstname.xlsx open and select the
Tickets Sold Chart again, and Copy.
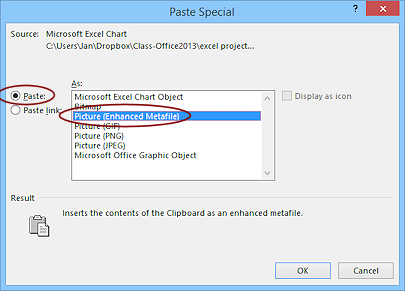 Switch back to Word and in sharedata-Lastname-Firstname.docx, with the cursor on the line below the word Picture, open the dialog Paste Special and choose Paste and Picture (Enhanced Metafile), then click on OK.
The chart is now a picture on your sheet and the Picture Tools tab shows on the ribbon.
 Resize the picture and the two other charts to about 3" in width so that all will fit on one page.
  Save.
Save.
[sharedata-Lastname-Firstname.docx]
Picture: Format
-
Click on the picture at the bottom of your Word page.
The Picture Tools ribbon tab appears. The picture shows its resizing handles, rotation handle at the top, and the Layout Options button at the side. You definitely have selected a picture.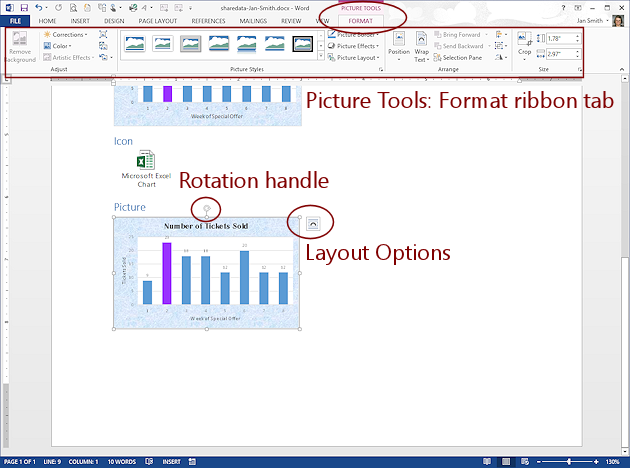
 Double
click the picture.
Double
click the picture.
Nothing happens.- If necessary, switch to the ribbon tab Picture Tools: Format.
These tools apply to this picture as a whole. To edit a part of the image, you must copy the picture to a graphics program or else convert it to a Microsoft Graphics Object. That format was one of the choices in the Paste Special dialog, so you could choose that format to start with if you know that you want to edit the picture.
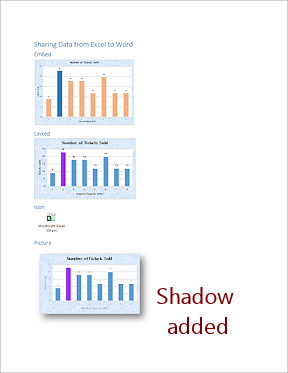
- On the Picture Tools: Format ribbon tab, click on the Picture Style Drop Shadow Rectangle. (first row, 4th
style)
The picture and its heading may move to the next page because the picture takes up more space with the added shadow.
- If necessary, resize the first two charts and the picture until all parts fit
onto one page.
- Save.
[sharedata-Lastname-Firstname.docx]
 Convert picture? Sometimes
you can covert a picture into a Microsoft Drawing Object and use the
Drawing Tools to edit it. But, once
you have formatted the picture, you cannot convert it to a Microsoft
Drawing Object.
Convert picture? Sometimes
you can covert a picture into a Microsoft Drawing Object and use the
Drawing Tools to edit it. But, once
you have formatted the picture, you cannot convert it to a Microsoft
Drawing Object.
Microsoft Office Graphic Object: Insert
Word has its own tools for creating and editing a chart. If you paste your picture as a Microsoft Office Graphic Object instead of a plain picture, you can format it with Word's own tools. These are not quite the same as Excel's tools.
-
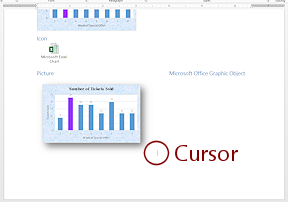 Click to the right of the word Picture in your Word document and space over past the picture below and type Microsoft Office Graphic Object.
- Click to the right of the picture of the chart
and space twice.
- Switch to Excel and copy the chart again.
- Switch back to Word and open the Paste Special dialog.
-
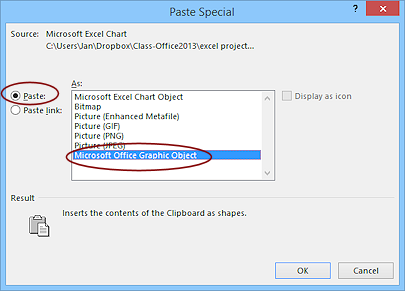 Select Paste and Microsoft Office Graphic Object and click on OK.
The new chart is too larger at its default size for the space. So it forces the Picture and itself onto a new page.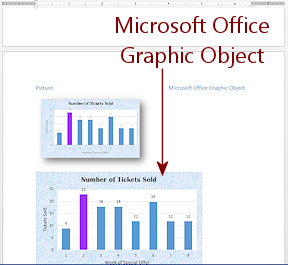
- Hold down the SHIFT key while dragging a corner handle to resize the new chart smaller until all charts are
back on one page.
Just dragging a corner of a graphic object does NOT keep the proportions.
The chart does not show well at this size. - Resize the chart taller to make it at least as tall as the picture plus its shadow and yet still keep the document to one page.
 Save.
Save.
[sharedata-Lastname-Firstname.docx]
Microsoft Office Graphic Object: Edit
The latest chart you pasted is more than a static picture. Selecting this object opens the Chart Tools ribbon tab, so you can edit the object, even changing the type of chart, without leaving Word.
- Click on this newest chart.
The ribbon tab Chart Tools appears.
- If necessary, click on the ribbon tab Chart Tools: Design.
-
Click the button Change Chart Type and select the first Pie Chart.
Your column chart immediately changes to a pie chart. You can do all of the editing here that you can do in Excel, without having to open Excel at all. Sweet!
 Excel 2013, 2016: Right click on the white Plot Area and select Format Plot Area. Change the Fill to None.
 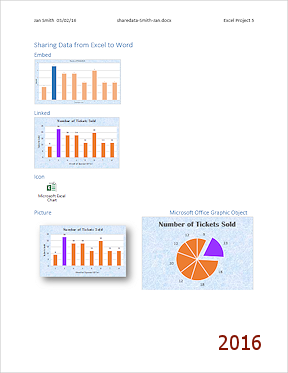 Prepare to Print: Create a header with your name and the date on the left, the
file name [Insert > Field or Quick Part > FileName] in the center, and Excel Project 5 on the right. Spell Check. Print Preview.
Prepare to Print: Create a header with your name and the date on the left, the
file name [Insert > Field or Quick Part > FileName] in the center, and Excel Project 5 on the right. Spell Check. Print Preview.
-
 Print.
Your linked object will be updated before printing, under the default Word settings. The embedded copy may print at a different size.
- Save.
[sharedata-Lastname-Firstname.docx] - Close Word and Excel.
Next you will look how you can reduce the size of the file, most of the time. This file size may now be nearly 1.5 MB, depending on your version of Excel. After this lesson the file size for shareddata-Lastname-Firstname.docx is 852 KB for the file I created as I edited these lessons to update for Excel 2016.
|
|
| © 1997-2017 Jan Smith All Rights Reserved |
Site Map What's New |
Privacy Policy Terms of Service Copyright Acknowledgements |
~~ 1 Cor. 10:31 ...whatever you do, do it all for the glory of God. ~~
Last updated: March 27, 2017