|
Step-by-Step:Custom Template |
|
What you will learn: |
to format text on Master
to format bullets
to remove text formatting not on the Master
to format background on Master
to apply an animation scheme to Master
to promote bullet levels (3 methods)
to save as a custom design template |
Start with:  ,
nz-word.ppt
,
nz-word.ppt
You will modify the Masters,
remove the formatting inherited from the Word document, and then save
your design as a template.
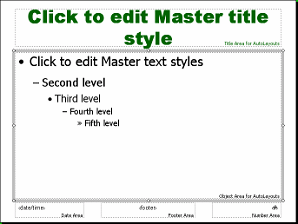
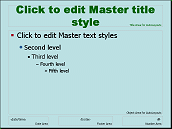
Master: Format Fonts
-
Open the Slide Master.
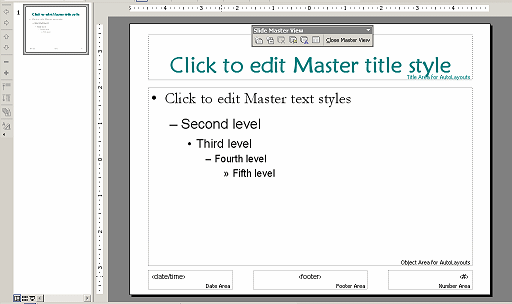
Hmmm. The formatting here is not quite what is actually showing on the slides.
That means that the slides are using some formatting that has been inherited
from the original document.
-
Click in the Title placeholder to select it.
-
Using the Formatting Bar, set the following:
Font = Arial Black
Font size = 44 pts
-
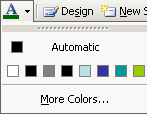 Click
the arrow beside the Font Color button and then click on More Colors...
Click
the arrow beside the Font Color button and then click on More Colors...
-
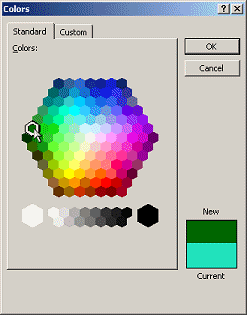 Select
the 1st green hexagon on the 6th row from the top.
Select
the 1st green hexagon on the 6th row from the top.
Green is the color that World Travel Inc. uses for its name and logo
materials. The font for the name is usually Matura MT Script Capitals, but that
font might not be on the computer running the slide show. It is a good idea to
use common fonts in presentations.
-
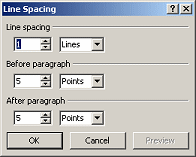 From
the menu select | .
The Line Spacing dialog appears.
From
the menu select | .
The Line Spacing dialog appears.
-
Change the line spacing to 1 line and click on OK.
-
Click
in the Text placeholder to select it.
Change the font on the Formatting Bar to Tahoma.

Master: Format Bullets
The standard bullets are OK but is easy to change them.
-
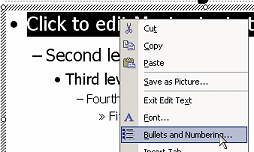 Click
on the
first outline level to select it
Click
on the
first outline level to select it
-
Right click on the selected line and select
Bullets and Numbering... from the popup menu. The Bullets dialog opens.
-
 Click
on the square bullet style.
Click
on the square bullet style.
-
Click
on the arrow at the right of the Color box at the bottom of the dialog to open the palette of colors
that are in the default color scheme.
None of these are particularly interesting.
-
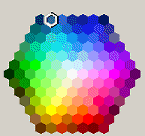
Click on the More Colors... link. The Colors dialog opens.
-
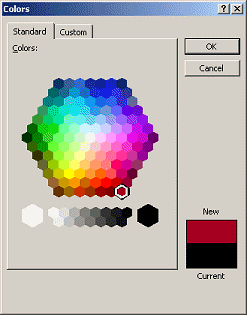 Click on the
color Red at the bottom right of the hexagon of colors and click
on OK.
Click on the
color Red at the bottom right of the hexagon of colors and click
on OK.
-
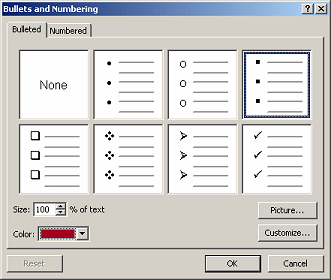 Click
on OK to close the Bullets dialog.
Click
on OK to close the Bullets dialog.
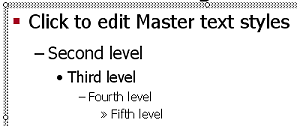 The
first outline level now has a bullet that is square and red. Not too hard to
do!
The
first outline level now has a bullet that is square and red. Not too hard to
do!
-
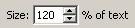
Select
the Second outline level and change its bullet to:
Shape = solid disk
Color = Blue - first row, second hexagon
Size = 120%

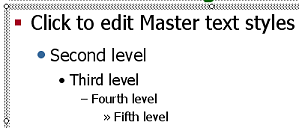 In the Master, the second level now shows a round, blue bullet.
-
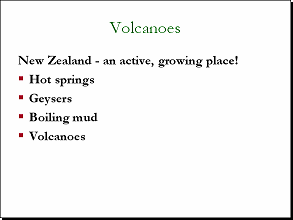 Close
the Master view and look at Slide #2:
Volcanoes.
Close
the Master view and look at Slide #2:
Volcanoes.
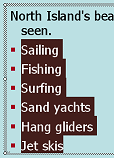
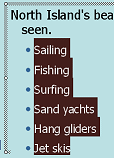
Something is wrong! The colors and bullets are right but the text is not using the fonts
you just set in the Slide Master. The cure is in the next set of steps - Remove
formatting that was applied directly to the text.
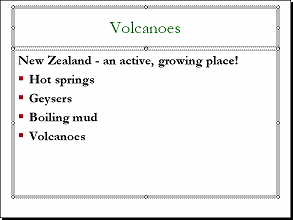
Slides: Remove Text Formatting
The slides are still using the fonts from the original outline. You must
make the slides use the formatting from the Masters.
-
 In
the Slide Pane,
click
on Slide #2: Volcanoes in an area outside of the two
placeholders.
In
the Slide Pane,
click
on Slide #2: Volcanoes in an area outside of the two
placeholders.
-
From the menu select |
OR
 Use the key combo CTRL + A.
The placeholders are both selected.
-
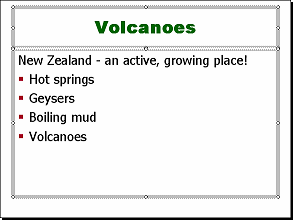 Use the key combo CTRL + SHIFT + Z to remove all of the formatting that is not
on the Master. Is this not cool!?
Use the key combo CTRL + SHIFT + Z to remove all of the formatting that is not
on the Master. Is this not cool!?
Even better, by using the Outline you can remove all the manual formatting from all the slides at once.
-
Click in the Outline pane and repeat the key combos above:
CTRL + A to select all the outline text
CTRL + SHIFT + Z to remove formatting that is not on the Master
The manual formatting is removed for all of the slides and the Master rules
again.
-
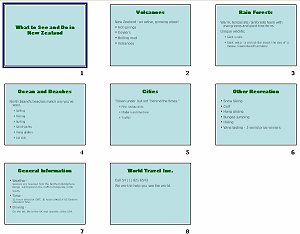
Switch to Slide Sorter view to see all of the slides at once.
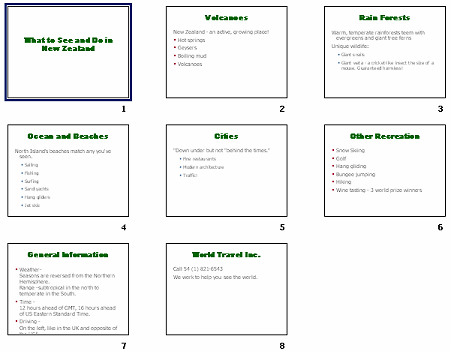
Slide #7 needs some work. The text is running off the slide!
Slide: Font Size
You need to apply some manual formatting of your own to get all of the text
on Slide #7 comfortably.
- In the Slide Sorter view, click on Slide #7: General Information.
The slide opens in the Slide Pane.
- Select the text of the first bullet item, starting with the word
Seasons.
- Change the font size to 24, using the Font Size box on the
Formatting Bar.
- Similarly, change the font size of the other two bullet
points to 24, starting with the second line of each bullet item.

Master: Background
You can set a background color, pattern, or image on the Slide Master.
On-screen presentations usually have dark backgrounds with light text.
White backgrounds can be too harsh and bright to the eyes, but a soft,
light color can work well, too.
Printed presentations work better with light background and dark text.
(Saves a lot of ink!)
Since this presentation will usually be viewed on a monitor, you will
change the background color.
-
 Open the Slide Master again.
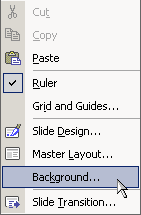
- Right click in an area that is not in a placeholder.
- From the popup menu select
.
The Background dialog opens.
-
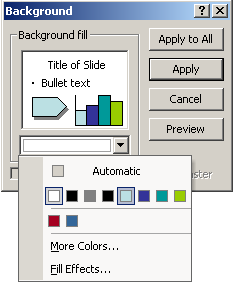 Click
the down arrow at the right of the color bar, to open the palette of
colors.
Click
the down arrow at the right of the color bar, to open the palette of
colors.
- Click on the light blue square to select it as the
background color for the slides.
 To use a color that is not in the
Color Scheme palette, you would click on the link More Colors... to open a
Colors dialog. The Fill Effects... link opens a dialog where you can choose a
texture, pattern, or image to use as a background fill.
To use a color that is not in the
Color Scheme palette, you would click on the link More Colors... to open a
Colors dialog. The Fill Effects... link opens a dialog where you can choose a
texture, pattern, or image to use as a background fill.
-
 Click
on the button Apply. The Slide Master changes.
Click
on the button Apply. The Slide Master changes.
- Close the Master View.
All of the slides now have a light blue background.
Master: Apply Animation Scheme
Advantage: By applying an animation scheme to the Master, all slides
that use that Master, including any slides you add later, will use the
same animation scheme. That's usually a good thing!
Disadvantage: Animations applied to the Master
cannot be turned off for a particular slide. You have to create a separate Master for
those slides.
-
Open the Master view to the Slide Master.
-
If necessary, show the Animation Schemes
task pane. [Slide Show | Animation Schemes...]
-
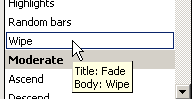 Select
the Wipe scheme from the Subtle section. The Slide Pane
automatically plays the effect once for you. The Title fades into view and
then the text in the text placeholder wipes into view from the left.
Select
the Wipe scheme from the Subtle section. The Slide Pane
automatically plays the effect once for you. The Title fades into view and
then the text in the text placeholder wipes into view from the left.
Can you tell exactly how your bullet points are going to show up? All
together or one at a time? Better check the Slide Show.
-
Close the Master view.
-
Click the first slide and then on
 the Slide Show
button at the bottom left of the window or on
the Slide Show
button at the bottom left of the window or on
 the Slide Show
button at the bottom of the task pane. Play the entire presentation, clicking the screen to advance to the next slide.
the Slide Show
button at the bottom of the task pane. Play the entire presentation, clicking the screen to advance to the next slide.
On some slides, all of the placeholder text appears in the same wipe. On
other slides, the paragraphs appear one after the other. What is the
difference?? It's the bullet levels involved.
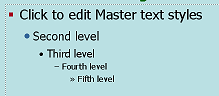 In this
scheme, first level bullets are revealed one after the other. Second
level bullets are revealed at the same time as the first level above
them. Your presentation only uses 2 bullet levels.
In this
scheme, first level bullets are revealed one after the other. Second
level bullets are revealed at the same time as the first level above
them. Your presentation only uses 2 bullet levels.
So, to make the bullet points appear one after the other, you will have
to make all of them first level. (Or you could choose a different
scheme or make changes in the Custom Animation task pane.)
Change Bullet Levels
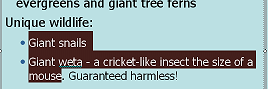
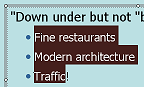
Three slides have second level bullet paragraphs, showing
blue circles: Rain Forests, Oceans & Beaches, Cities. You need to
promote those
paragraphs to first level so that the animation scheme will reveal each bullet
point in turn and not all at once.
Similar methods work to demote paragraphs to lower bullet
levels.
Method 1: Indent Button on Formatting Bar
-
Open the slide Rain Forests.
-
 Drag
on the slide or on the outline
to select the two bullet points. (You can select just part of each bullet
point.)
Drag
on the slide or on the outline
to select the two bullet points. (You can select just part of each bullet
point.)
-
 Click
Click
 the Decrease Indent button on the Formatting bar.
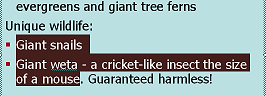
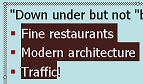
The bullet points are moved to the left and now show the red square bullet
that indicates first level bullet points. The text formatting changed also.
Method 2: Arrow Button on Outlining Bar
-
Open the slide Oceans & Beaches.
-
If necessary, show the Outline
toolbar. (View | Toolbars | Outlining)
-
 Drag
on the slide or on the outline
to select the bullet points.
Drag
on the slide or on the outline
to select the bullet points.
-
Click on
 the Left Arrow to promote the bullet
points to first level.
the Left Arrow to promote the bullet
points to first level.
Method 3: Keyboard Shortcut
-
 Open
the slide Cities.
Open
the slide Cities.
-
Select the bullet points, which have
blue circles as bullets.
-
 On the
keyboard, hold down the SHIFT key and press the TAB key
once, then left go of both keys.
On the
keyboard, hold down the SHIFT key and press the TAB key
once, then left go of both keys.
The bullet points have first level formatting and first level bullets.
Excellent!
-
Play these three slides in a slide show again
and verify that the bullet points are now appearing one after the
other.
Save As a Custom Template
Now that you have created a look and chosen an animation
scheme, it would be nice to be able to apply it again later to a different
presentation. That means you have to save your design as a custom
template.
 After you save your
presentation as a template, PowerPoint contains the template that
you just saved, not the original presentation!
After you save your
presentation as a template, PowerPoint contains the template that
you just saved, not the original presentation!
- Save the presentation before saving as a
template or your recent changes will be lost!!
- Close the template and re-open the presentation before doing any more editing!!!
-
From
the menu select . Use the name nz.ppt and
save your changes to your Class disk.
 How to handle a full Class disk
-
From the menu select again.
-
Change the file type to Design Template
(*.pot).
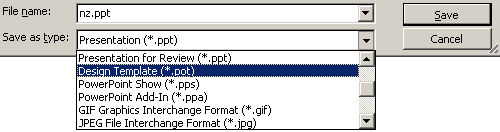
The dialog changes to show the Templates folder.
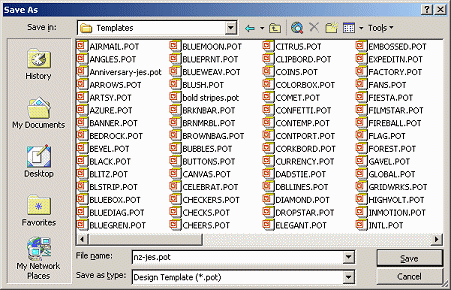
Templates saved to this Templates folder will show in the list of
template choices inside PowerPoint. Of course, you can save to any
folder you wish. For this lesson, you will not save to the Templates
folder.
-
Change the file name to nz-xxx.pot, but
replace the xxx with your own initials.
-
Navigate to your Class disk. The dialog won't show any files! The
file type is currently set to .pot and there are not any files of that
type on your Class disk yet.
-
Click the Save button in the dialog.
How to handle a full Class disk
- Close the current document in PowerPoint, which is the
template.
Be SURE to close the current document, which is the template.
~~ 1 Cor. 10:31 ...whatever you do, do it all for the
glory of God. ~~