
Jan's Working with Windows:
Help: Vista, Win7, Win8/8.1: Search in Help
Unlike Help in previous versions of Windows, Help for Vista, Win7, Win8, and Win8.1 does not have a visible Index. Instead, you can use the Search box to look for articles that include your keywords. This box appears at the top of all Help windows. The results will be ONLY Help pages. You can choose whether to include online help as well as articles that were installed on your hard disk (i.e. offline) with the operating system.
![]()
![]()
Keywords are the words or phrases that you tell Windows to look for. If you want to know what the Windows desktop is, you should type 'desktop', not 'what is a desktop'. Search programs will ignore common words like a and is. Most search programs, including Search Help, will search for an exact phrase if you type quotes around the phrase, like "what is a widget". Just remember that Search does not look for the answer to the question but for that exact text.
Search online: In truth, you often get more helpful information by using a normal web search like Google or Bing. For example, a search on the terms Windows desktop in Google had as its first result an article from Microsoft,
Desktop> - Microsoft Windows![]() . But searching inside Help for Win8.1 did not find that article in the first 4 pages of results (after which I quit looking!). The article was written about Windows 7, which is likely why the search ignored. But some of the information was quite relevant even for Windows 8 and 8.1. The real question is 'Why isn't there an article like that for Windows 8 and 8.1?'
. But searching inside Help for Win8.1 did not find that article in the first 4 pages of results (after which I quit looking!). The article was written about Windows 7, which is likely why the search ignored. But some of the information was quite relevant even for Windows 8 and 8.1. The real question is 'Why isn't there an article like that for Windows 8 and 8.1?'
Step-by-Step: Search Help -
|
|
| What you will learn: | to choose whether or not to include online Help to use keywords to search Help to use Find to search on a page to recognize and use links to hidden text |
![]() WinXP: To
work with Help in WinXP, skip to WinXP Help
WinXP: To
work with Help in WinXP, skip to WinXP Help
Start with: Help & Support Center/Help is open.
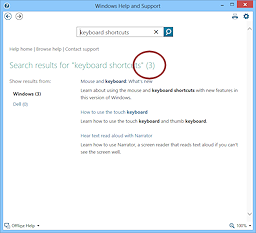
Where to Search - Online or Offline
Help allows you to choose whether or not to include in the results online Help from microsoft.com. Searching online can take longer, of course, but it provides more results and the most recent version of articles that have been updated. The default setting is to include online Help. 'Offline Help' means the articles which are stored on your computer's disk as part of Windows. We will start by seeing what is available offline.
- If necessary, open the Help and Support Center:

 Vista, Win7:

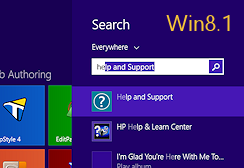

 Win8, Win8.1: Start screen; type Help; press ENTER.
The Help window opens.
 Inspect the bottom of the Help window.
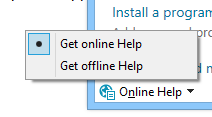
Does it show Offline Help or Online Help in a corner?
Vista and Win7 use the right corner. Win8 and 8.1 use the left corner.
- If the corner shows Online Help,
 click on the Online Help button to see the menu and then on .
The button in the corner changes to Offline Help.
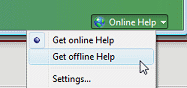
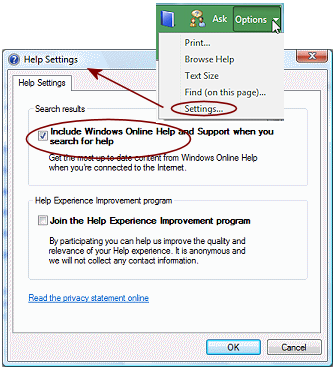
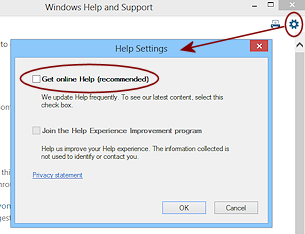
Alternate method to use Offline help ALWAYS: Help Settings
To change the default, the Options button > or the Settings button ![]() opens the Help
Settings dialog. Check the box at the top to include online Help articles and uncheck it to use only articles already on your own computer when you
search for Help information. This setting will be remembered. If you just change your choice using the drop list at the bottom of the Help window, your choice is not remembered the next time you open Help.
opens the Help
Settings dialog. Check the box at the top to include online Help articles and uncheck it to use only articles already on your own computer when you
search for Help information. This setting will be remembered. If you just change your choice using the drop list at the bottom of the Help window, your choice is not remembered the next time you open Help.
Vista and Win7 use the Options button to open the Help Settings dialog;
Win 8 and 8.1 use the Settings button to open that dialog.
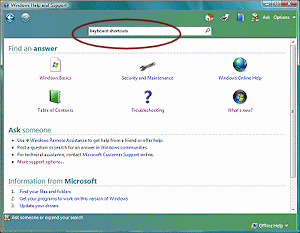
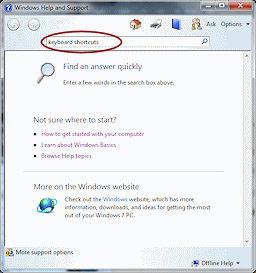
Search Help with Keywords
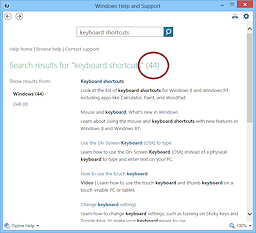
Each Help window has a search text box at the top.
- Click in the Search Help text box at the top of the page.
- Type keyboard shortcuts and press
the ENTER key or click
the magnifying glass
 at the
right end of the box.
at the
right end of the box.

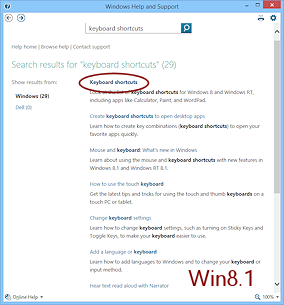
The page changes to show a list of articles that match the keywords.
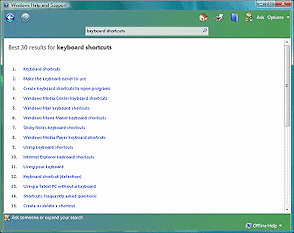
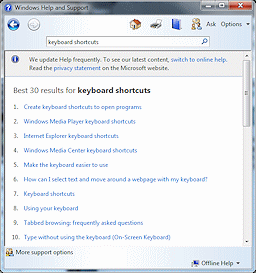
 Most useful
first: Windows tries to guess which articles you would find the most useful and puts
them first in the results list. The order appears to be similar to the
following-
Most useful
first: Windows tries to guess which articles you would find the most useful and puts
them first in the results list. The order appears to be similar to the
following-Article contains the keywords:
-
in the title
-
somewhere as a phrase
-
somewhere as separate words instead of as a phrase
-
only 1 word from the phrase
Some articles may not contain the words at all but are considered to be related to your keywords. It may not be obvious to you why Windows thinks so!
-
- Change the Offline Help to Online Help, using the button at the
bottom right of the window.
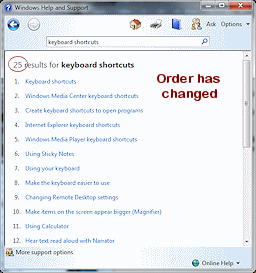
The list automatically revises itself to include any online articles that match the keywords. The order of articles in the list may change.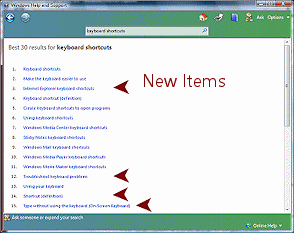
Unlike previous versions of Windows, there is no easy way to tell which articles are online and which are offline!
-
Scroll the list to see all of the results.
When there are more results than will fit on the page, there are navigation links to open more pages.Further results are usually not very close to what you were looking for... if you chose your keywords well.

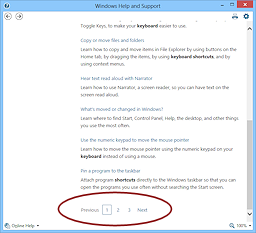
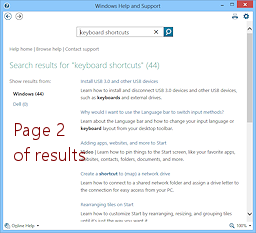
- At the bottom of the page, click on the link for more
results for keyboard shortcuts or page 2.
The page changes to show the next page of links to articles. Now we are getting to articles that don't look too promising!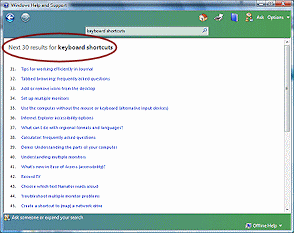
- Use the Back button to return to the first page of results.
- Change back to using only Offline Help.
- Open and inspect a several of the articles in the results
list.
Are there any that do not seem to belong?
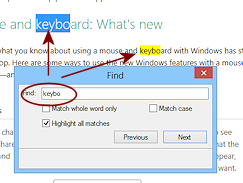
Find On This Page: Right Click
Sometimes your keywords may not be in the title or even the first paragraph of the article. To search on a particular page, you must switch to a different search feature,
- Click on the result:
'Make the keyboard easier to use'
'Mouse and keyboard: What's new'.
The window displays an article. Do you see your keywords on this page?
Windows can help you find those keywords.
-
 Right
click on the page.
Right
click on the page.
A context sensitive menu appears.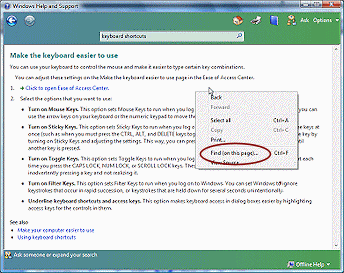
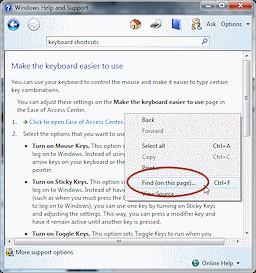
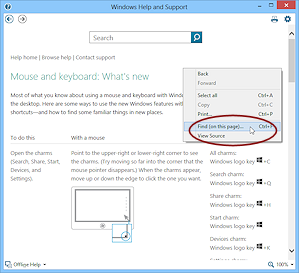
 Click on .
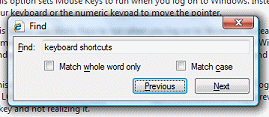
The Find dialog appears.
-
Type in your keywords again, keyboard shortcuts
(It would make sense for the Find dialog to fill in what you were just using Search Help for, but it does not.)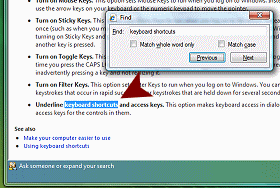
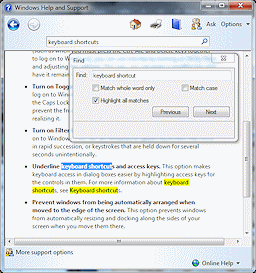
Vista: Click on the Next button (even though you have not found the first one yet!)
Windows highlights the first "keyboard shortcuts" that it finds. Win7, Win8, Win8.1: Automatically highlights the keywords in the article as you type.
The first match past where the focus is in the article has a blue background. The rest have a yellow background. You can scroll the document and see where your keywords appear. If you don't like this, uncheck the box 'Highlight all matches' in the dialog.All or nothing: The Find dialog is not like Search! It looks for the phrase only, not for individual
words in the phrase. So if you type in 'cats and dogs',
Find
will not find the single word "cats" or "dogs". You would have to
repeat your search with single words.Match whole word only: You can check
this box to insist on searching only for your exact keywords. So if you
typed in cat, the results would not include cats or category or catastrophe.Match case: If you checked this box
and typed in cat, then the results would not include Cat. - Click on the Next button again.
The next instance of the keywords is highlighted.
This shows that Find does look at ALL of the text on the page, including links to other pages. - Click on the Next button repeatedly until you return to the first occurrence.
- Click on the Close button

 for the
Find dialog.
for the
Find dialog.
- Click the Back button

 to return to the results list.
Related Articles: Single words but not the phrase
Some results may not actually have your keyword phrase in the article at all or it may be hard to find.
- Open another article from the search results:
Vista: Click the link 'Shortcuts: frequently asked questions'. Win7: Click the link 'Using Sticky Notes'. Win8, Win8.1: Switch to Online Help.
The list of articles refreshes and shows many more than before.
Click the link 'Pin a program to the taskbar' or 'Make your PC easier to use.'The selected article opens.
- Open the Find dialog again.
- If necessary, type 'keyboard shortcut'.
Whoops.Vista: Click Next.
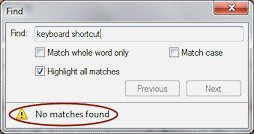
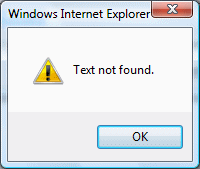 A message in a new message window or at the bottom of the Find dialog tells you that your keywords are not there at all, even though the article was listed in the search results for the same phrase!
Does it make sense to you to include this page in the search results??
Certainly! All of the listed titles have information about shortcuts of some sort.
-
Vista: Click OK to close the message box.
- Edit the keywords to just keyboard.
Any results? Vista: Click Next.
- Edit the keywords again to just the word shortcut.
Vista finds many now! Still no success with Win7 or Win8. Vista: Click Next.
This shows that the Find dialog works somewhat differently than Search.Find: Whole Phrase Only
Find looks only for the whole set of words as a phrase. It will not present to you any instances where only one of the words is present.
- Inspect the article to see why it was included in the search results:
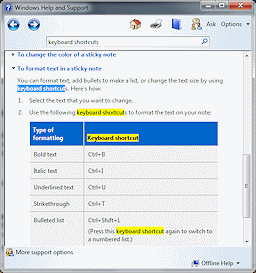 Win7: In the article 'Using Sticky Notes', scroll down, and click on the item 'To format text in a Sticky Note' to expand this topic.
Now use Find on this page again.
Aha! There is a whole table of shortcuts! This is why the article was included in the original search results.
Win8, Win8.1: The article never uses the words keyboard or shortcut. So why is the article listed in the search results?
Thinking... When you pin a program to the Taskbar, you are actually creating a special shortcut. Shortcuts certainly make a PC easier to use. Sneaky thinking by Microsoft - giving you are result that you probably did not know was related!
- Click the Back button enough times to return to the first page of the results list again.
The Find dialog automatically closes.
Show/Hide
Some Help pages include text that does not show when the article is first
opened. This is indicated by a topic title with an arrow pointing to the right.
![]()
![]()
Clicking this kind of link reveals the hidden information. There may be a link Show all at the top of the list or at the upper right of the page. Clicking that link will reveal ALL of the hidden text on the page at once. Some pages have just one or two hidden sections. Others have many!
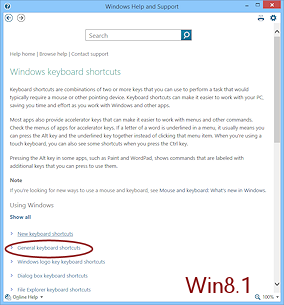
- Click on the link, General Keyboard shortcuts or just Keyboard shortcuts.
- If necessary, scroll to see a list of links.
You might expect these to be links to articles. But they are not. The link will open hidden text that is directly below the link on the same page.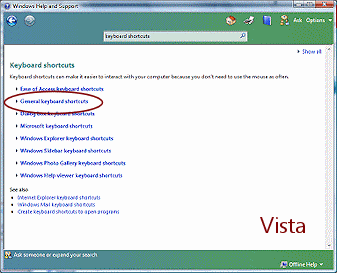
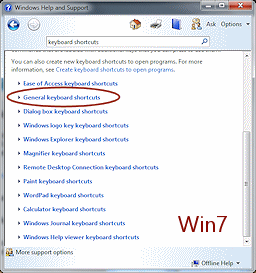
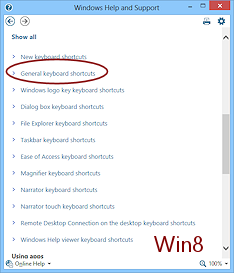
- Click on the link General keyboard shortcuts.
A new section appears on the page! The arrow beside the topic title changes to point down.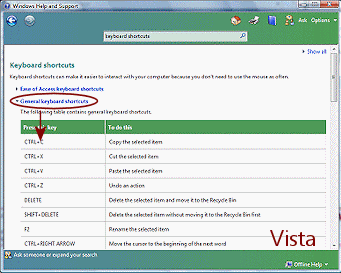
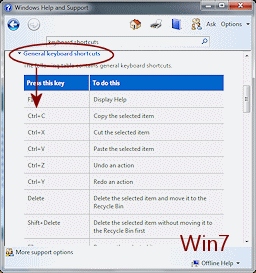
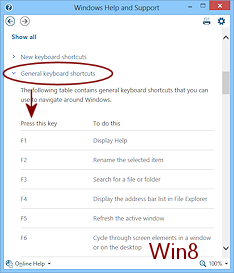
- Look at the list of common keyboard shortcuts. These are VERY useful to
know.
How to read a shortcut: Some shortcuts use more than one key at a time.
For example, CTRL + C means to hold down the CTRL key and press the C key. Then release both keys. This combination will copy whatever is selected on the screen. - Click on the
link General keyboard shortcut again. The text is hidden once
more.
- Click on
several different links to have them all open at the same time.
- Click on
each topic title to hide all the text again.
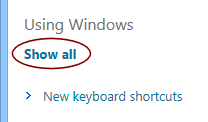
 Scroll up and click on the link Show all.
ALL of the hidden sections are revealed at once. The link changes to read Hide all.
- Scroll to see how long the page is now!
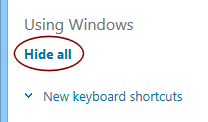
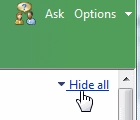 Click on Hide all to tidy the page up again.
- Close the Help window by clicking the Close button at the top right of the Title bar.
|
|
| © 1997-2017 Jan Smith All Rights Reserved |
Site Map What's New |
Privacy Policy Terms of Service Copyright Acknowledgements |
~~ 1 Cor. 10:31 ...whatever you do, do it all for the glory of God. ~~
Last updated: March 22, 2017