 |
To move text, you select it and either drag to the
new location or cut it and paste in the new location. On a long drag your finger might slip and accidentally
drop your text in the wrong spot. Cut and paste will be easier in that
case.
If the new location is not in view, you must drag off the top or
bottom of the screen. The document will scroll for you but this can be very
slow. Cut and paste is faster.
Selecting exactly what you need can be tricky. Sometimes
you want to include the paragraph mark in your selection and sometimes you
don't. It makes a difference! A bit of practice will make it clear
why. |
|
Where you are:
JegsWorks > Lessons > Word97-2003
Before you start...
Project 1: Word Basics
Project 2: Auto
Tools
Make Changes 
 Add
Text Add
Text
Delete
Text
Modify Text
Move
Text
Autoformat
Margins &
Breaks
Wizards/Templates
Summary
Quiz
Exercises
Project 3:
Brochure
Project 4: Report
Search
Glossary |
|
 |
Step-by-Step: Move Text |
|
|
What you will learn: |
to move selected text by drag and drop
to move selected text
by cut and paste
|
Start with: trip planner.doc
Move Text: Drag & Drop
- Select the paragraph that starts on line 16 with
the words You will be taken ...
Be sure to include the paragraph mark
on the next line after the paragraph ends, too.
Hint: Drag in the selection area to the left of the text to select
all the lines. Or, double-click in the selection area beside the
paragraph, then hold the SHIFT key down and click beside the paragraph
mark below it.
-
 Drag
the selected paragraph and drop it at the beginning of the
paragraph above that starts Since most
travelers ... Drag
the selected paragraph and drop it at the beginning of the
paragraph above that starts Since most
travelers ...
 If this
didn't work, you must put a check beside Drag-and-Drop Text
Editing in the dialog |
| . If this
didn't work, you must put a check beside Drag-and-Drop Text
Editing in the dialog |
| .
Error: If you didn't include in your selection the
paragraph mark below the paragraph you are moving, you will have one too
many paragraph marks in the old spot, and you'll be short one in new
location. Delete one of the extras. (Move the cursor to the left
of the extra paragraph mark and BACKSPACE.) Add a paragraph mark after
the dropped paragraph by putting the cursor at the end of the paragraph
and pressing the ENTER key.
- Click out of the
selection if necessary to remove the highlighting.
- Hold down the CTRL key and click
in the sentence- You will be taken …special
guest. in the paragraph that you just dragged. The whole sentence
and the ending period and space are selected! A neat way to select a whole sentence!!
It can be
hard to select by dragging and get that tiny period without catching the
first word of the next sentence. When you don't want
the whole sentence but you do want the period, you
might find it easier to start just to the right of the period and drag
to the left.
- Drag the selection to the end of the
next sentence Once you are…come
home!
Word will automatically fix the spaces at the beginning and end of
the sentence if you have chosen | | | .
-
 Save. Save.
 How to handle a full disk
Move Text: Cut & Paste
-
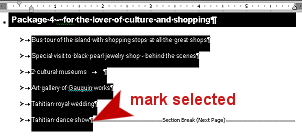 Select by dragging down the left margin
starting with Package 4 and ending on
the second page with the paragraph mark below Tahitian
dance Select by dragging down the left margin
starting with Package 4 and ending on
the second page with the paragraph mark below Tahitian
dance
 Alternate technique - if the page scrolls too
fast and makes you select too much: Alternate technique - if the page scrolls too
fast and makes you select too much:
- Move the cursor to the left of
Package 4
- Scroll to the next page
- Hold down the SHIFT key and
click to the right of the paragraph mark below Tahitian Dance . All the text between
your cursor location and where you clicked will be selected. Be
sure you caught the paragraph mark below the line Tahitian Dance .
-
Use the key combo
CTRL + X to cut these lines.
-
Press the PAGE UP
key or the Up arrow key, if necessary, to scroll the document so
you can see the line which starts with Package
3 .
-
Click in that
line and press the HOME key to move the cursor to the beginning of the
line.
-
Use the key combo
CTRL + V to paste the selected lines. Since you included a final
blank line, your list remains spaced correctly. But the numbers are now
wrong.
- Renumber Package 4 as Package 3 and the original
Package 3 as Package 4. (Position the cursor to the left of the number
to be changed, press the DELETE key to remove the number, and type the
new number.)
This list
was not created with Word's automatic numbering feature.
If automatic numbering had been used and you cut and pasted
correctly, the numbers would be automatically corrected. It is a little
tricky, however, to move numbered or bulleted text. Those final
paragraph marks and exactly where you paste are very
important.
Prepare for Print
- Add a header containing your name at the left, the
date in the center, and Word Project 2 at the right.
( | )
- Spell check. Word's grammar checker is really
confused by the lists! Lots of wavy green underlines. These are not
errors since they aren't sentences! Most of the "errors" are from the
spacing and capitalization of the lists. Let Word capitalize the first
word in the Package lists but do not change the spacing. There is at
least one real spelling error.
The name of the painter whose
museum is listed is indeed Gauguin. This name may not be in the
original dictionary, in which case Word will mark it as a possible error. Do NOT add it
to the dictionary!
- Print Preview. Make corrections if
needed.
-
Save As
triplanner2.doc .
How to handle a full disk
 Print. (trip planner2.doc = 2 pages) Print. (trip planner2.doc = 2 pages)
|
