Breaks
Breaks come
in several flavors.
-
line break
-
text
wrapping break
-
soft page break
-
hard page break
-
column break
-
section
break -
-
next page
-
continuous
-
even page
-
odd page
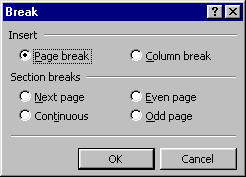
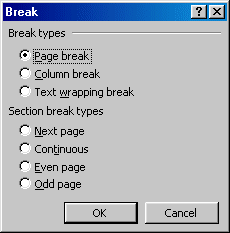
Most of these are found in the Break dialog, which you
open from the menu |
|

 Word 97 Word 97 |


  Word 2000/2002/2003 Word 2000/2002/2003 |
Line break:
A line break starts a new line
without starting a new paragraph. This is useful when your paragraph style
would put in too much white space between paragraphs or if you want to
ensure that a certain phrase starts at the margin.
The mark for a line break looks like:
 . .
You create one with the key combo SHIFT + ENTER.
 Text-wrapping break: Text-wrapping break:
   In Word 2000/2002/2003 the Break dialog includes a
text wrapping break In Word 2000/2002/2003 the Break dialog includes a
text wrapping break
 . It
looks and functions a lot like a line break. . It
looks and functions a lot like a line break.
If you save your document as a web page, a text wrapping
break makes the text drop below any images or tables that are aligned on
the left or right margins. This jump won't show up as you view the
document in Word, even in Print Preview! You must look at the page with a
browser to see the difference.
Soft page break:
Word creates a soft page break every time it wraps text
onto a new page. This one is automatic!
Page break:
 When you want to guarantee
where a new page starts, put
in a hard page break. The text to the right
of the cursor will be at the top of the next page no matter how much text you add or
delete in front of it in the document. A hard page break is marked on the
screen by a dotted line across the page with the words "Page Break". This
mark won't print, of course. When you want to guarantee
where a new page starts, put
in a hard page break. The text to the right
of the cursor will be at the top of the next page no matter how much text you add or
delete in front of it in the document. A hard page break is marked on the
screen by a dotted line across the page with the words "Page Break". This
mark won't print, of course.
 Use the Break dialog on the menu | or the keystroke combo CTRL +
ENTER to create a page break. Use the Break dialog on the menu | or the keystroke combo CTRL +
ENTER to create a page break.
Column
break
:
A column break forces your
text into a new column, if you already have columns created. Otherwise it
has the same effect as a page break.
 You may
lose your column breaks if you change the margins of your pages! You may
lose your column breaks if you change the margins of your pages!
Section
break:
 A section break divides the document into sections for
formatting changes. You must create a new section to change the size of
margins, the number of columns, the header or footer, or the page
numbering for a part of the document. A section break is marked on your display with a double dotted
line and the words "Section Break" plus the type of break. A section break divides the document into sections for
formatting changes. You must create a new section to change the size of
margins, the number of columns, the header or footer, or the page
numbering for a part of the document. A section break is marked on your display with a double dotted
line and the words "Section Break" plus the type of break.
Next Page section
break: Starts the new section at the top of a new page.
Continuous section break: Does not start a new page but allows changes within the page. This
kind of break is created automatically when you create a set of columns within
a page. You can use this type for indenting some text by using a wider
margin.
Odd and Even
breaks: For creating headers and footers that are different
for odd and even pages. For example, a book might have the chapter
title in the header for the right-hand page and the book title in the header
of the left-hand page.
Margins
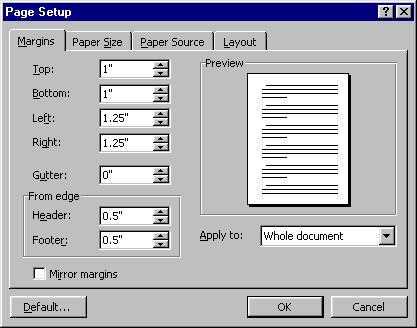
 You can adjust top, bottom, and side margins by
dragging the boundary on the rulers between the white and gray portions of the ruler or
by using the Page Setup dialog. The ruler applies changes to the whole section, if
you created any sections. You can adjust top, bottom, and side margins by
dragging the boundary on the rulers between the white and gray portions of the ruler or
by using the Page Setup dialog. The ruler applies changes to the whole section, if
you created any sections.
 Page Setup lets you apply
your changes to the whole document, the selected section, or just the selected
text. Word will automatically create a section for you when you adjust the
margins for selected text. Until you create a section, Word considers the
whole document as one section. Page Setup lets you apply
your changes to the whole document, the selected section, or just the selected
text. Word will automatically create a section for you when you adjust the
margins for selected text. Until you create a section, Word considers the
whole document as one section.
   
~~ 1 Cor. 10:31 ...whatever you do, do
it all for the glory of God. ~~
Last updated:
30 Apr 2012 |

