|
Step-by-Step: Adjust Columns |
|
What you will learn: |
to adjust
indention with the ruler
to change
column margin with the
ruler
|
Start with: ,
trip planner7.doc
,
trip planner7.doc
Adjust Columns: Indention
Word's automatic columns are not
always quite what you want. You can use the ruler to make some
adjustments. Getting the distances just exactly right is
important only sometimes! Your selection is
always important when changing
indentions.
To have your page look like the illustrations, if you are using
metric measurements instead of inches, use about 6.3 mm instead of ÂĽ" and about 12.7
mm instead of ½". The point of this section is not to get
the numbers exactly right! It is to learn how to change the look of your columns.
These actions can be applied to regular paragraphs, too, of course, not just columns.
-
 Select all the lines in the right
column of Package 1's list. The
ruler changes to measure just the columns instead of the whole page.
Select all the lines in the right
column of Package 1's list. The
ruler changes to measure just the columns instead of the whole page.
 When adjusting indentions, you do not have to select the whole paragraph as you did before to create
the columns. As long a part of the paragraph is included in the selection, your changes will be applied
to it.
When adjusting indentions, you do not have to select the whole paragraph as you did before to create
the columns. As long a part of the paragraph is included in the selection, your changes will be applied
to it.
-
 Move your pointer over the indention box
 on the ruler.
-
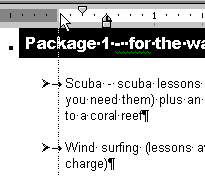
 Drag the box to the left from the ½" mark to the ¼" mark
and drop. Whoops! You dragged a left tab stop
Drag the box to the left from the ½" mark to the ¼" mark
and drop. Whoops! You dragged a left tab stop
 instead!
That's OK.
instead!
That's OK.
-
 Again drag the box to the ÂĽ" mark. Now the indent
moves. (Word is a bit strange sometimes.)
Again drag the box to the ÂĽ" mark. Now the indent
moves. (Word is a bit strange sometimes.)
-
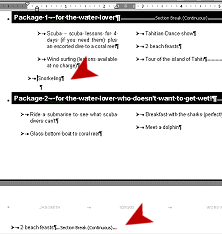
 Do the same for the bulleted lists
under Package 2. Package 2 has one item that changed pages and columns!
Do the same for the bulleted lists
under Package 2. Package 2 has one item that changed pages and columns!
- Select
the list items.
- Change
the indent for column 2.
- Change the indent for the line that changed
pages.
 List still has item on
next page: If the last item for Package 2 is still on page 2,
delete one of the blank lines on page 1.
List still has item on
next page: If the last item for Package 2 is still on page 2,
delete one of the blank lines on page 1.
- Repeat to change the indentions in column 2
for Packages
3 and 4.
- Check indentions:
The left columns of all 4 packages should have the indention box on the ½"
mark. The right columns should have the indention box in the ÂĽ" mark. If
necessary, select all the lines in a column and move the tab and the
indention box to the correct spot.
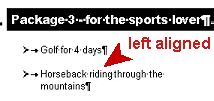
-
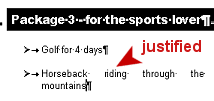 Fix
justification: Look for list items that
are being spread out too far because of being justified. Fix
justifications by putting the cursor in the paragraph and clicking
Fix
justification: Look for list items that
are being spread out too far because of being justified. Fix
justifications by putting the cursor in the paragraph and clicking
 the Left Align
button.
the Left Align
button.
 Changing
alignment also changes the indentions: Immediately after you change
the alignment, click the Undo button. The indentions return to the
previous settings. Word is doing some kind of automatic formatting of
the columns when you change the alignment. Unexpected!
Changing
alignment also changes the indentions: Immediately after you change
the alignment, click the Undo button. The indentions return to the
previous settings. Word is doing some kind of automatic formatting of
the columns when you change the alignment. Unexpected!
- Save as trip planner8.htm to the word project2 folder
of your Class disk.
 How to handle a full disk
Adjust Columns: Margins
Another way to adjust the columns layout is to change the width of the column
or of the space between the columns. You do this on the ruler by
dragging at the boundary between the gray and white areas.
- Put the cursor somewhere
in the first list item for Package 1.
 Move the
pointer to the ruler, over the left
boundary between the gray
and white areas that define the column width. The pointer shape changes to
a double arrow when you are in the right spot.
Move the
pointer to the ruler, over the left
boundary between the gray
and white areas that define the column width. The pointer shape changes to
a double arrow when you are in the right spot.
-
 Drag right. A dotted
line runs down the page to show where the margin will be.
Drag until the
dotted line meets the left side of the letter k in Package 1. Release
the mouse button. The column margin is moved.
Drag right. A dotted
line runs down the page to show where the margin will be.
Drag until the
dotted line meets the left side of the letter k in Package 1. Release
the mouse button. The column margin is moved.
 The columns width is
smaller. The items wrap differently. Some lines change columns or
pages. Package 2 lost its last item to the next page again because
Package 1's list is taking up extra vertical space on the page.
The columns width is
smaller. The items wrap differently. Some lines change columns or
pages. Package 2 lost its last item to the next page again because
Package 1's list is taking up extra vertical space on the page.
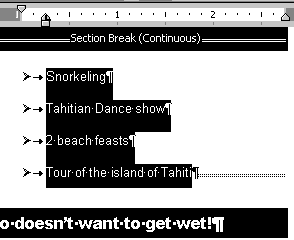
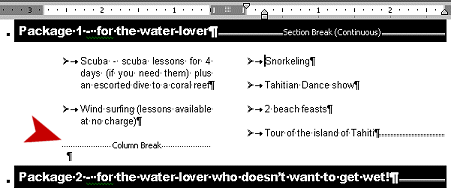
Snorkeling
moved over to column 1, but it is not lined up with the first two
items. Why?? The line Snorkeling has its indention set to ÂĽ"
like column 2, while the rest of column 1 has an indention of
½".
Adjust Columns: Column Break
That Snorkeling item needs to be back over in column 2. A column break is what you need.
-
 Move
your cursor to the left end of the line Snorkeling.
Move
your cursor to the left end of the line Snorkeling.
-
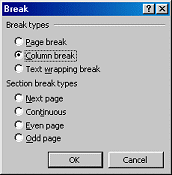 Select from the menu | | and
click on OK to close the dialog.
Select from the menu | | and
click on OK to close the dialog.
Snorkeling
moves back to the top of the second column and Package 2 gets its last
item back.
- Repeat the margin adjustment
for the other 3 package lists.
- Click in an item in left column.
- Drag left margin on ruler until dotted line
meets the k in the word Package. (You should not need any more columns breaks.)
Final Edit & Print
Before printing, check your document thoroughly. Be
sure that you have not introduced any new problems on the pages that you
could not see as you changed margins and did other edits. You must read
the document carefully to find errors that the Spell Check and Grammar
Check will not notice.
Look carefully at the Page Setup dialog. Once you start
creating different sections and margins and indentions in your document,
you increase the likelihood of having problems when you try to print. This
is especially easy to do if you change the paper size or enter numbers in
Page Setup instead of dragging on the ruler. You can omit a decimal, for
example, so that a margin of 2.0 cm becomes a margin of 20 cm!
- Alignments: Check
alignments of paragraphs, including
columns.
- Spell Check.
- Read: Look for
errors like "it" for "is". Check capitalization of list items
- Page Setup: Open
Page Setup- |
-
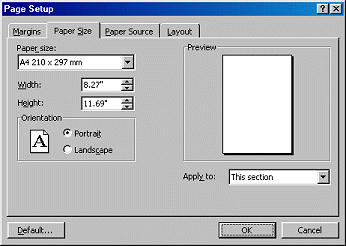 On the Paper Size tab,
look at the list of available sizes.
Those of you in the USA probably use Letter paper almost all of the
time. Those of you in other parts of the world probably use A4 paper
mostly.
On the Paper Size tab,
look at the list of available sizes.
Those of you in the USA probably use Letter paper almost all of the
time. Those of you in other parts of the world probably use A4 paper
mostly.
-
Change the Paper size to A4, which is narrower than Letter size
and apply it to the Whole document. (If you
are already using A4, change the width to something smaller than the
current number.)
The Preview image goes blank. Why? The
next step tells you, sort of.
- Click on OK. A warning message appears.
Error - paper not wide enough
This narrower
paper is not wide enough for your margins, column spacing, and
paragraph indents when they are added together! There are other ways to
hit this message besides changing paper size.

Some other programs will offer to automatically
adjust these so that all will fit on the page. Unfortunately, with Word
you must do some detective work yourself. It can be very frustrating! You
must check each section, including the header and footer. The offending part may be
a formatted line that is blank or one does not have
enough text on it to show the problem!
The moral of this tale = pick your
paper size before typing your document!
-
Click on
OK to close the warning message. You are back
in Page Setup.
-
Change your paper
size back to the original and click on
OK
to close the dialog.
-
Print
Preview: You may spot bad alignments in this view more easily. There are
no marks and break lines to get in your way. If your Package 2 has an
item on Page 3 (again!), remove a blank line somewhere above that
section.
Don't be startled by
page 3 in Preview. When you view the whole page, the lines for the
fill-in-the-blanks may not show. Zoom in to see the blanks.
-
Save as trip planner8.htm in the word project2 folder of your
Class disk.
How to handle a full disk
-
 Print: From
the menu choose File | Print... and then check the Printer options
from the Print dialog before you print all three
pages.
Print: From
the menu choose File | Print... and then check the Printer options
from the Print dialog before you print all three
pages.