 |
 |
Step-by-Step: Columns |
|
What you will learn: |
to select list items to put into
columns
to use the Columns button
to use the Columns dialog
what causes extra blank
lines in your columns
|
Start with: ,
trip planner6.doc ,
trip planner6.doc
To improve the look of the Packages' details, you will reformat each
Package list into two columns of equal width. You will adjust the indents
using the ruler.
Create Columns: Button
-
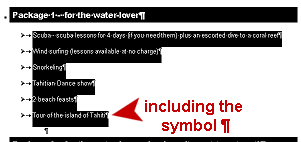 On page 1 of the Trip Planner, select all the lines of the
bulleted list under Package 1. Be careful to
select
the paragraph mark at
the right of the last item. On page 1 of the Trip Planner, select all the lines of the
bulleted list under Package 1. Be careful to
select
the paragraph mark at
the right of the last item.
-
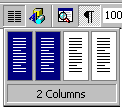 On the toolbar, click on the Columns button and drag across 2 columns in the palette. On the toolbar, click on the Columns button and drag across 2 columns in the palette.
 Word
creates a Continuous section break and rearranges
your
selected text into two columns of equal width. Do you see the section break
lines? Word
creates a Continuous section break and rearranges
your
selected text into two columns of equal width. Do you see the section break
lines?
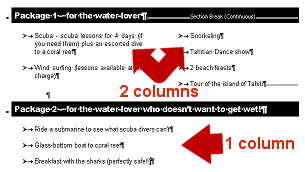
Only the selected text was adjusted. The items under Package 2
are NOT in two columns.
-
Repeat for Packages 2 and 3:
Select list items. Use Columns button
to create 2 columns. For Package 2 be careful to select the
items on the second page, too.
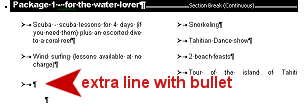  Error - Extra bullet line: If you did not include that paragraph mark Error - Extra bullet line: If you did not include that paragraph mark
 at
the end of the line with the last item in a package, you will
get an extra blank, bulleted line. Undo your last action and select again. at
the end of the line with the last item in a package, you will
get an extra blank, bulleted line. Undo your last action and select again.
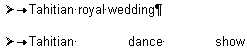
This sort of thing can drive you crazy
if you don't know where it is coming from! The illustration is
for Package 1, Tour of the island of
Tahiti
Further down the page you will see how to correct this without having to start over.
Create Columns: Dialog
With the Columns dialog you have more control over the columns you create, if you know
exactly what you want. For Package 4 you have
a special problem since it is at the end of a section. First you will experiment to see what the problem is. Then you will learn how to fix the problem.
Include last paragraph mark:
-
 Drag in the
selection area at the left of the text to select all the lines of
Package 4's list. This method of selection will catch the final
paragraph mark
at the end of the
list. Drag in the
selection area at the left of the text to select all the lines of
Package 4's list. This method of selection will catch the final
paragraph mark
at the end of the
list.
-
 From the menu open
the Columns dialog by choosing | . From the menu open
the Columns dialog by choosing | .
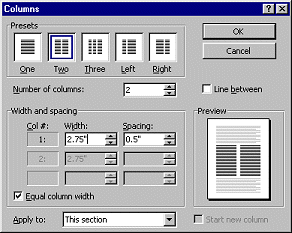
Here you can make a number
of choices about the layout of your columns. You won't need these
features this time, but it's nice to know where they are!
- Select the box for
Two columns and leave the other settings at the
defaults: width-2.75", Spacing = .5", Equal column width checked, Apply
to: This section.
- Click on OK.
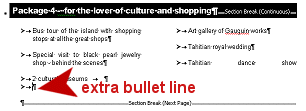
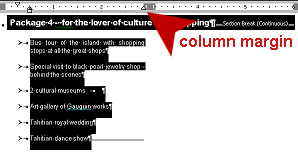 Whoops! All your
items are in the left-hand column. (You can tell
because the first two items are wrapping at the column margin and the ruler at the top is split for two columns now.)
Whoops! All your
items are in the left-hand column. (You can tell
because the first two items are wrapping at the column margin and the ruler at the top is split for two columns now.)
What happened?? You included the section
break
at the end when you selected the whole last line, so Word broke the
column there. A column break is a
kind of section break.
-
Undo your action.
Not including last paragraph mark:
-
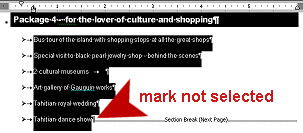 Drag from
the last character up through the list,
so you won't catch that section break by mistake. Drag from
the last character up through the list,
so you won't catch that section break by mistake.
 Dragging up still includes
paragraph mark: Click to the left of the first bullet item. Hold the SHIFT
key down and click between the last paragraph mark and the last letter. Dragging up still includes
paragraph mark: Click to the left of the first bullet item. Hold the SHIFT
key down and click between the last paragraph mark and the last letter.
-
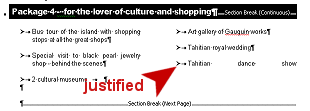
 Use the Columns dialog to create 2 columns. Hmmm. You
get two columns, but one has a bulleted blank line. In addition the last
item may be spaced out too widely, depending on exactly what
you did. Word is trying to justify that line. Notice that there is
no paragraph mark at the
end of the
line. So, nothing told Word to "Stop now!" Use the Columns dialog to create 2 columns. Hmmm. You
get two columns, but one has a bulleted blank line. In addition the last
item may be spaced out too widely, depending on exactly what
you did. Word is trying to justify that line. Notice that there is
no paragraph mark at the
end of the
line. So, nothing told Word to "Stop now!"
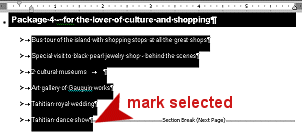
These effects happened because you did not
include
in your selection the paragraph mark after the last item in the list, Tahitian dance show . But, if you do
include the paragraph mark, you also catch the section break
and get only one column! How frustrating!
- Undo
your action.
- Try creating the columns with the
Columns button. Nope. Same problem.
How do you remove this persistent but unwanted bullet?? See the next
section!
Fixing Problems
-
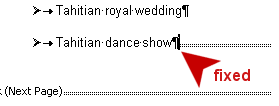
 Extra bullet
line: Place the cursor to the right of the
extra bullet. Press BACKSPACE once. The bullet
vanishes. Extra bullet
line: Place the cursor to the right of the
extra bullet. Press BACKSPACE once. The bullet
vanishes.
 Alternate fix (if you
plan ahead!): Before creating
columns, add a blank line after the last list item. Don't include the
blank link in your selection or you will STILL get an extra bulleted
line. Alternate fix (if you
plan ahead!): Before creating
columns, add a blank line after the last list item. Don't include the
blank link in your selection or you will STILL get an extra bulleted
line.
-
 Justification: If
necessary, for the
last list item, put your cursor at the end of the line and press ENTER. Justification: If
necessary, for the
last list item, put your cursor at the end of the line and press ENTER.
 You
might notice that the cursor is now to the right of the
paragraph mark! You can do this only when there is a section break
there, too. You
might notice that the cursor is now to the right of the
paragraph mark! You can do this only when there is a section break
there, too.
-
Save as trip planner7.htm in the word project2
folder on your Class disk.
 How to handle a full disk
|

 N
N The Columns dialog, from the menu