Project 3: Brochure
Document as Template

Title: Jan's Illustrated Computer Literacy 101
Did you want: Working with Words: Word 2007,2010,2013,2016 or españolIcon: Change web


Now that you've worked with text boxes a little, you can proceed to work with a document which uses text boxes for the entire layout. This method allows you tighter control of where your text is on the page. This is critical for documents like brochures that must fold just right.

Unlike in Project 2, you are not going to create a new document by using a template from Word's Templates folder. Instead you will open a sample document from the resource files and modify it.  Such a sample document can also be called a template.


Where you are:
JegsWorks > Lessons > Word97-2003

Before you start...

Project 1: Word BasicsTo subtopics

Project 2: Auto ToolsTo subtopics

Project 3: Brochure
    Linked Text BoxesTo subtopics
    Brochure Subtopics display
    icon-footprintDoc Template
        Paragraph Dialog
    icon-footprintBrochure Cover
    icon-footprintBrochure Back
    icon-footprintBrochure Flap
    icon-footprintCharacter Spacing
         Styles
    icon-footprintApply Styles
    icon-footprintFormat Flap
    icon-footprintBrochure Inside
    Summary
    Quiz
    ExercisesTo subtopics

Project 4: ReportTo subtopics


    Search   Glossary


Icon Step-by-Step 

Step-by-Step: Use a Document as a Template

 Icon Step-by-Step

What you will learn:

to show text boundaries
to change Zoom
to remove temporary text from text boxes
to save template under another name

Start with: Class disk Icon- Word with blank document

A sample document, images, and replacement text are in your resources files in the  tahiti  folder.

Settings

  1. From the resource files, open the document  brochure.doc  that is in the  tahiti  subfolder. The full path is:
    c:\My Documents\complit101\words\tahiti\brochure.doc

    if you used the default location. 
     
  2. From the menu select  Tools  |  Options  |  View . In the section labeled Show or Print and Web Layout options place a checkmark in the box by  Text boundaries . This will help you see where your text and graphics can go and where the white space will be.
     
  3. Button: Zoom - Whole pageSet Zoom to  Whole Page . (You can change the zoom later as you work.)
     
  4. Maximize the document and look at both pages of the document.

     
  5. Read the comments included in brochure.doc which explain how the text boxes in this document work. Depending on your monitor size and resolution, you may need to enlarge the Zoom. The text won't show in Word 95, which does not understand linked text boxes.

    Sample document for a brochure

  6. Print icon Print this document on two separate pages and number the boxes for later reference. You will delete these helpful instructions from the document next. Later, directions will refer to these text boxes by number.

Remove Temporary Text
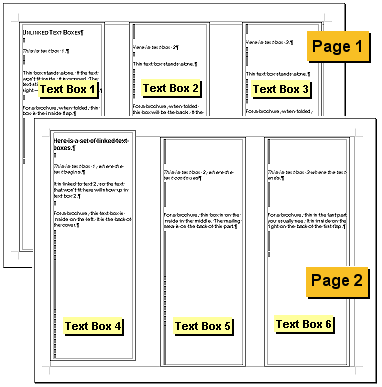
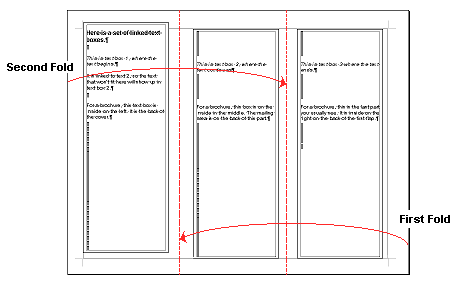
  1. Select the text inside Text Box 3, on the far right of page 1. (Be sure you are on page 1!)
     
  2. Press the DELETE key to remove this temporary text.
     
  3. Repeat for Text Box 1 and Text Box 2
     
  4. Class diskSave with the name  brochure-tahiti.doc  to your Class disk in the  word project3  folder.
    Full disk How to handle a full disk

How a Tri-Fold Works

The first page of the sample document lays out the outside of the brochure. The second page handles the inside parts.

This brochure is a tri-fold, which means there are 3 panels formed by folding the page twice. The panels overlap in the middle. The parts folding in are NOT exactly the same size. The section on the right must be a little narrower than the section on the left or the edges won't be even after folding.

Folding the sample brochure

The paper is not folded along the edge of any of the text boxes. That would put text right in the fold. Not a good look. The paper should be folded in between the text boxes.

You might wonder why there aren't any handy lines in the template that you could fold along. It is actually a little difficult for most people to fold accurately along a printed line. If your brochure is folded a little off center, having fold lines on it emphasizes the fact that you missed! A miss is much less noticeable without printed fold lines.


Fold It

Practice by folding the sample document that you printed above.

  1. Lay the sheet with Unlinked text boxes face down with the top edge away from you.
  2. Lay the sheet with Linked text boxes face up on top of the first sheet, also with the top edge away from you.
  3. Holding the two sheets together, fold the right edge toward the middle. Line up the outside edge halfway between the text boxes 4 and 5 at the left. Crease the folded edge.
  4. Fold the left edge toward the middle. Line up the outside edge with the folded edge on the right. Crease the new fold flat.

    You now should have Text box 3 (cover) on top. TaDa!

Now your template document is ready for you to enter your own text. The next pages will guide you through the creation of the various parts of the brochure.  But first let's take a look at the Paragraph dialog. You'll be using it in several places.